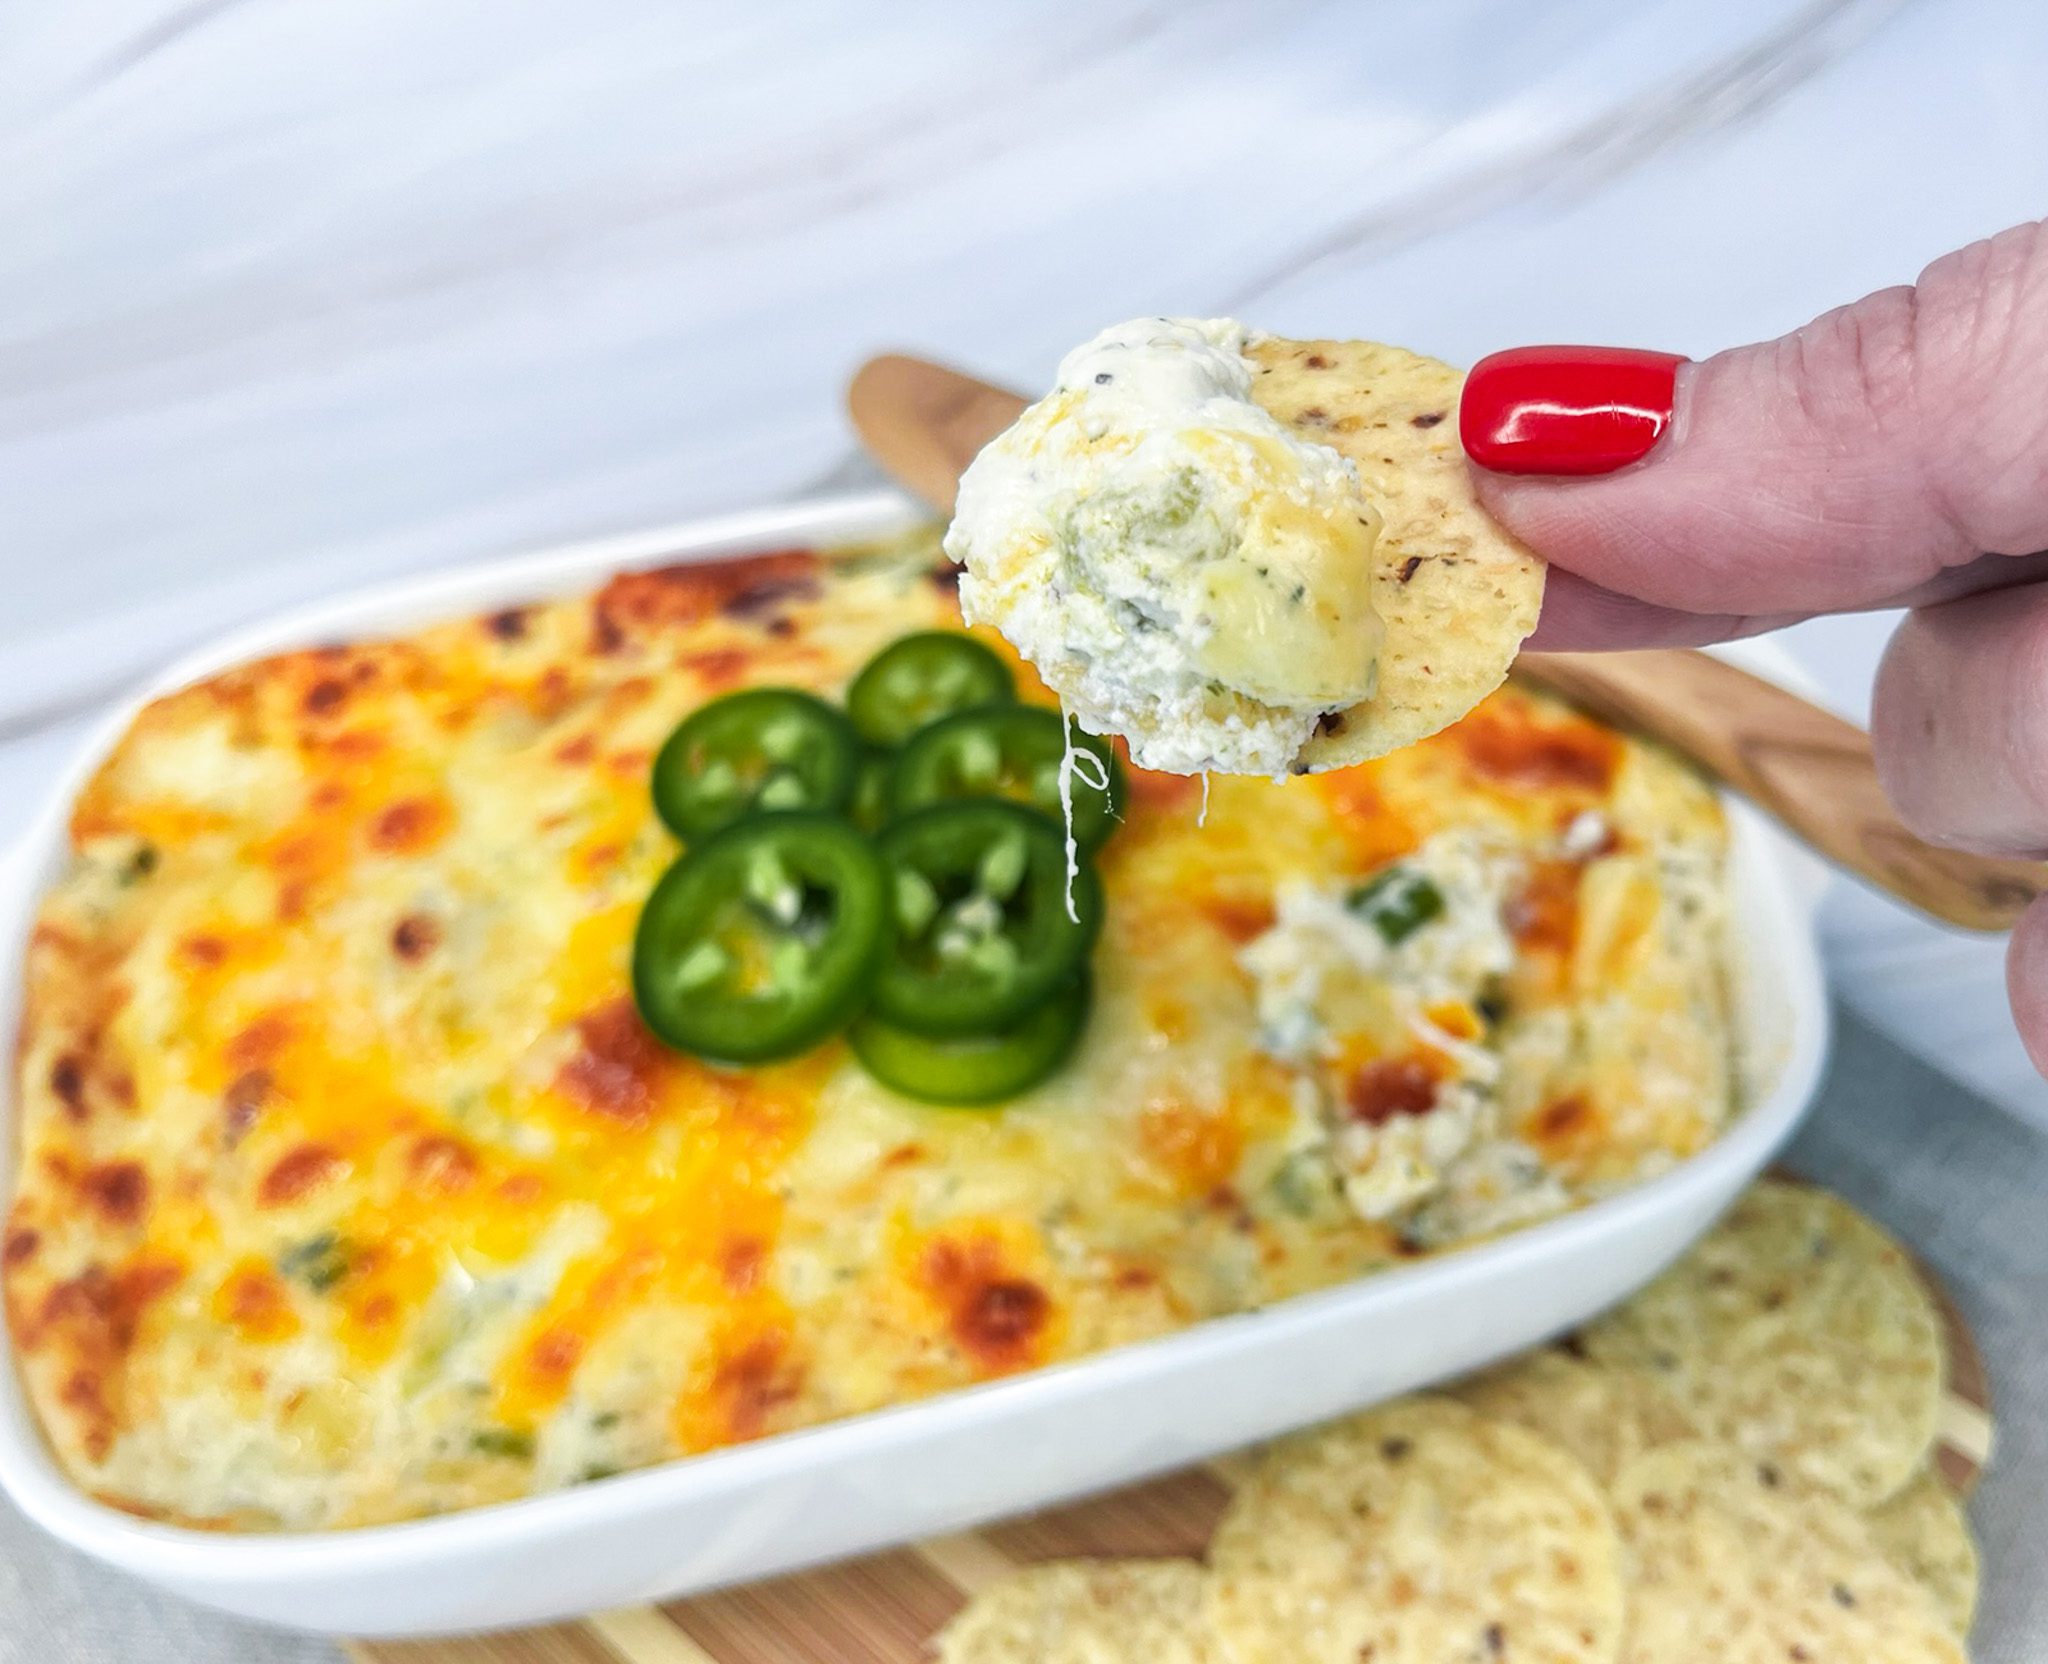
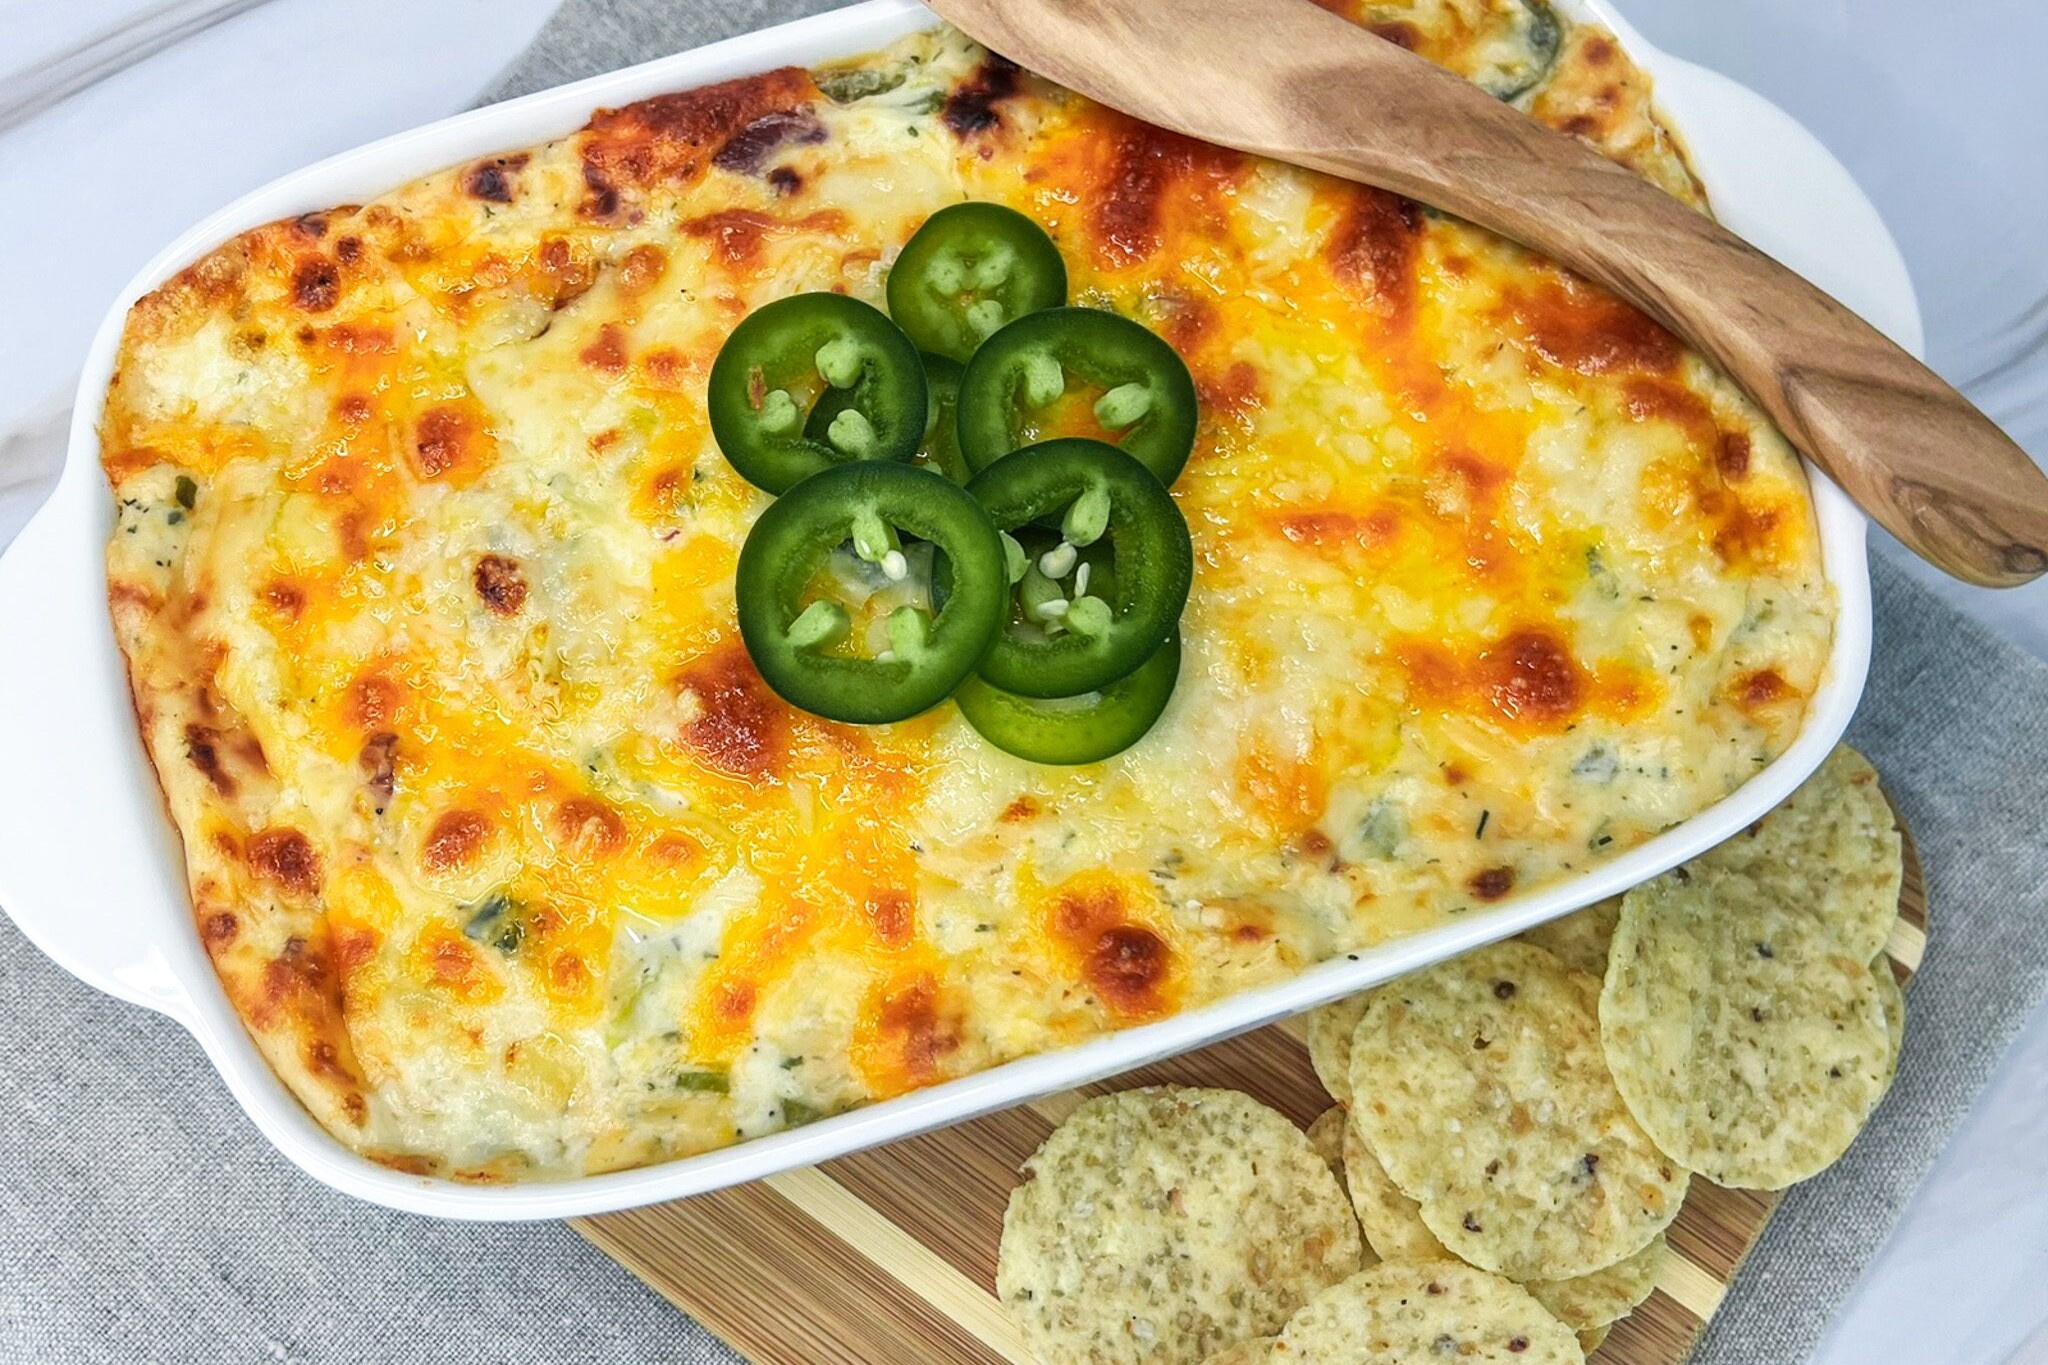
Jalapeno Popper Dip
Jalapeno Popper Dip
Perfectly balanced creamy, cheesy richness, with a spicy kick of jalapenos, and a homemade burst of flavor thanks to the Daisy Ranch Dip, this recipe contains all the flavors you love in a popper in an addictive, irresistible, sharable dip.
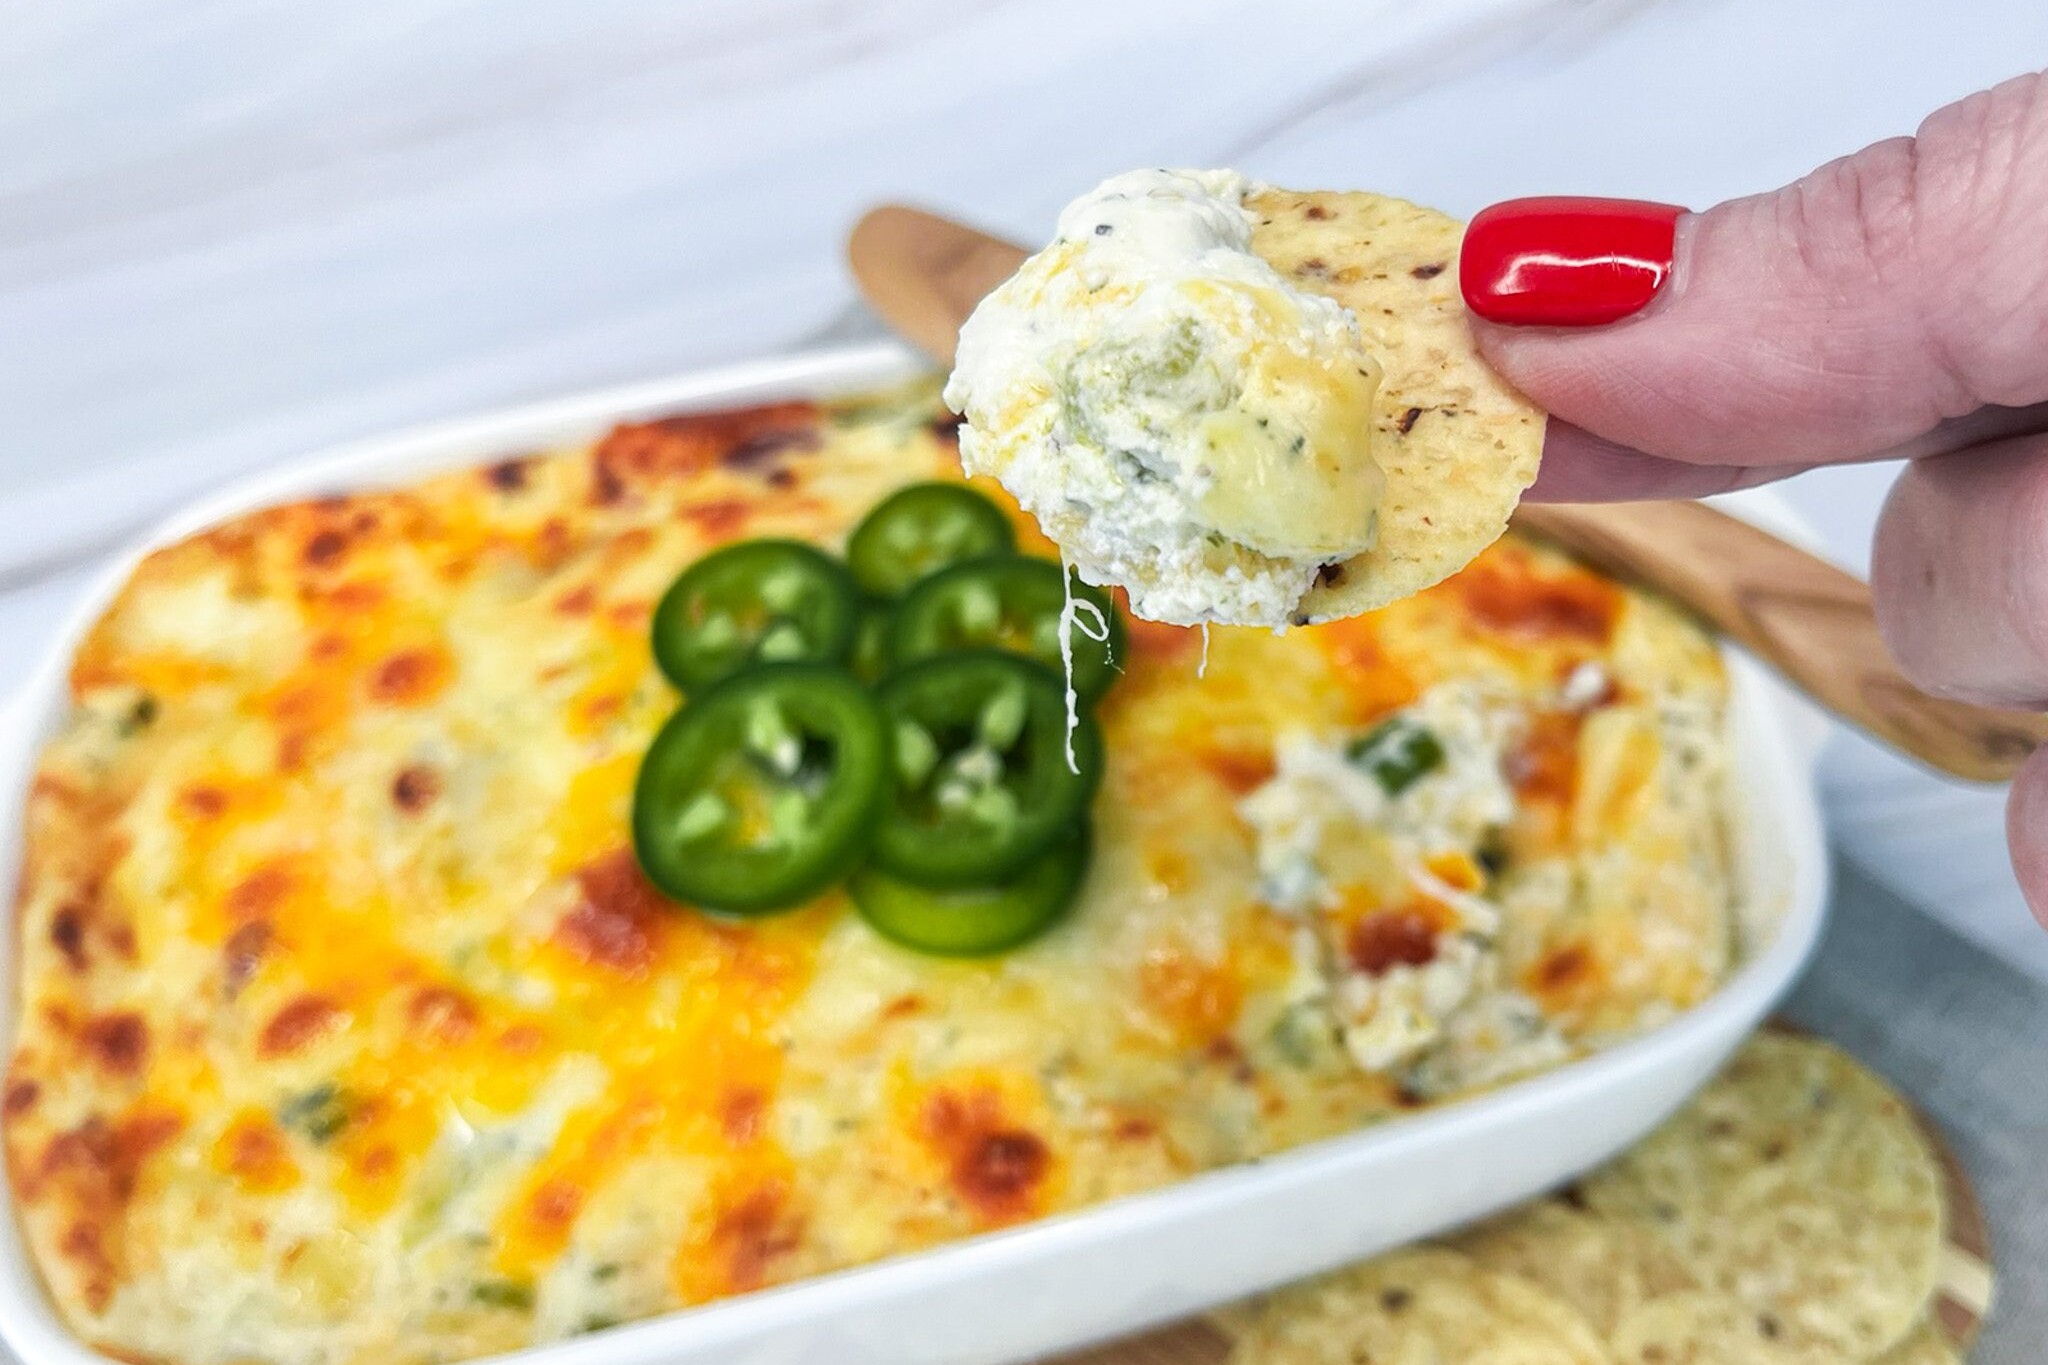
This Jalapeño Popper Dip is perfect for casual gatherings like game days, potlucks, holiday parties, movie nights, and showers, basically any occasion where people gather for fun and enjoy a crowd-pleasing, cheesy, slightly spicy appetizer with chips, crackers, or veggies. It’s a versatile party starter that’s always a hit.
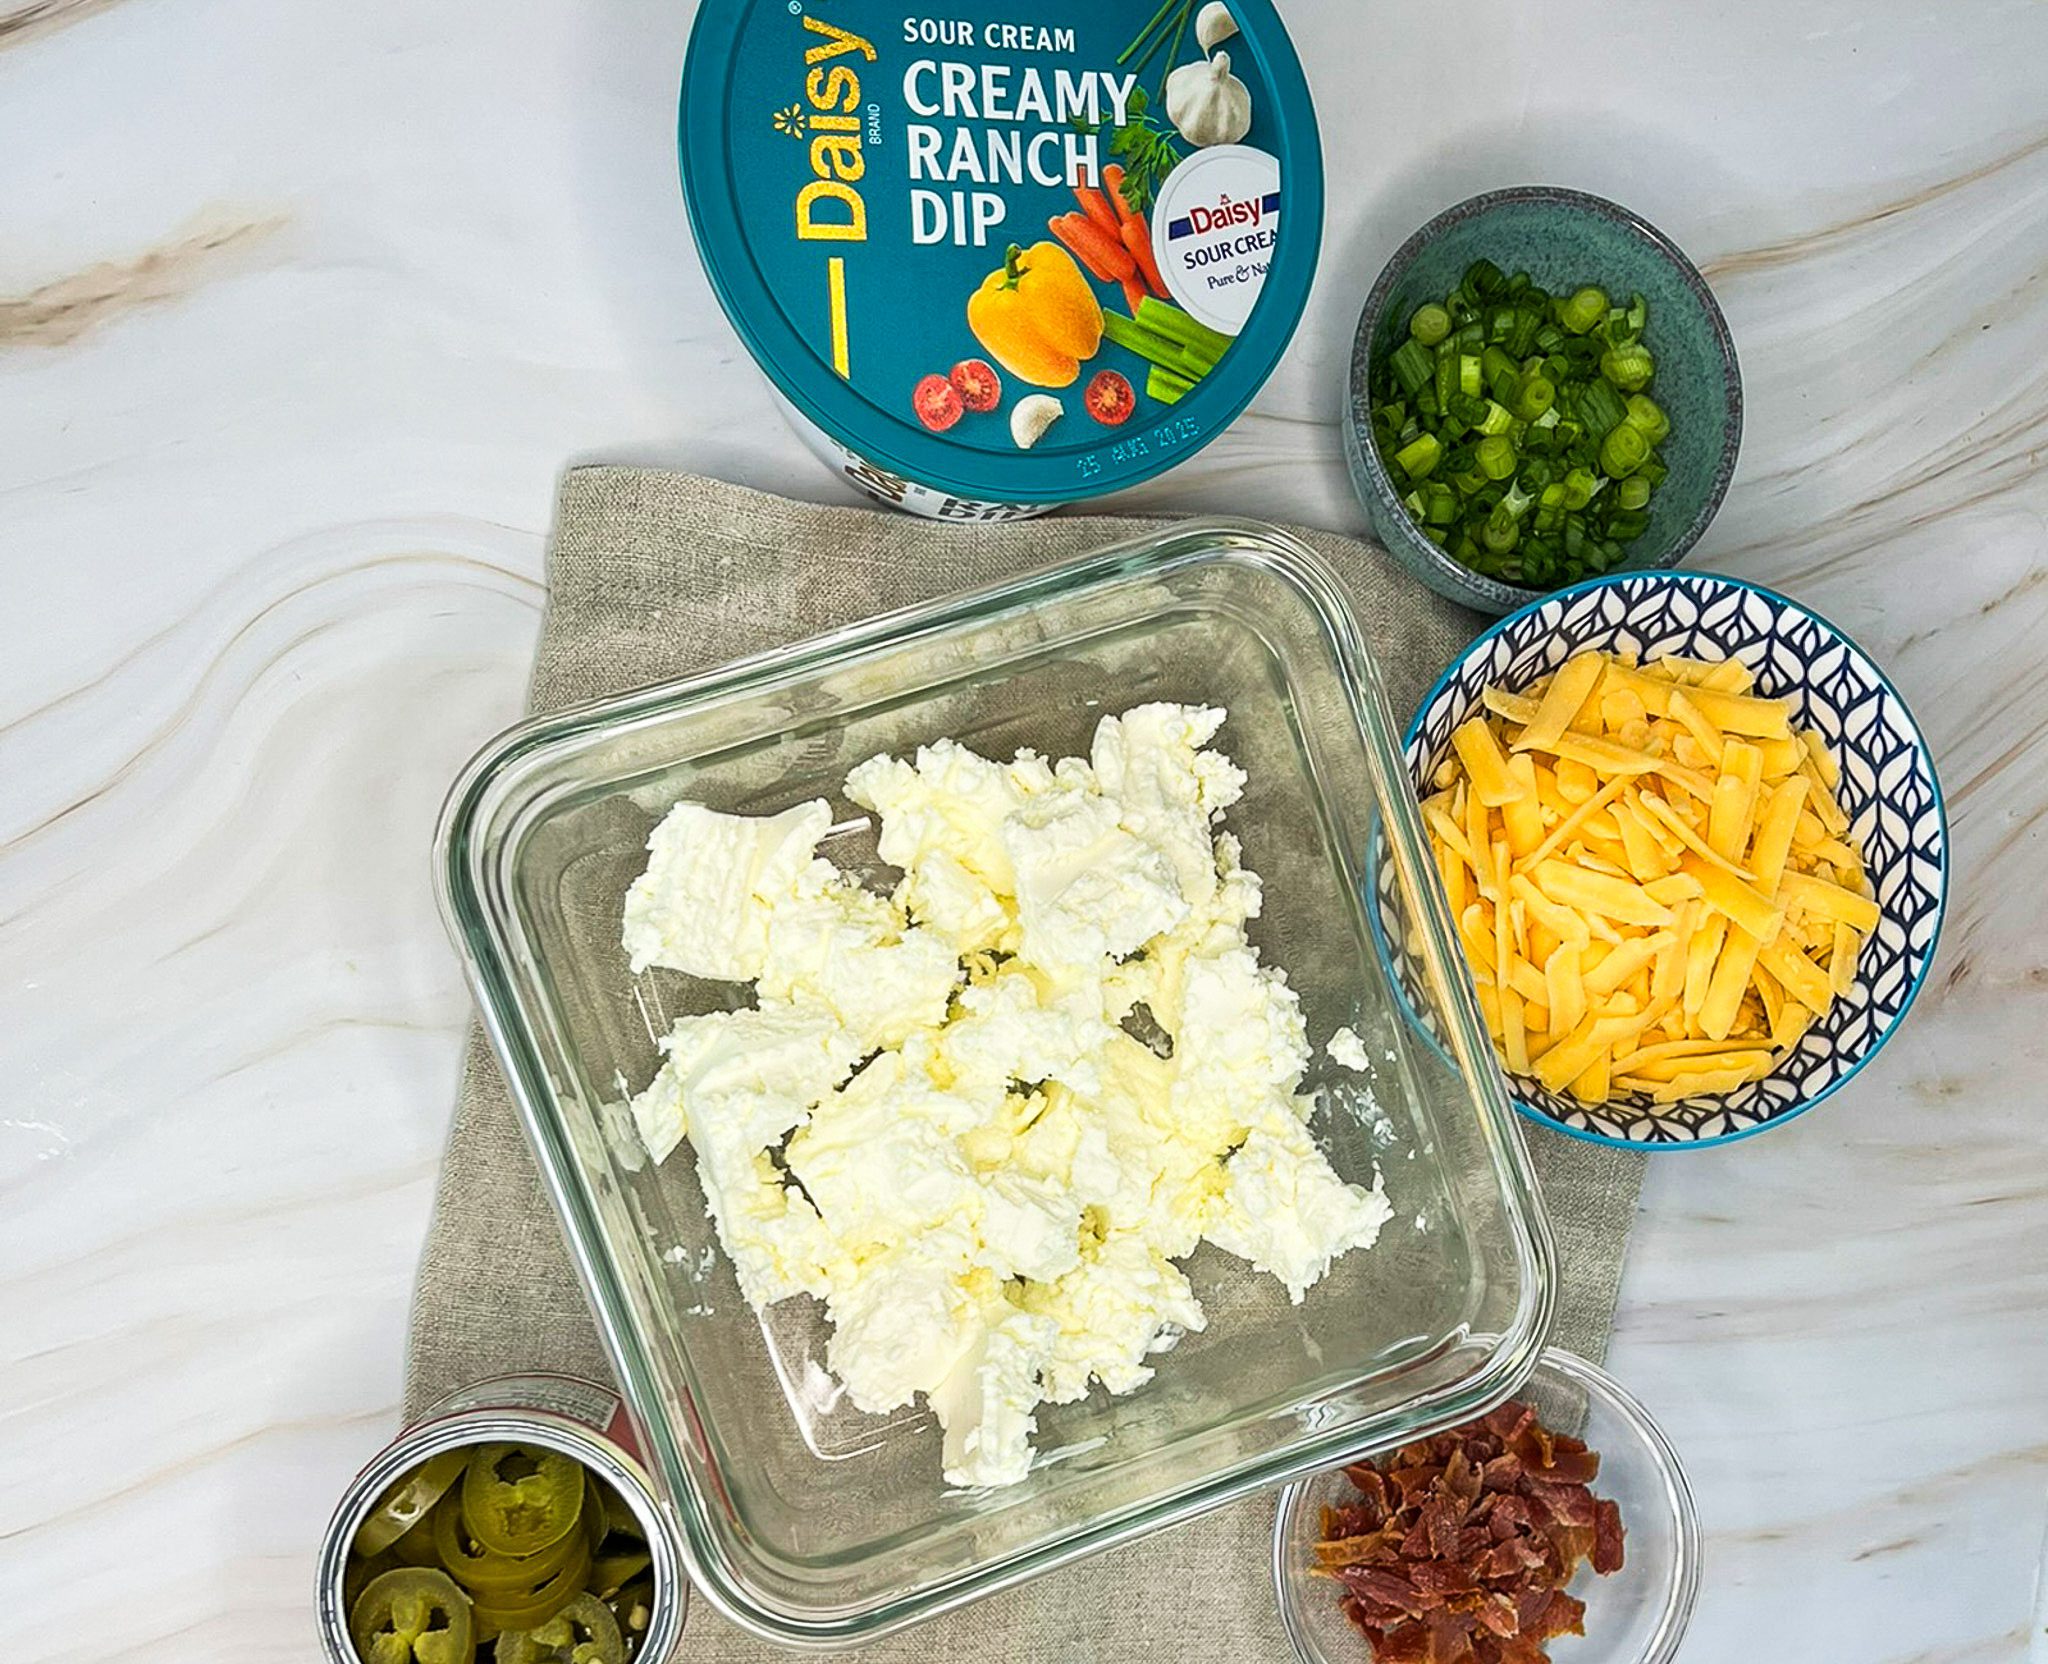
Jalpeno Popper Dip Ingredients
- Softened Cream Cheese (8 ounces): A mild cheese that helps bind the dip together and adds a velvety texture to the dip.
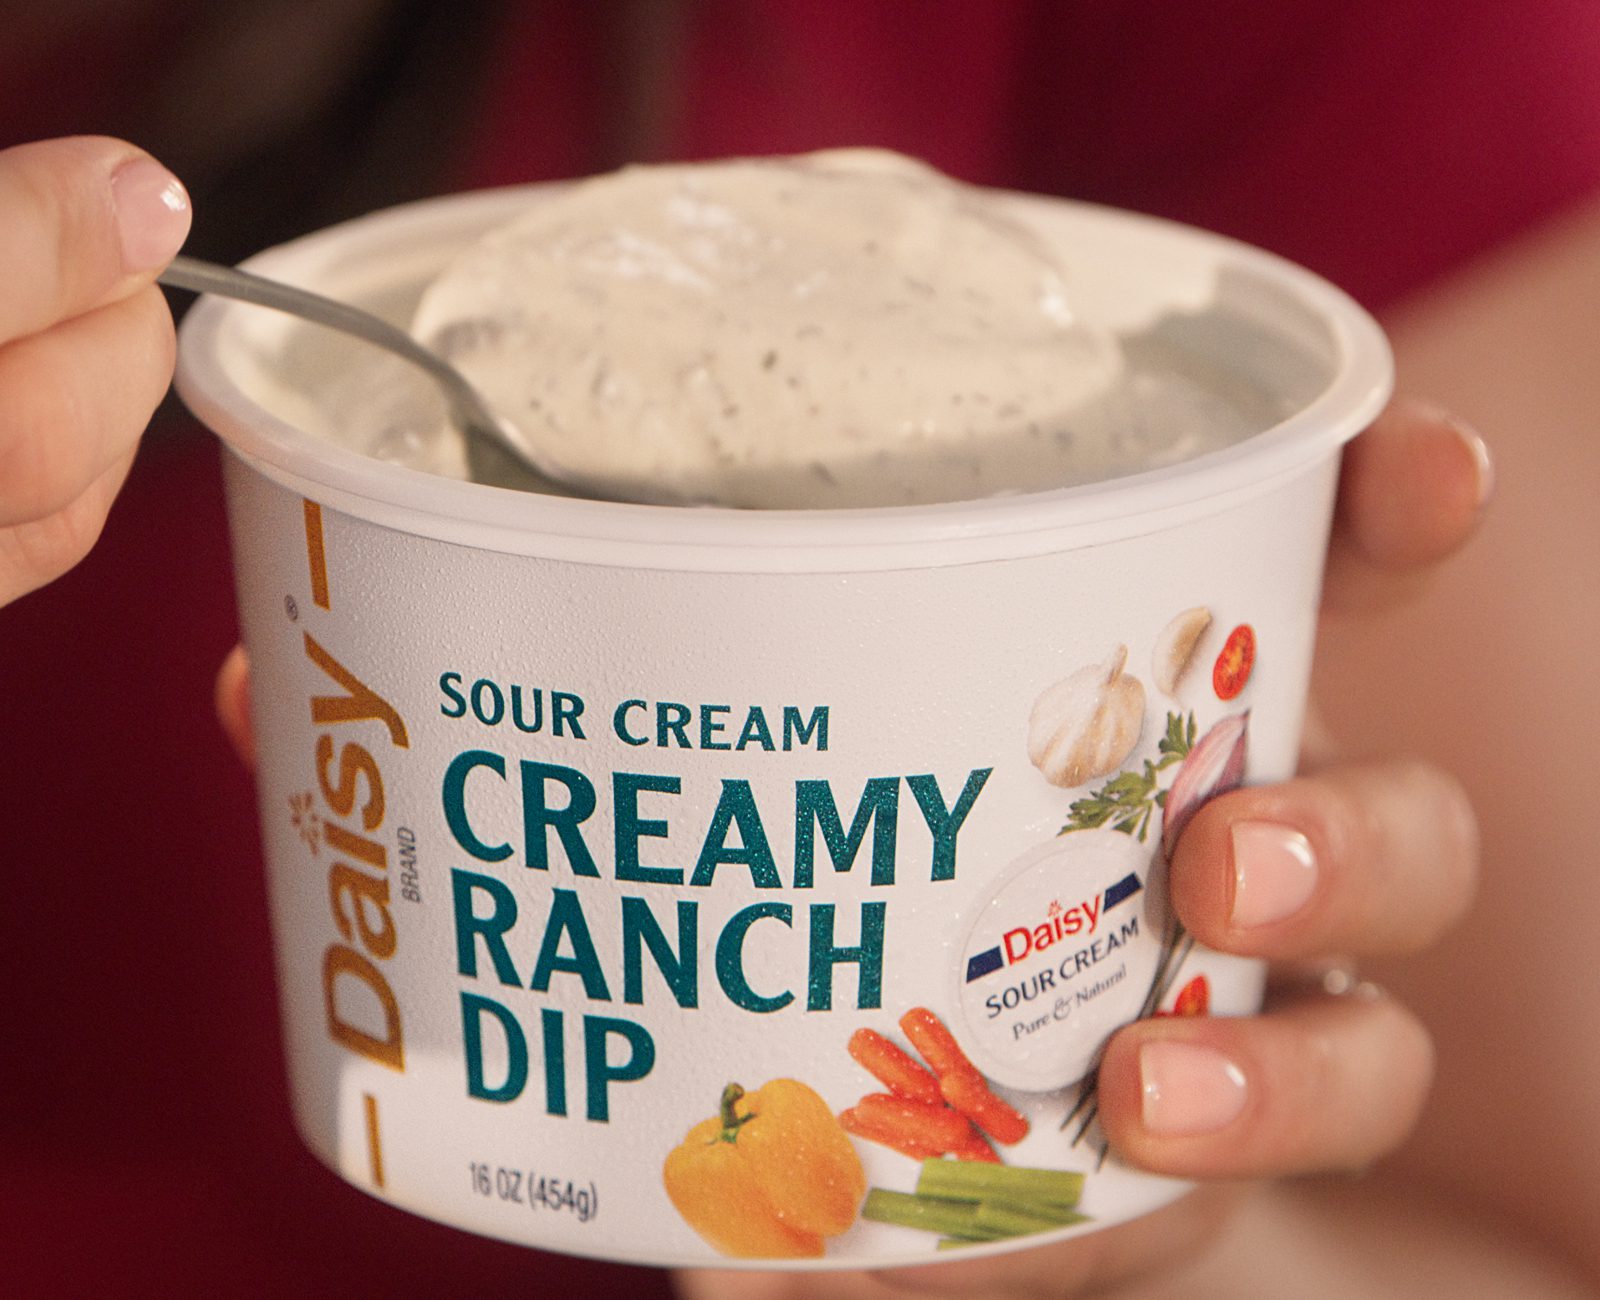
- Daisy Creamy Ranch Dip (1 cup): Contains the traditional spices and herbs of ranch dressing built in with delicious homemade tastes. It provides a creamy richness and depth of flavor to the dip.
- Shredded Cheddar Cheese (1 cup): Offers a sharp, tangy flavor and melts well into a creamy, gooey texture.
- Bacon Bits (1/4 cup): Adds an irresistible smoky and salty flavor with a crispy texture.
- Diced Green Onions (1/4 cup): They add a mild onion taste as well as a pop of color to the dip.
- Canned Pickled Jalapenos (15 ounces, rinsed and drained): Convenient and consistent, canned jalapenos provide mild heat and a tangy flavor that cuts through the richness of the cheese.
Substitutions, Variations, and Tips
- Any melting cheese may be used in place of the cheddar. American, Monterey Jack, Colby Jack, Gouda, Pepper Jack, Velveeta, Gruyere, Swiss, Fontina, or a mixture are all good choices.
- Jarred or fresh bacon bits work well in this recipe.
- Shallots or chives may be used in place of the green onion.
- Fresh jalapenos may be used I place of the canned jalapenos. Note that fresh jalapenos vary in heat level. For milder flavor, remove the seeds and ribs of the fresh jalapeno and finely dice.
- Hatch green chilies or other canned chilies may be used in place of the jalapenos.
- You can spice up your dip more by adding a dash of hot sauce, a sprinkle of red pepper flakes, or a few diced up jalapenos.
- Top with toasted breadcrumbs or canned French onions for added texture.
- Try adding more protein. Cooked shredded chicken or ground sausage are great additions.
- No oven space? You can prepare the dip in a slow cooker on low. Just be sure to give it a good stir every so often.
- Any left-over dip may be reheated in the microwave at 50% power in 30 second intervals until warm.
How to make Jalapeno Popper Dip
- Preheat the oven to 350°F.
- Mix all ingredients and place in a baking dish. Bake 20 minutes or until bubbly and golden brown.
- Serve with your favorite dippers.

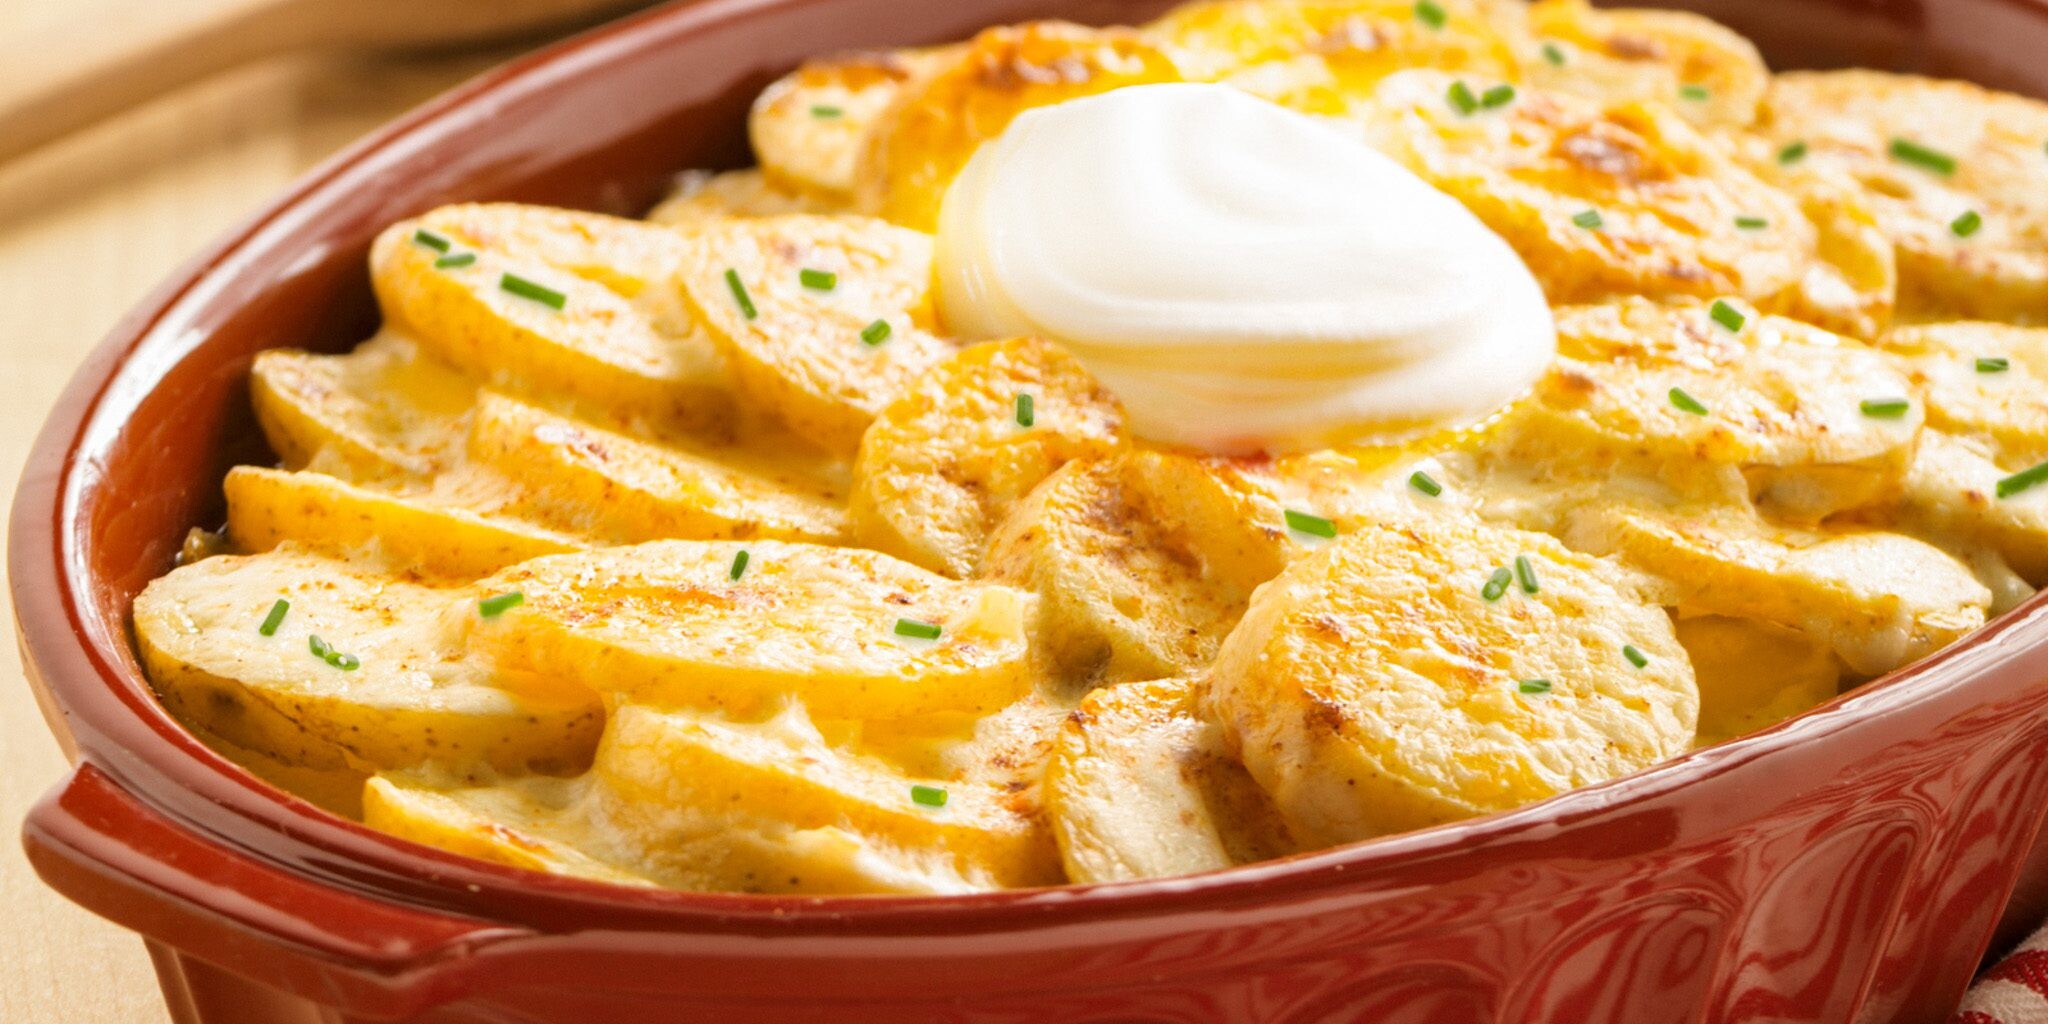
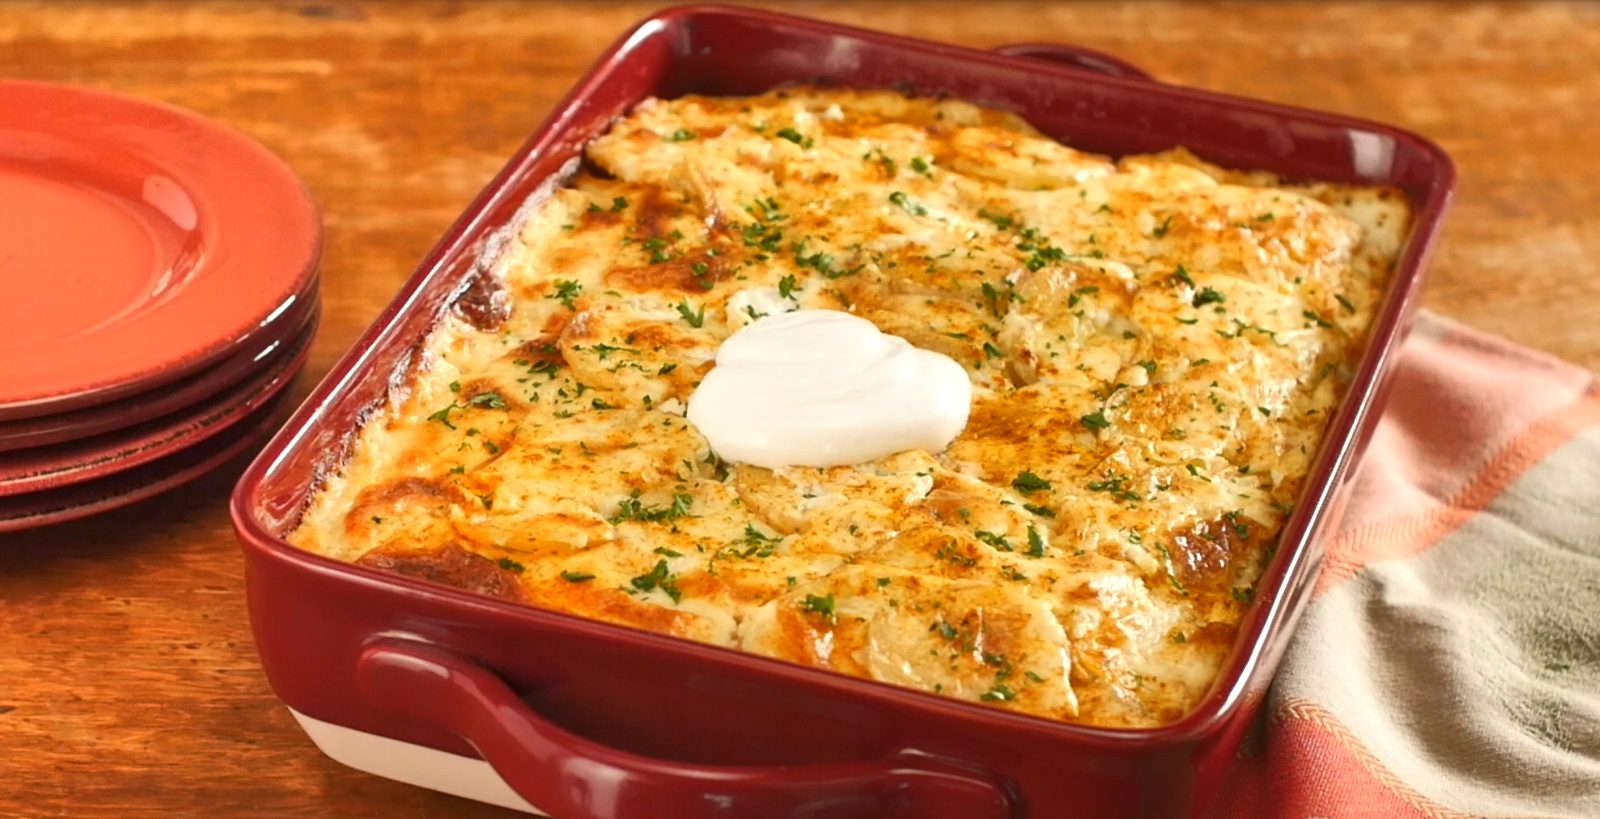
French Onion Au Gratin Potatoes
French Onion Au Gratin Potatoes
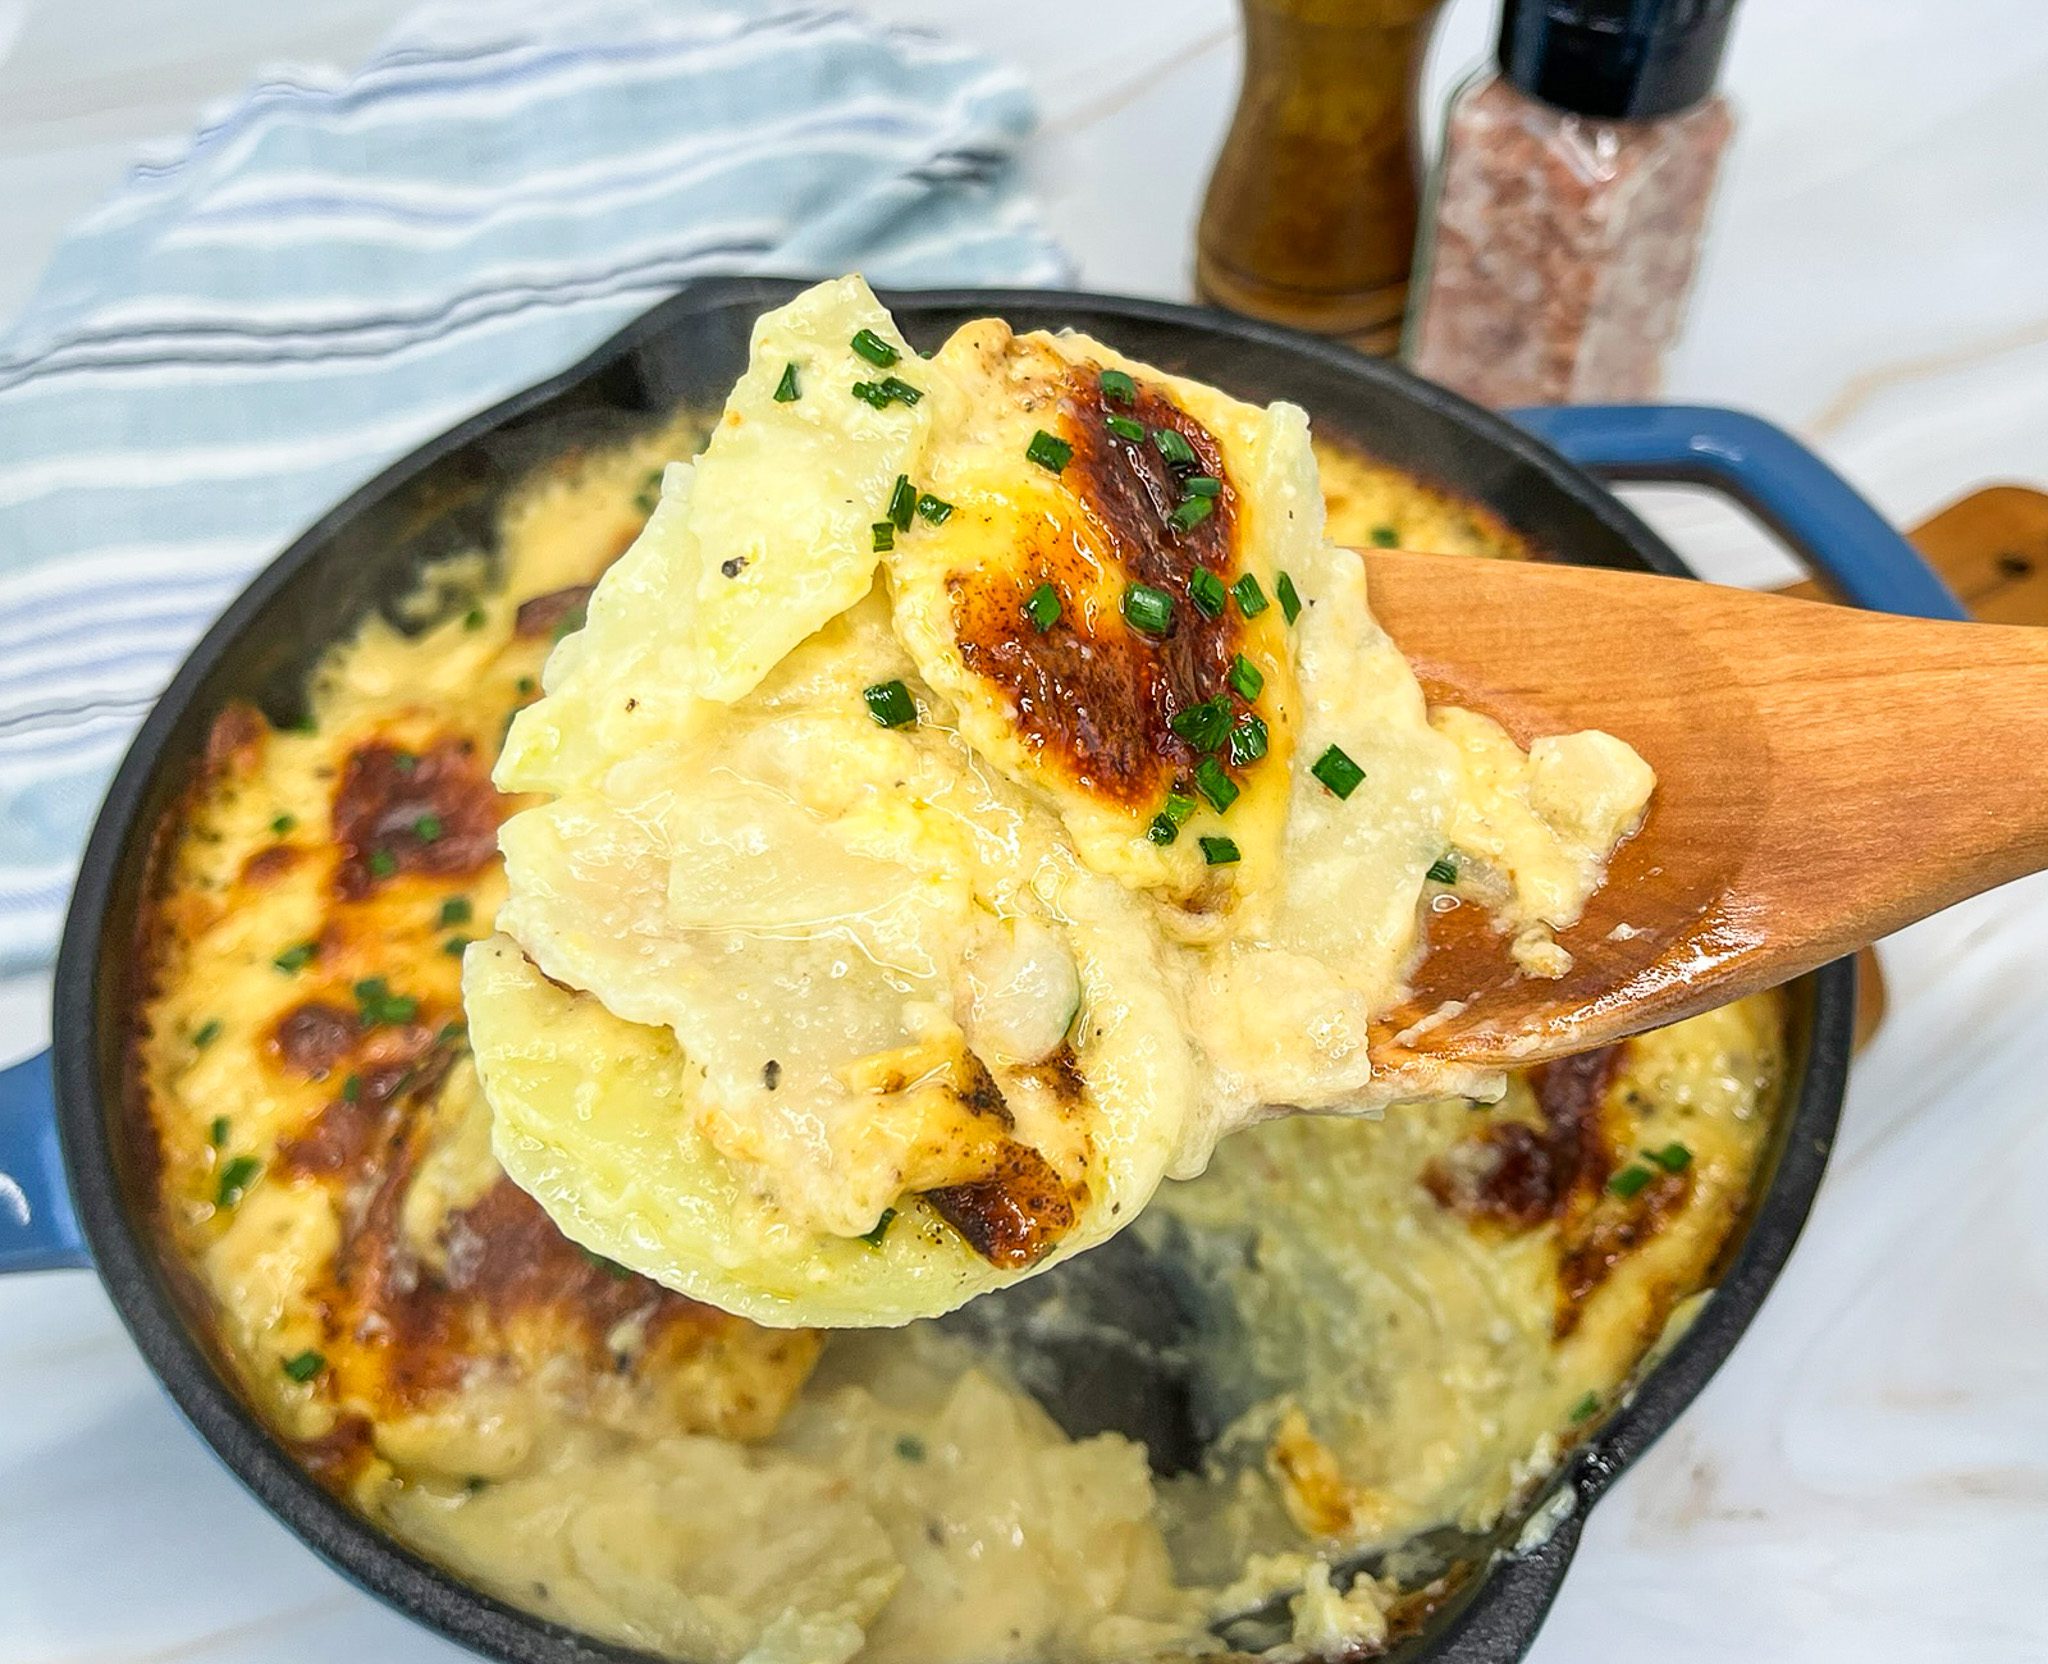
Excellent for chilly winter nights, this crowd-pleasing potato recipe is warm, filling, and perfect for cozy weeknight dinners—yet elegant enough for special occasions. Savory, cheesy, oniony, and decadent, these classic potatoes get their rich, robust flavor from the addition of Daisy French Onion Dip.

Similar to scalloped potatoes, these Au Gratin potatoes feature thinly sliced potatoes and onions layered and baked in an indulgent, creamy cheese sauce until tender. The result is soft, velvety potatoes coated in a luscious, comforting sauce.
Incredibly simple to prepare, this straightforward recipe requires very little culinary skill. It’s so irresistible, it’s sure to become a favorite savory side dish.
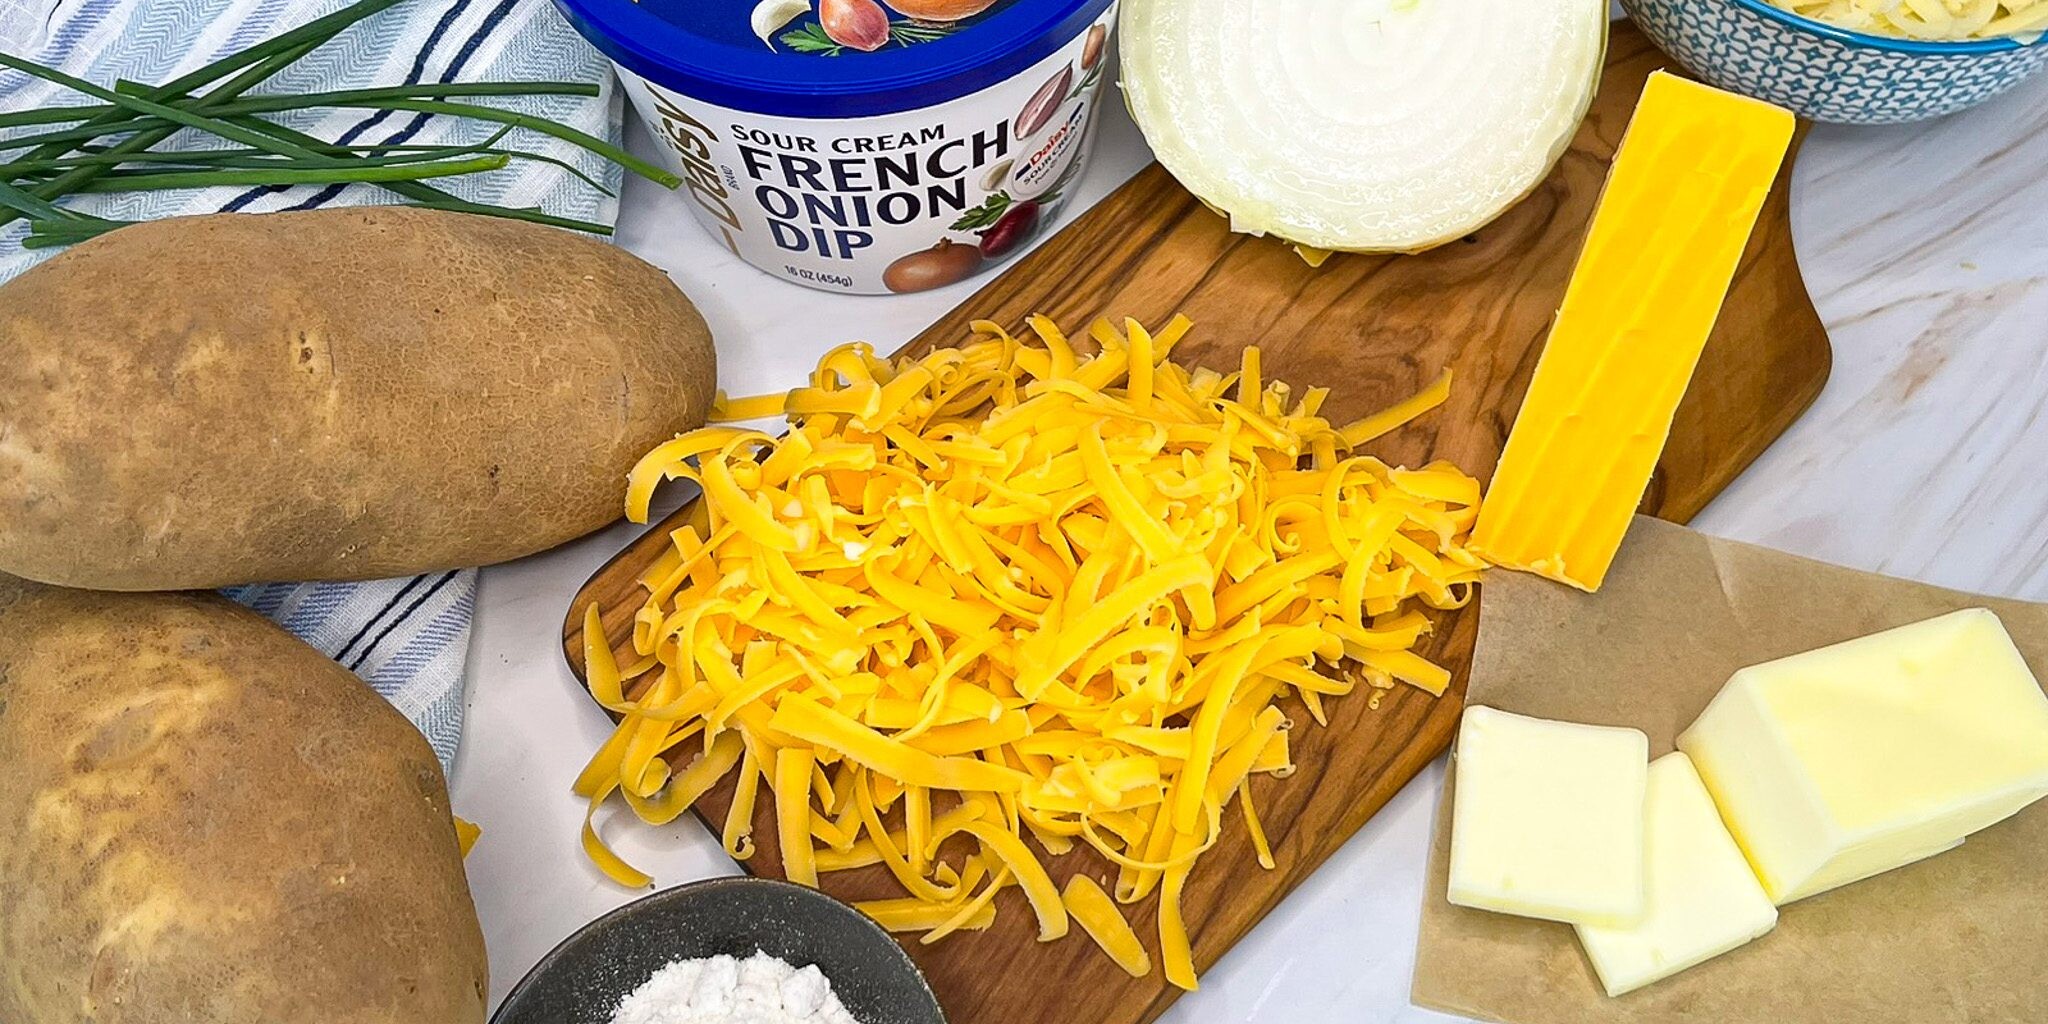
French Onion Au Gratin Potato Ingredients
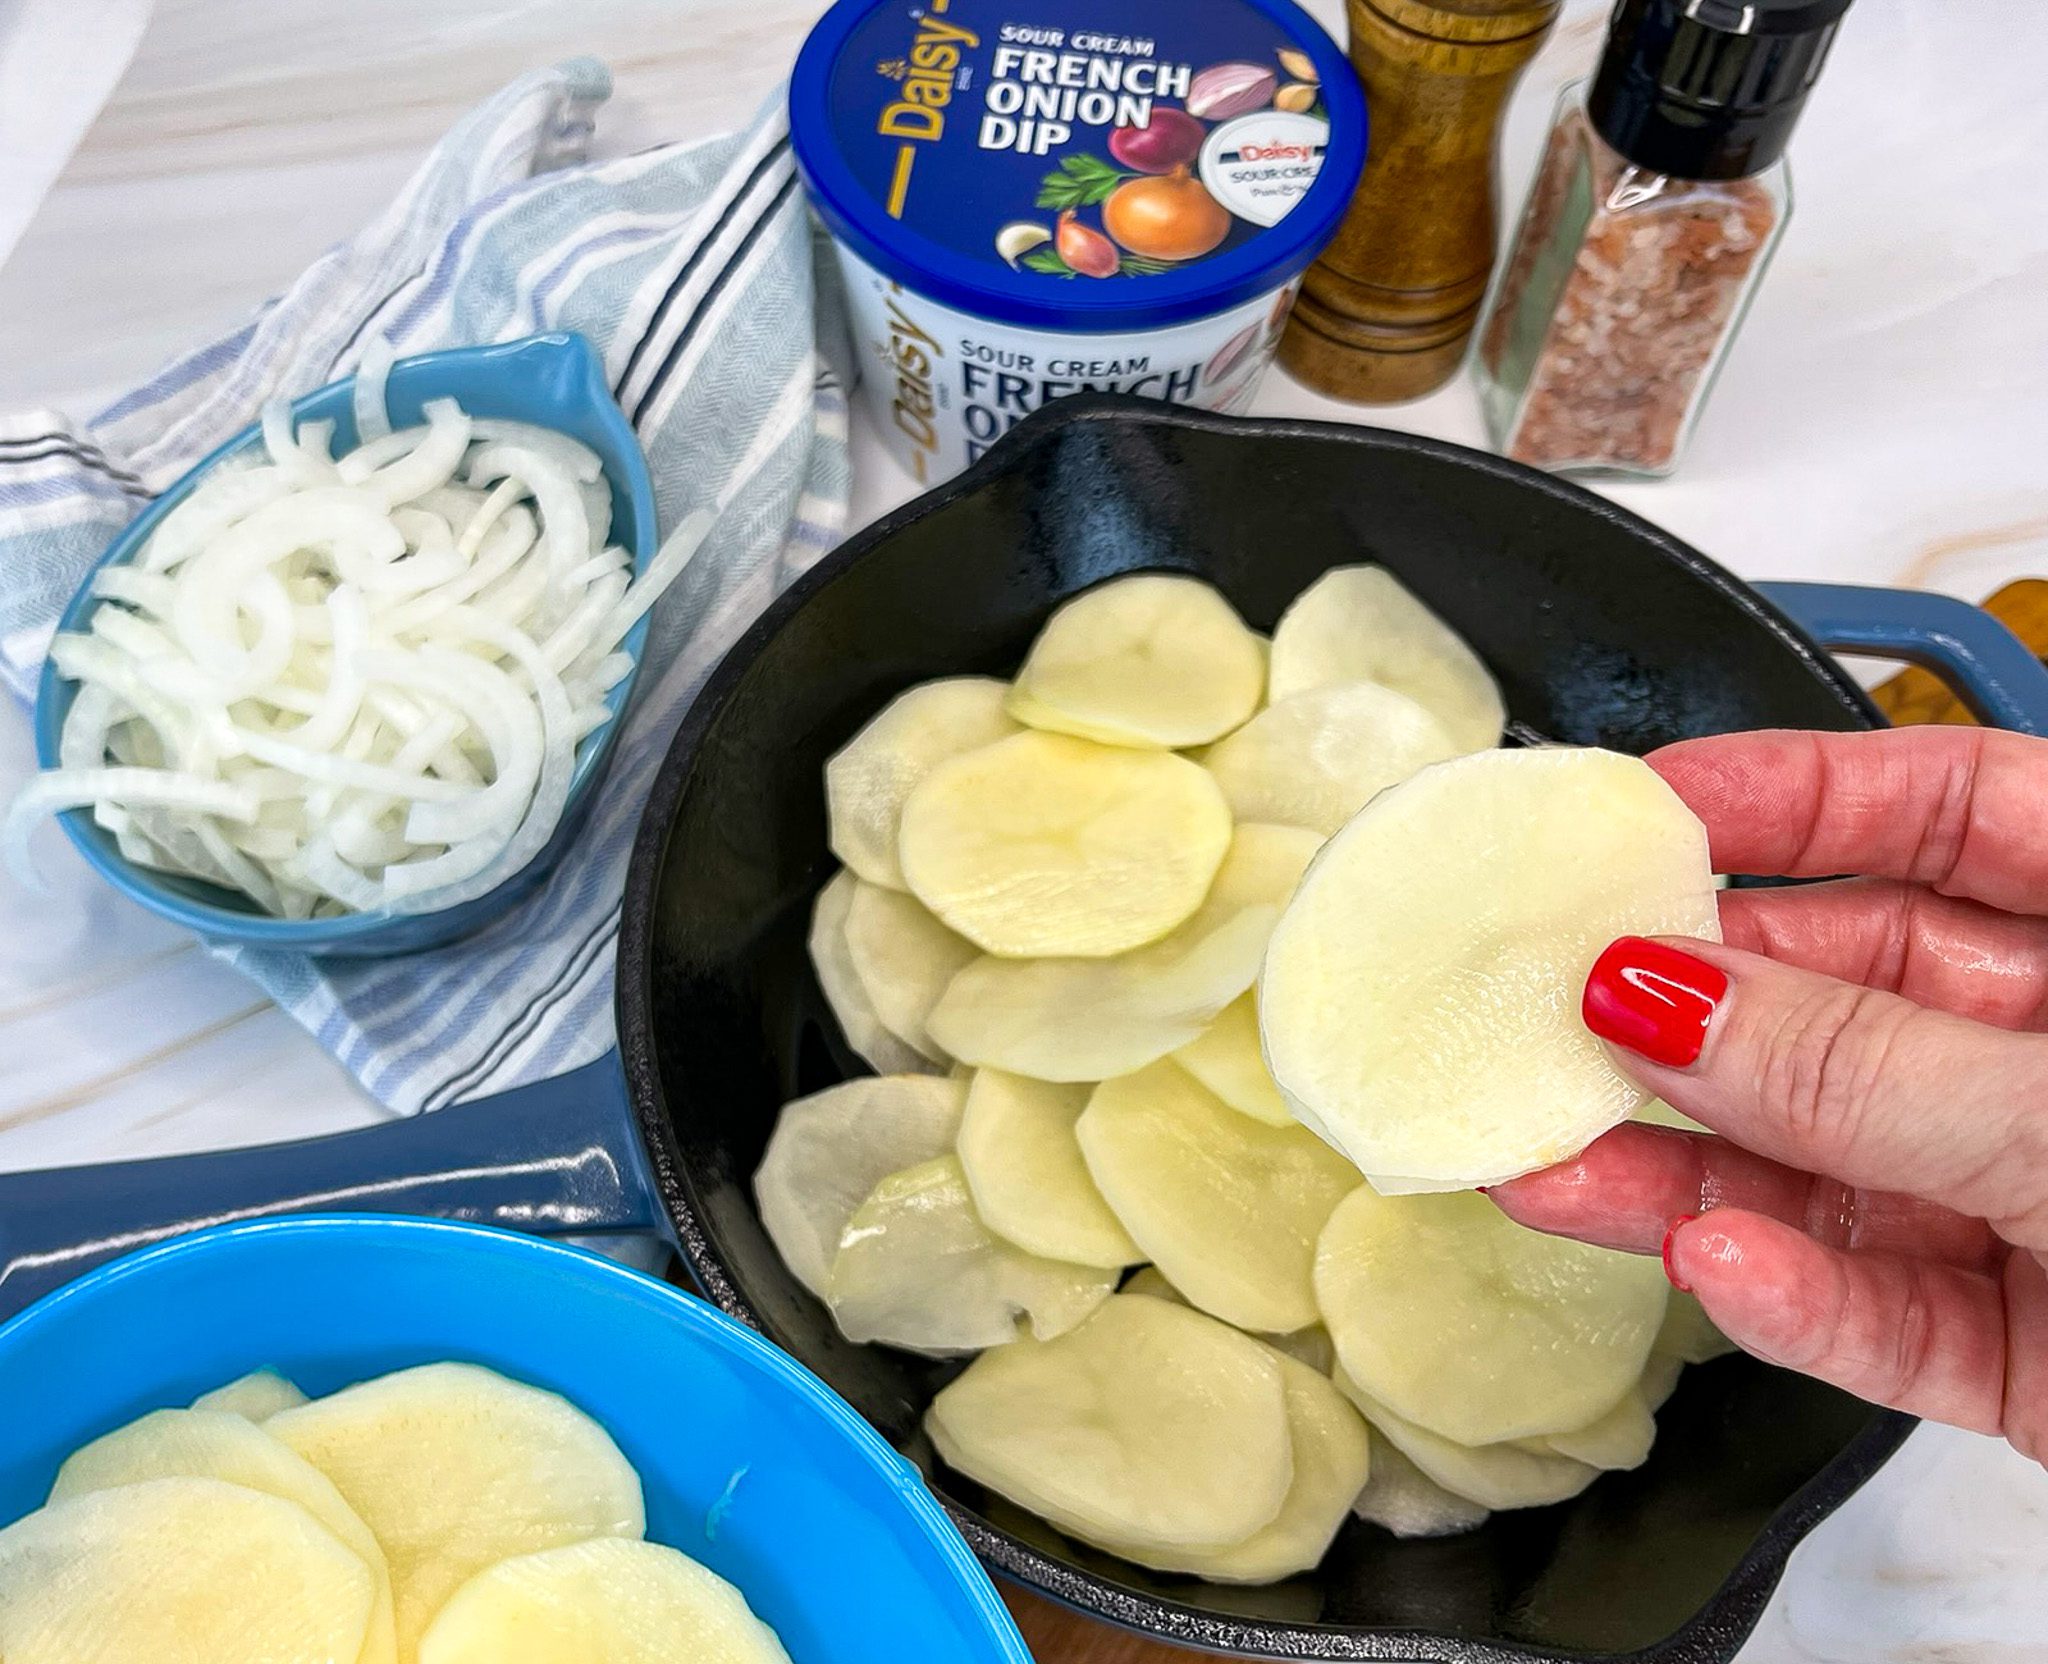
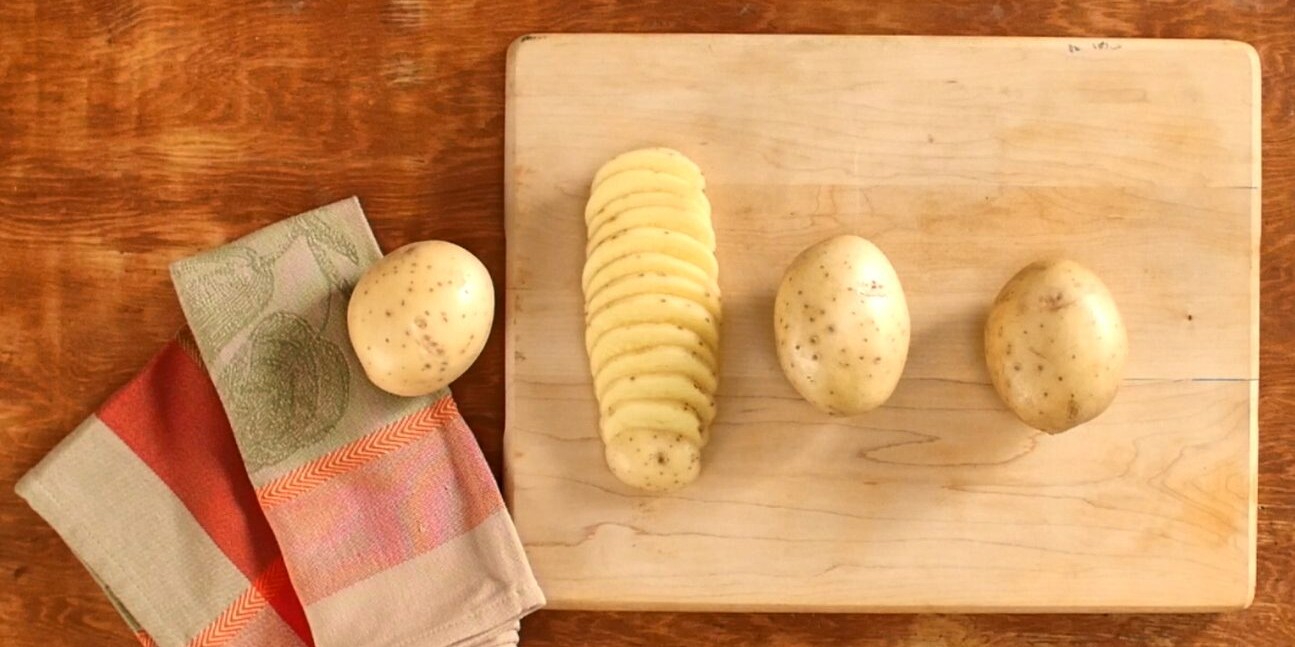
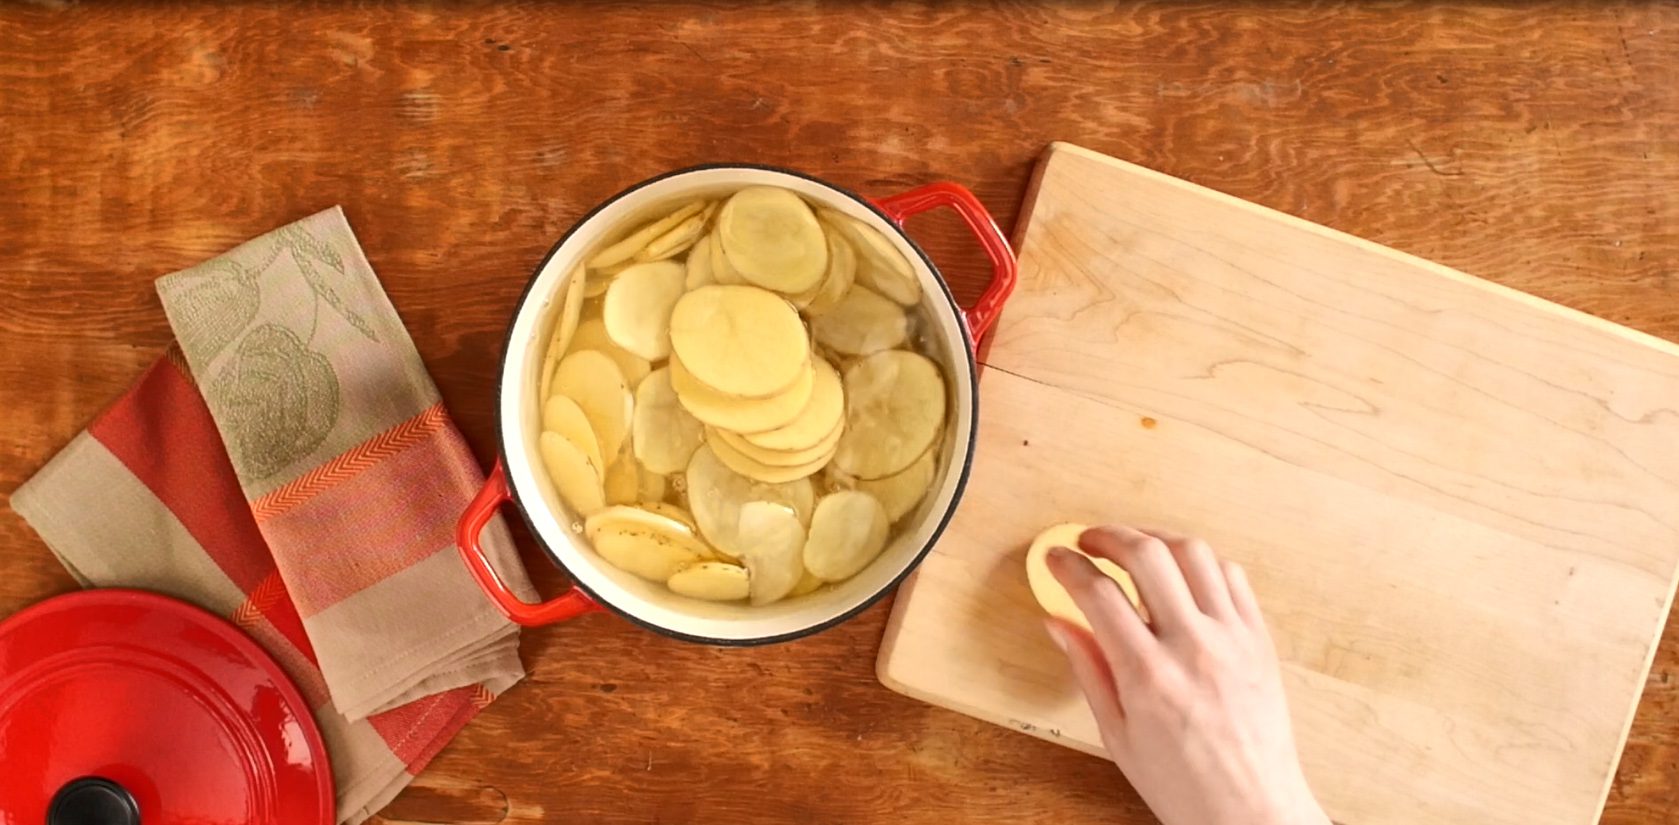
- Russet Potatoes (2 medium, thinly sliced): With their high starch content, russet potatoes naturally release starch as they cook, helping to thicken the cream sauce and create a rich, creamy, melt-in-your-mouth texture. For best results, slice them evenly so they cook at the same rate.
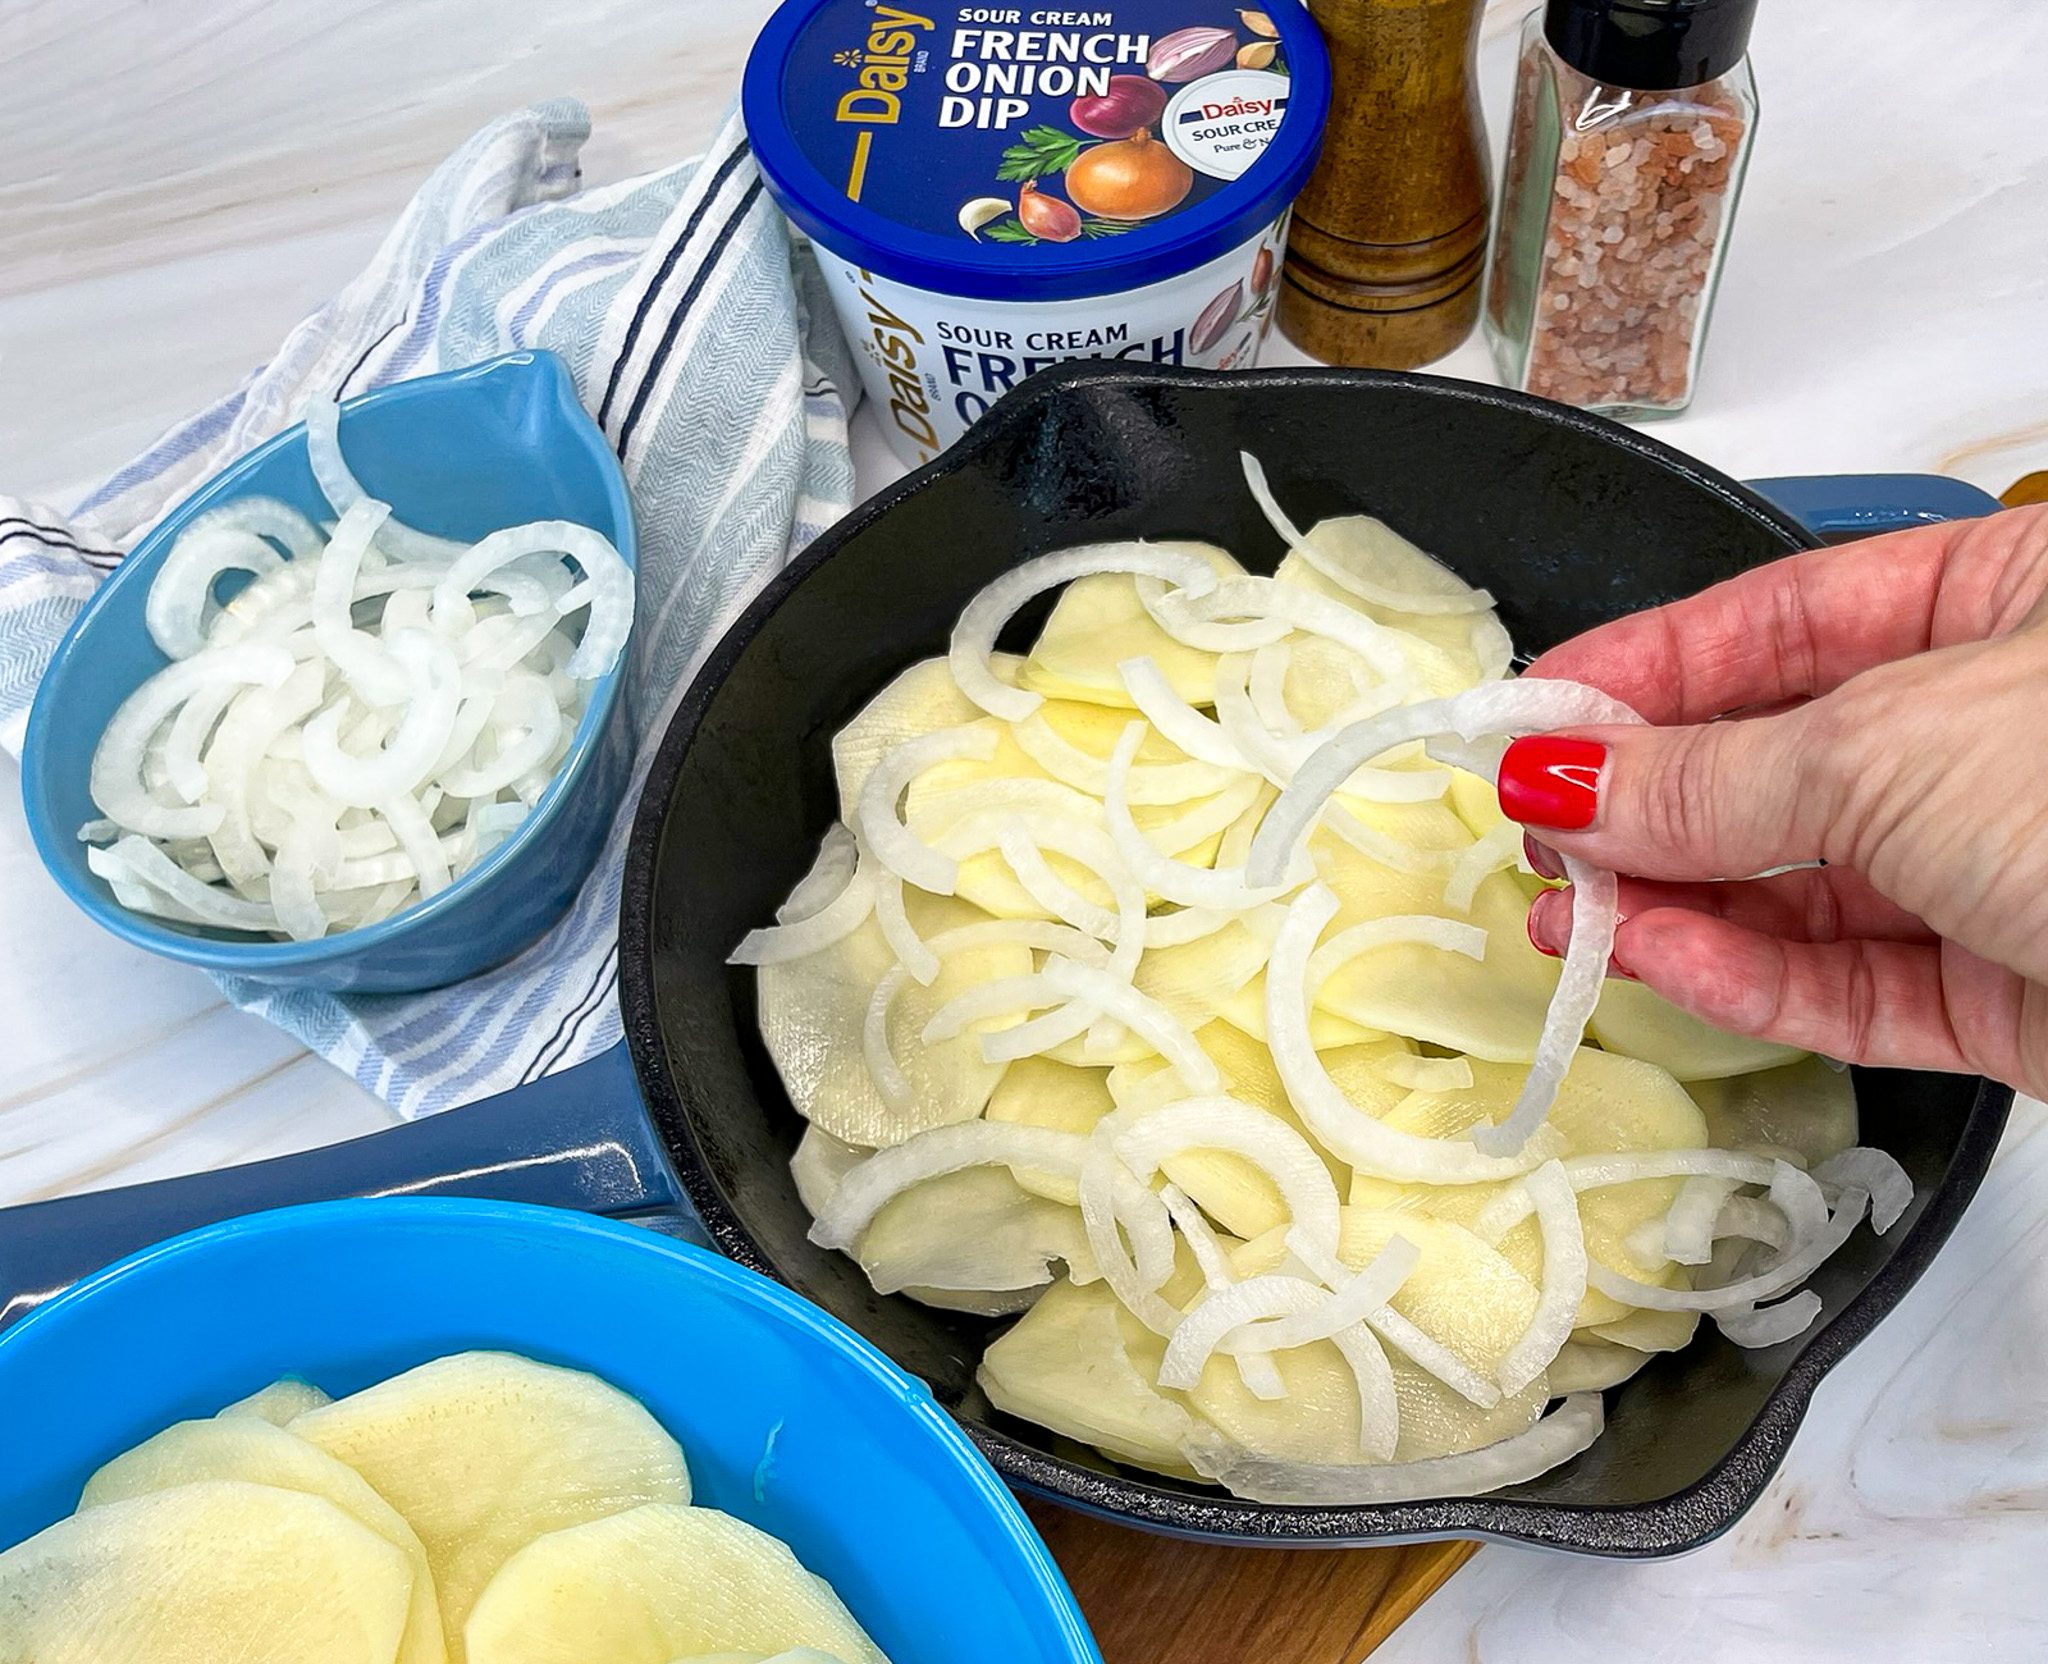
- Onion (1/2 medium, thinly sliced): The perfect companion to potatoes, onions add a sweet, slightly sharp, earthy flavor. Both white and yellow onions work well—white onions are a bit more pungent, while yellow onions are slightly sweeter.
- Salt & Pepper (to taste): This classic seasoning duo enhances and balances all the other flavors in the dish.
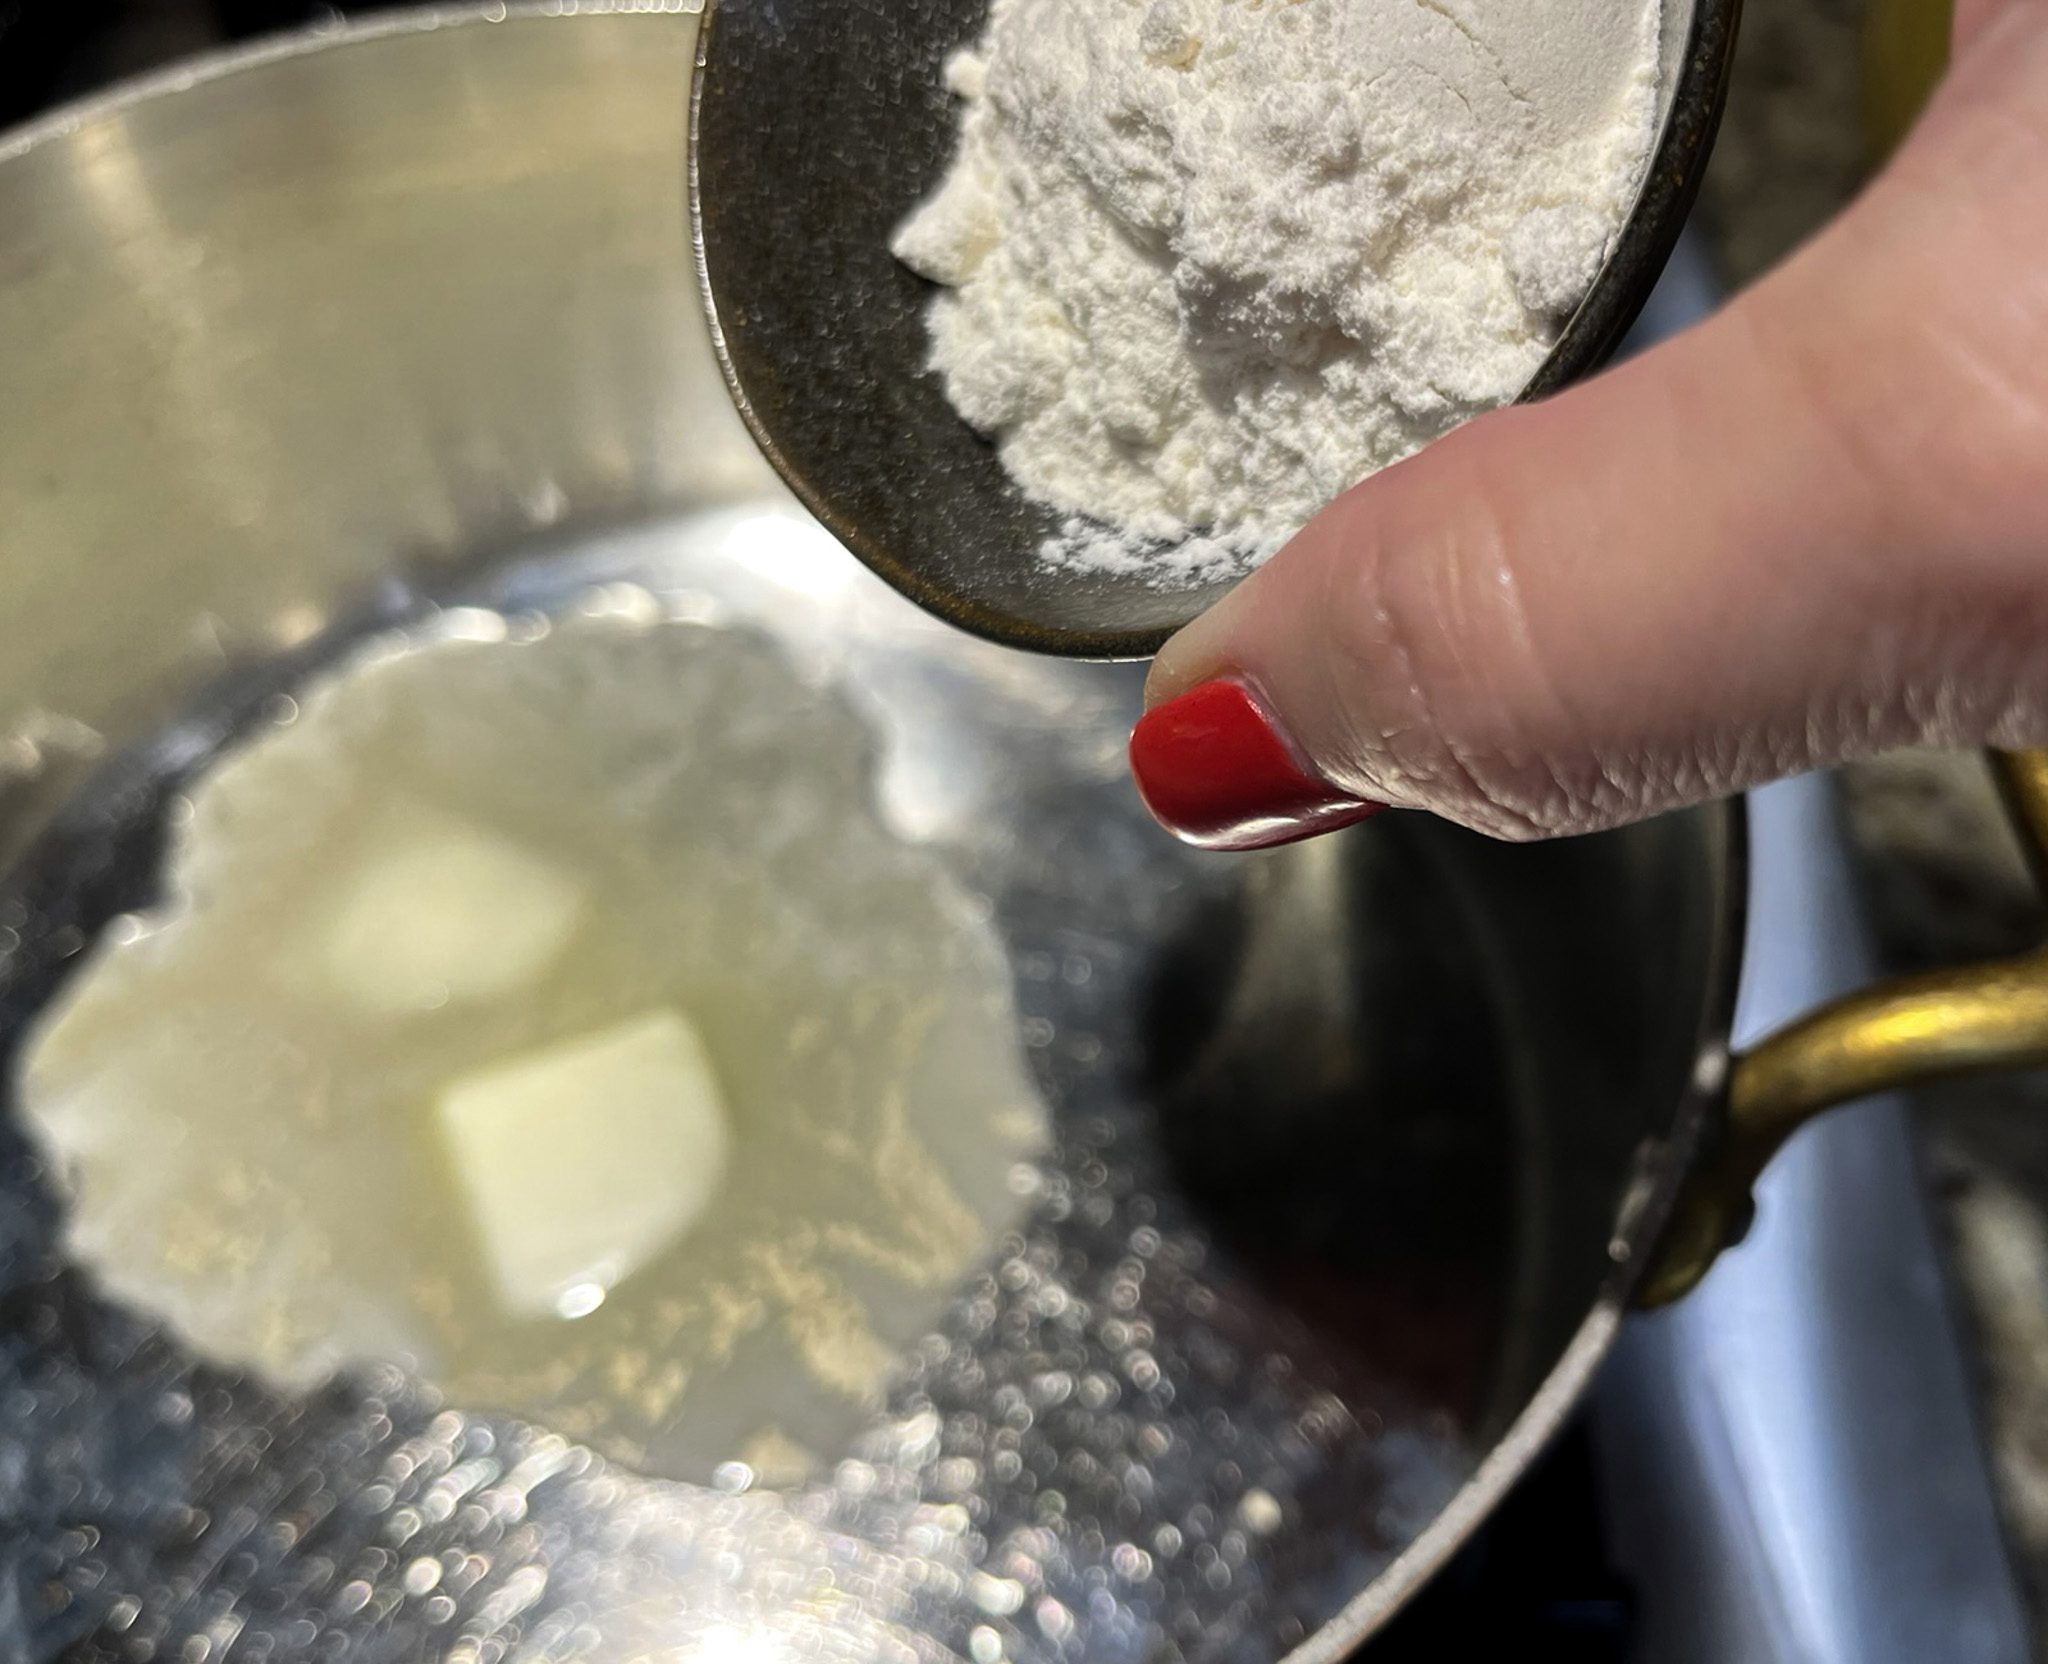
- Butter (1 ½ tablespoons): Adds richness and depth, forming the flavorful base of the sauce.
- All-Purpose Flour (1 ½ tablespoons): Used to thicken and stabilize the sauce, ensuring it’s smooth and creamy rather than runny.
- Milk (3/4 cup): Helps thin the sauce and evenly distribute the cheesy goodness throughout the potatoes. Whole milk is ideal for the creamiest result.
- Daisy French Onion Dip (1 ¼ cups): Creamy and delicious, this dip adds richness, bold onion flavor, and a pleasant tang that elevates the entire dish.
- Cheddar Cheese (3/4 cup, freshly shredded): This salty, sharp cheese melts beautifully, creating a comforting, classic cheesy sauce. Shredding it fresh helps it melt more smoothly.
- Gruyère Cheese (½ cup, freshly shredded): Known for its superior melting quality, Gruyère creates an exceptionally creamy, velvety sauce. Its nutty, earthy, subtly sweet flavor pairs perfectly with cheddar for added depth.
- Fresh Chives (about 2 tablespoons, finely chopped): With a mild onion-garlic flavor and vibrant green color, chives add a fresh finishing touch and a pop of color to the finished potatoes.
Substitutions, Variations, and Tips
- Yukon Gold potatoes may be used in place of russets. Yukon Golds have a sturdier texture and a slightly buttery flavor.
- Red potatoes are not ideal for this recipe, as they are too waxy and can result in a gluey texture.
- Olive oil may be used in place of butter.
- Purple (red) onions may be used instead of yellow or white onions, adding a more peppery, pungent flavor.
- Cornstarch may be used in place of flour to thicken the sauce if gluten is a concern. Add the milk to the melted butter first, then whisk in the cornstarch until smooth.
- Half-and-half may be used in place of milk, though it will create a thicker, richer sauce.
- Other cheeses may be substituted for cheddar and Gruyère, such as Asiago, Manchego, or Parmesan.
- Fresh garlic and herbs can enhance the potatoes and add delicious depth of flavor. Try adding about 1 teaspoon of minced garlic, along with freshly chopped thyme or rosemary, to the sauce.
- Feel free to top with additional cheese or breadcrumbs for extra texture and flavor.
- The easiest way to uniformly slice the potatoes and onions is by using a mandoline slicer or a food processor.
- Make-ahead friendly: You can prepare this dish up to one day in advance. Wrap tightly in plastic wrap and refrigerate until ready to bake.
- To reheat: Preheat the oven to 350°F. Cover with foil and bake for 15–30 minutes, or until heated through. Individual portions can also be reheated in the microwave at ½ power in 15–30 second intervals.
- Freezing instructions: The cooked potatoes may be frozen. To reheat, either cover and bake at 325°F for about 75 minutes, or allow the dish to come to room temperature, then cover and bake at 350°F for 15–30 minutes, until hot throughout.
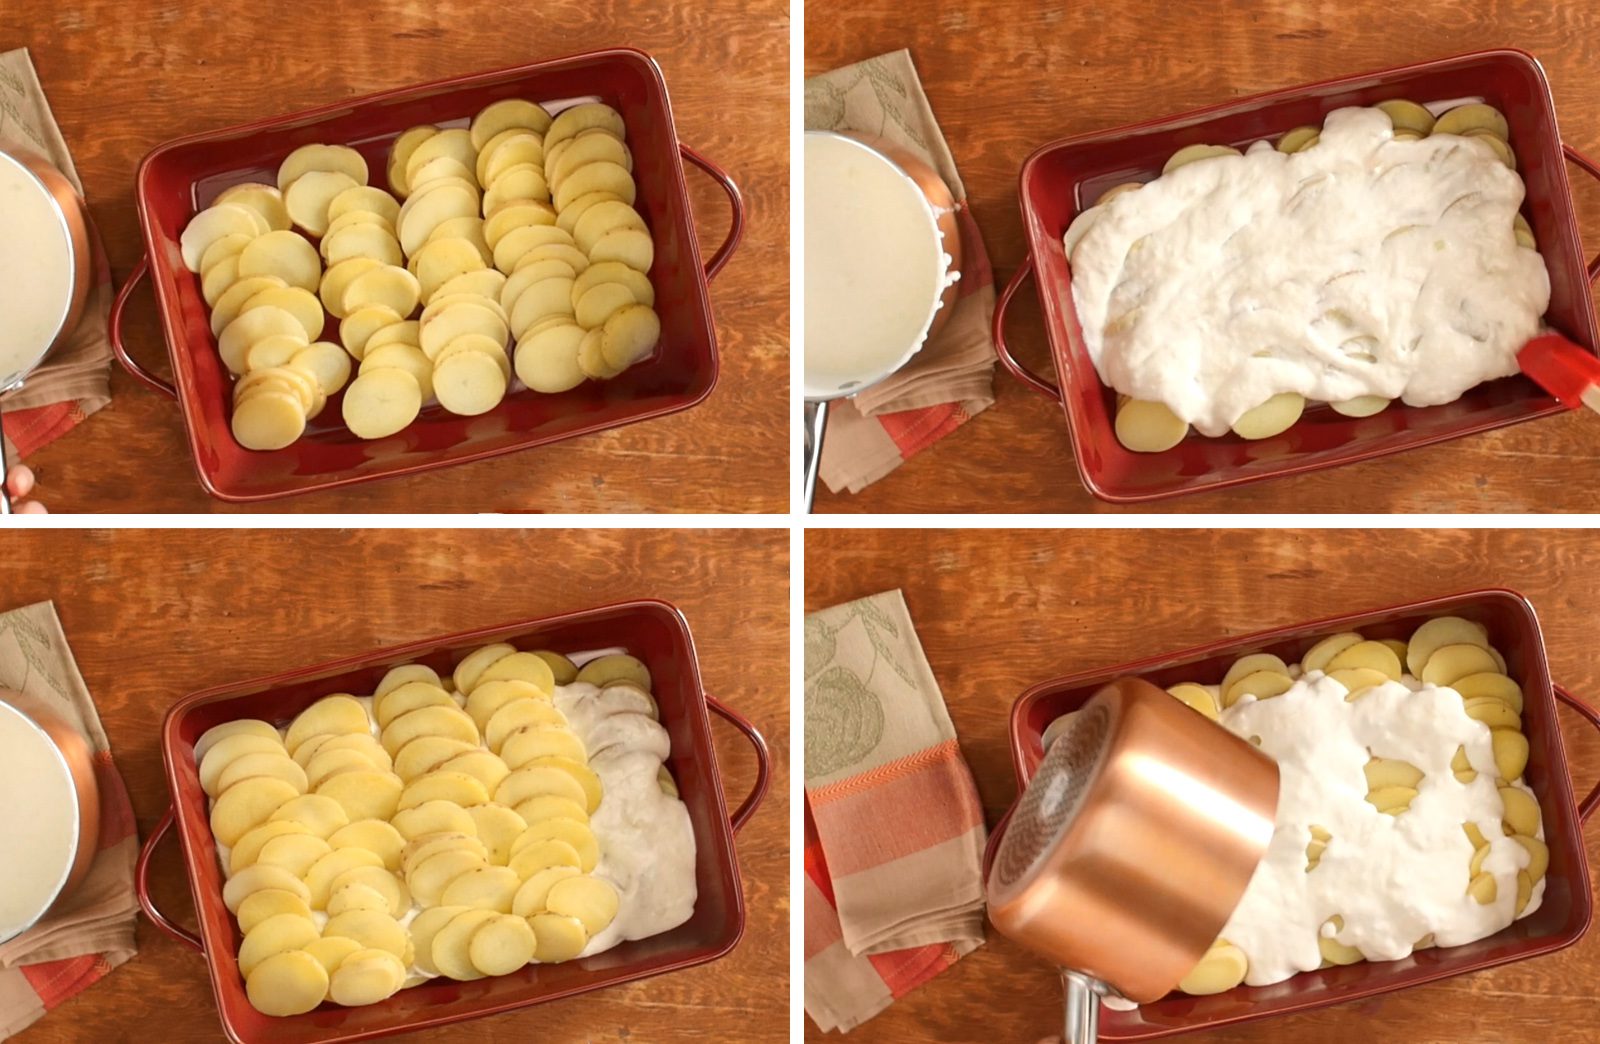
How to Make French Onion Au Gratin Potatoes
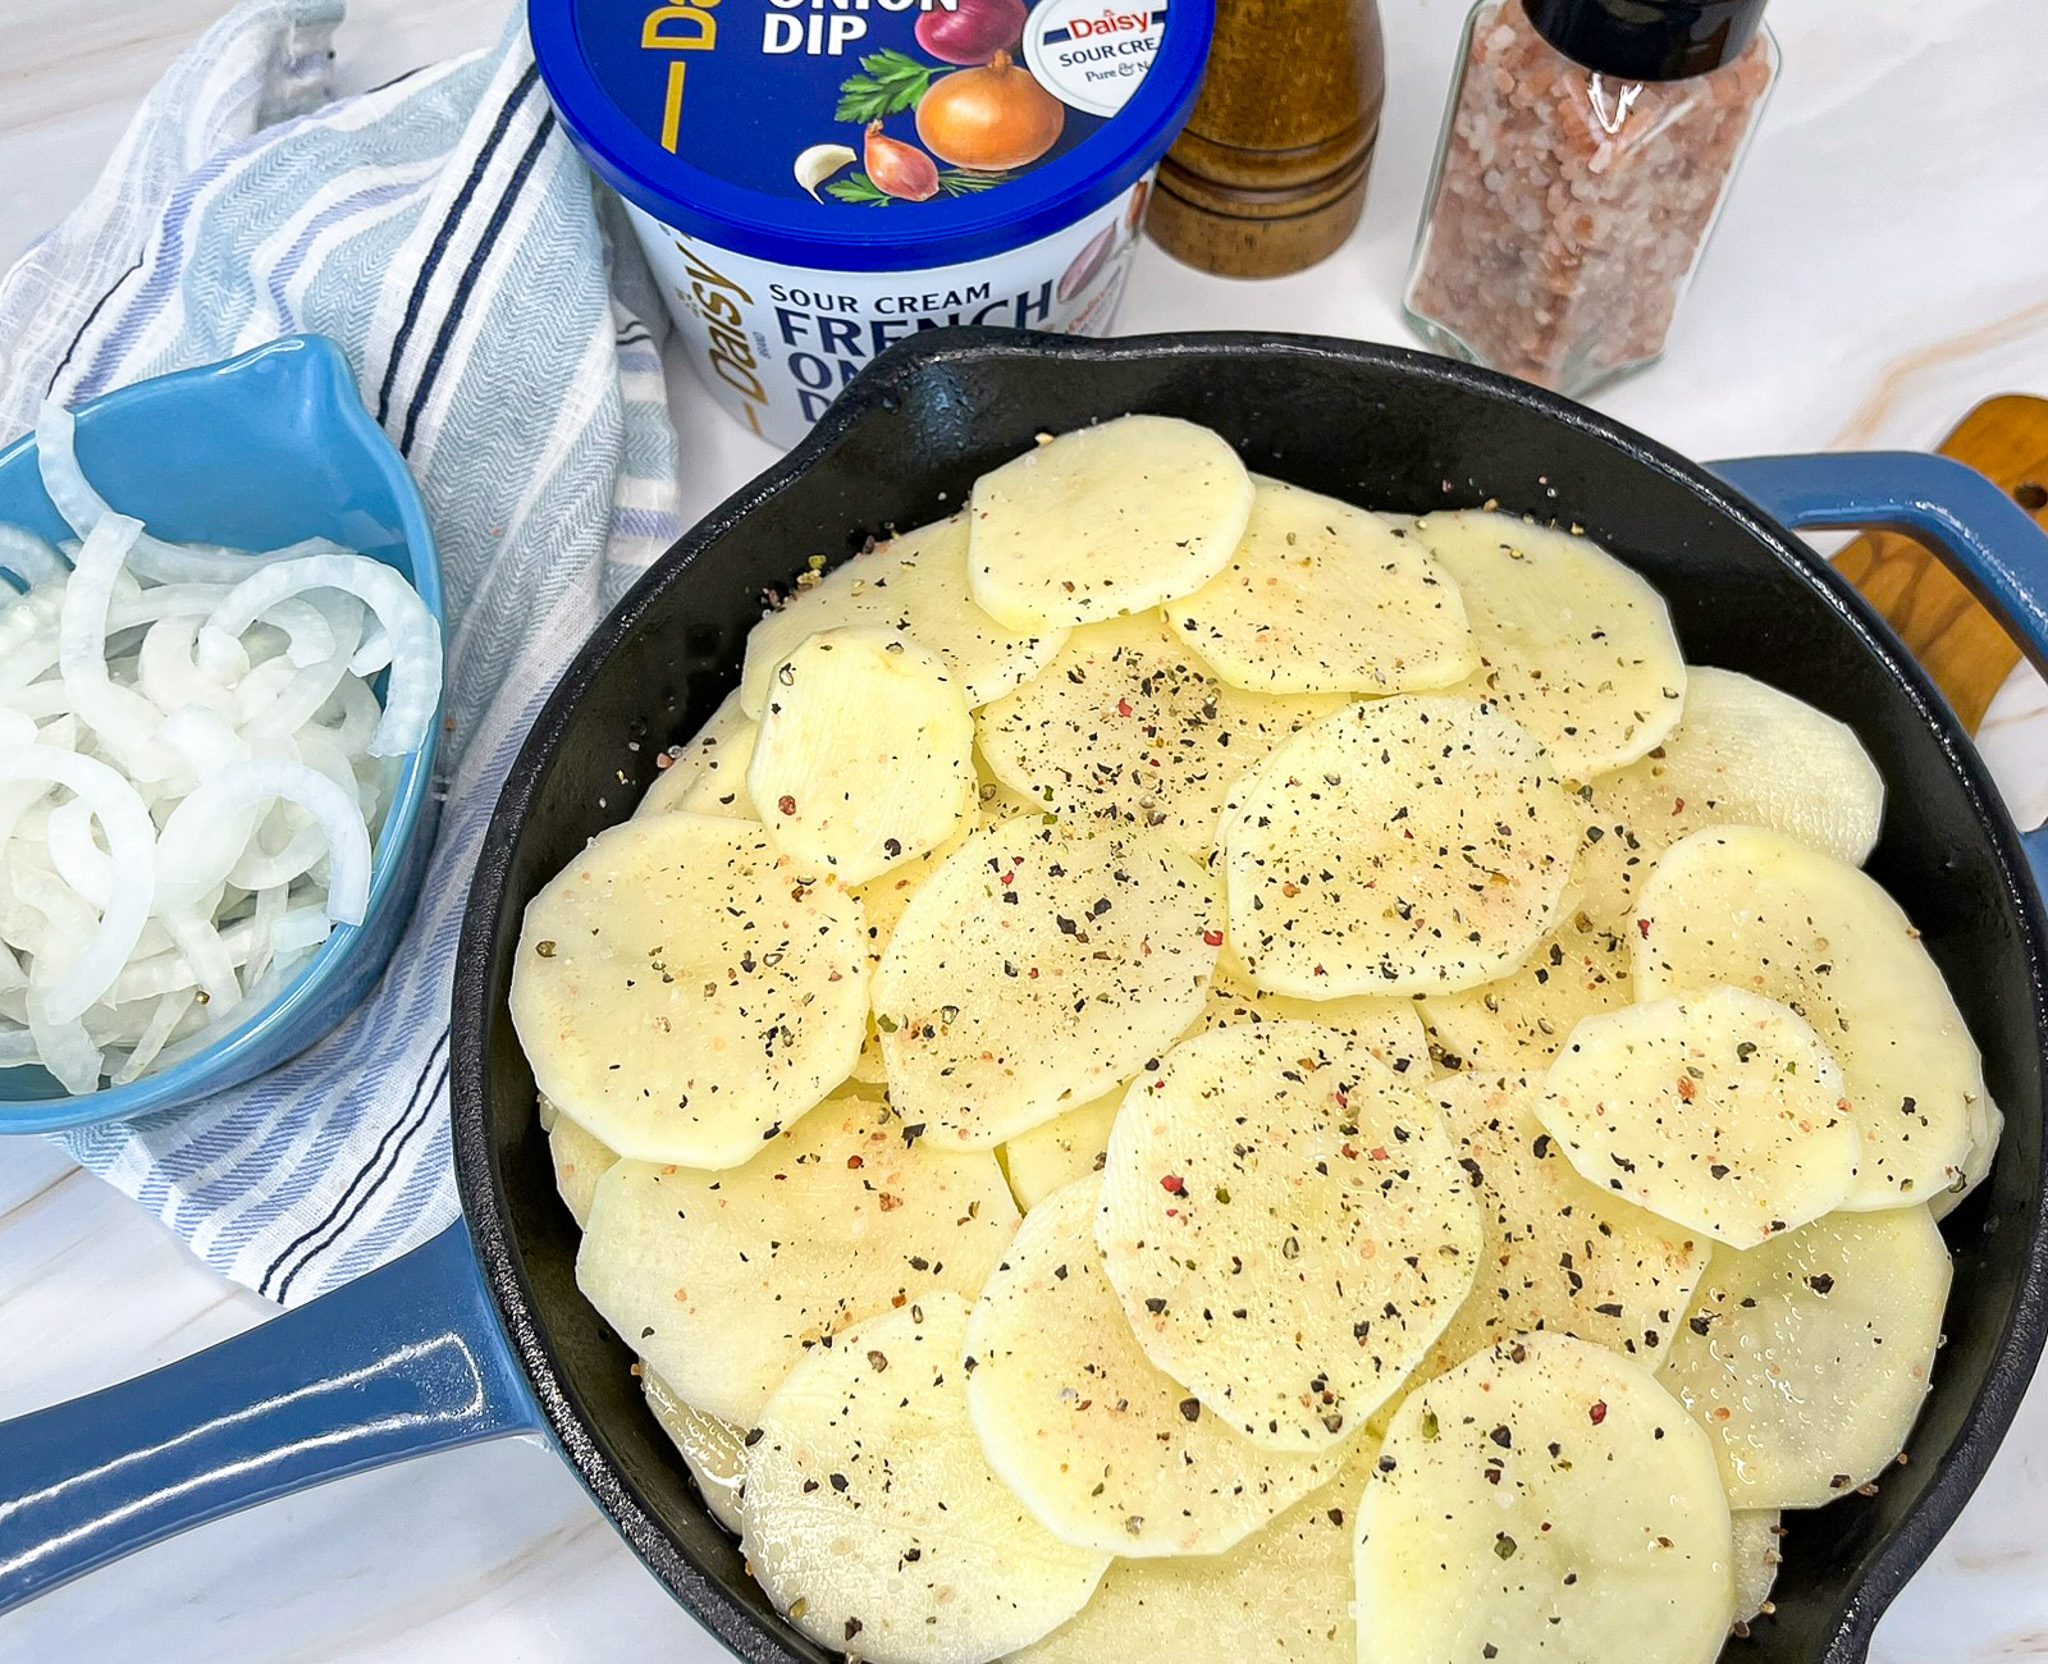
- Preheat the oven to 400°F. Spray an 8-inch dish with nonstick spray.
- Layer half the potatoes in the dish. Season with salt and pepper. Add the onions and then add the remaining potatoes. Season again with salt and pepper.
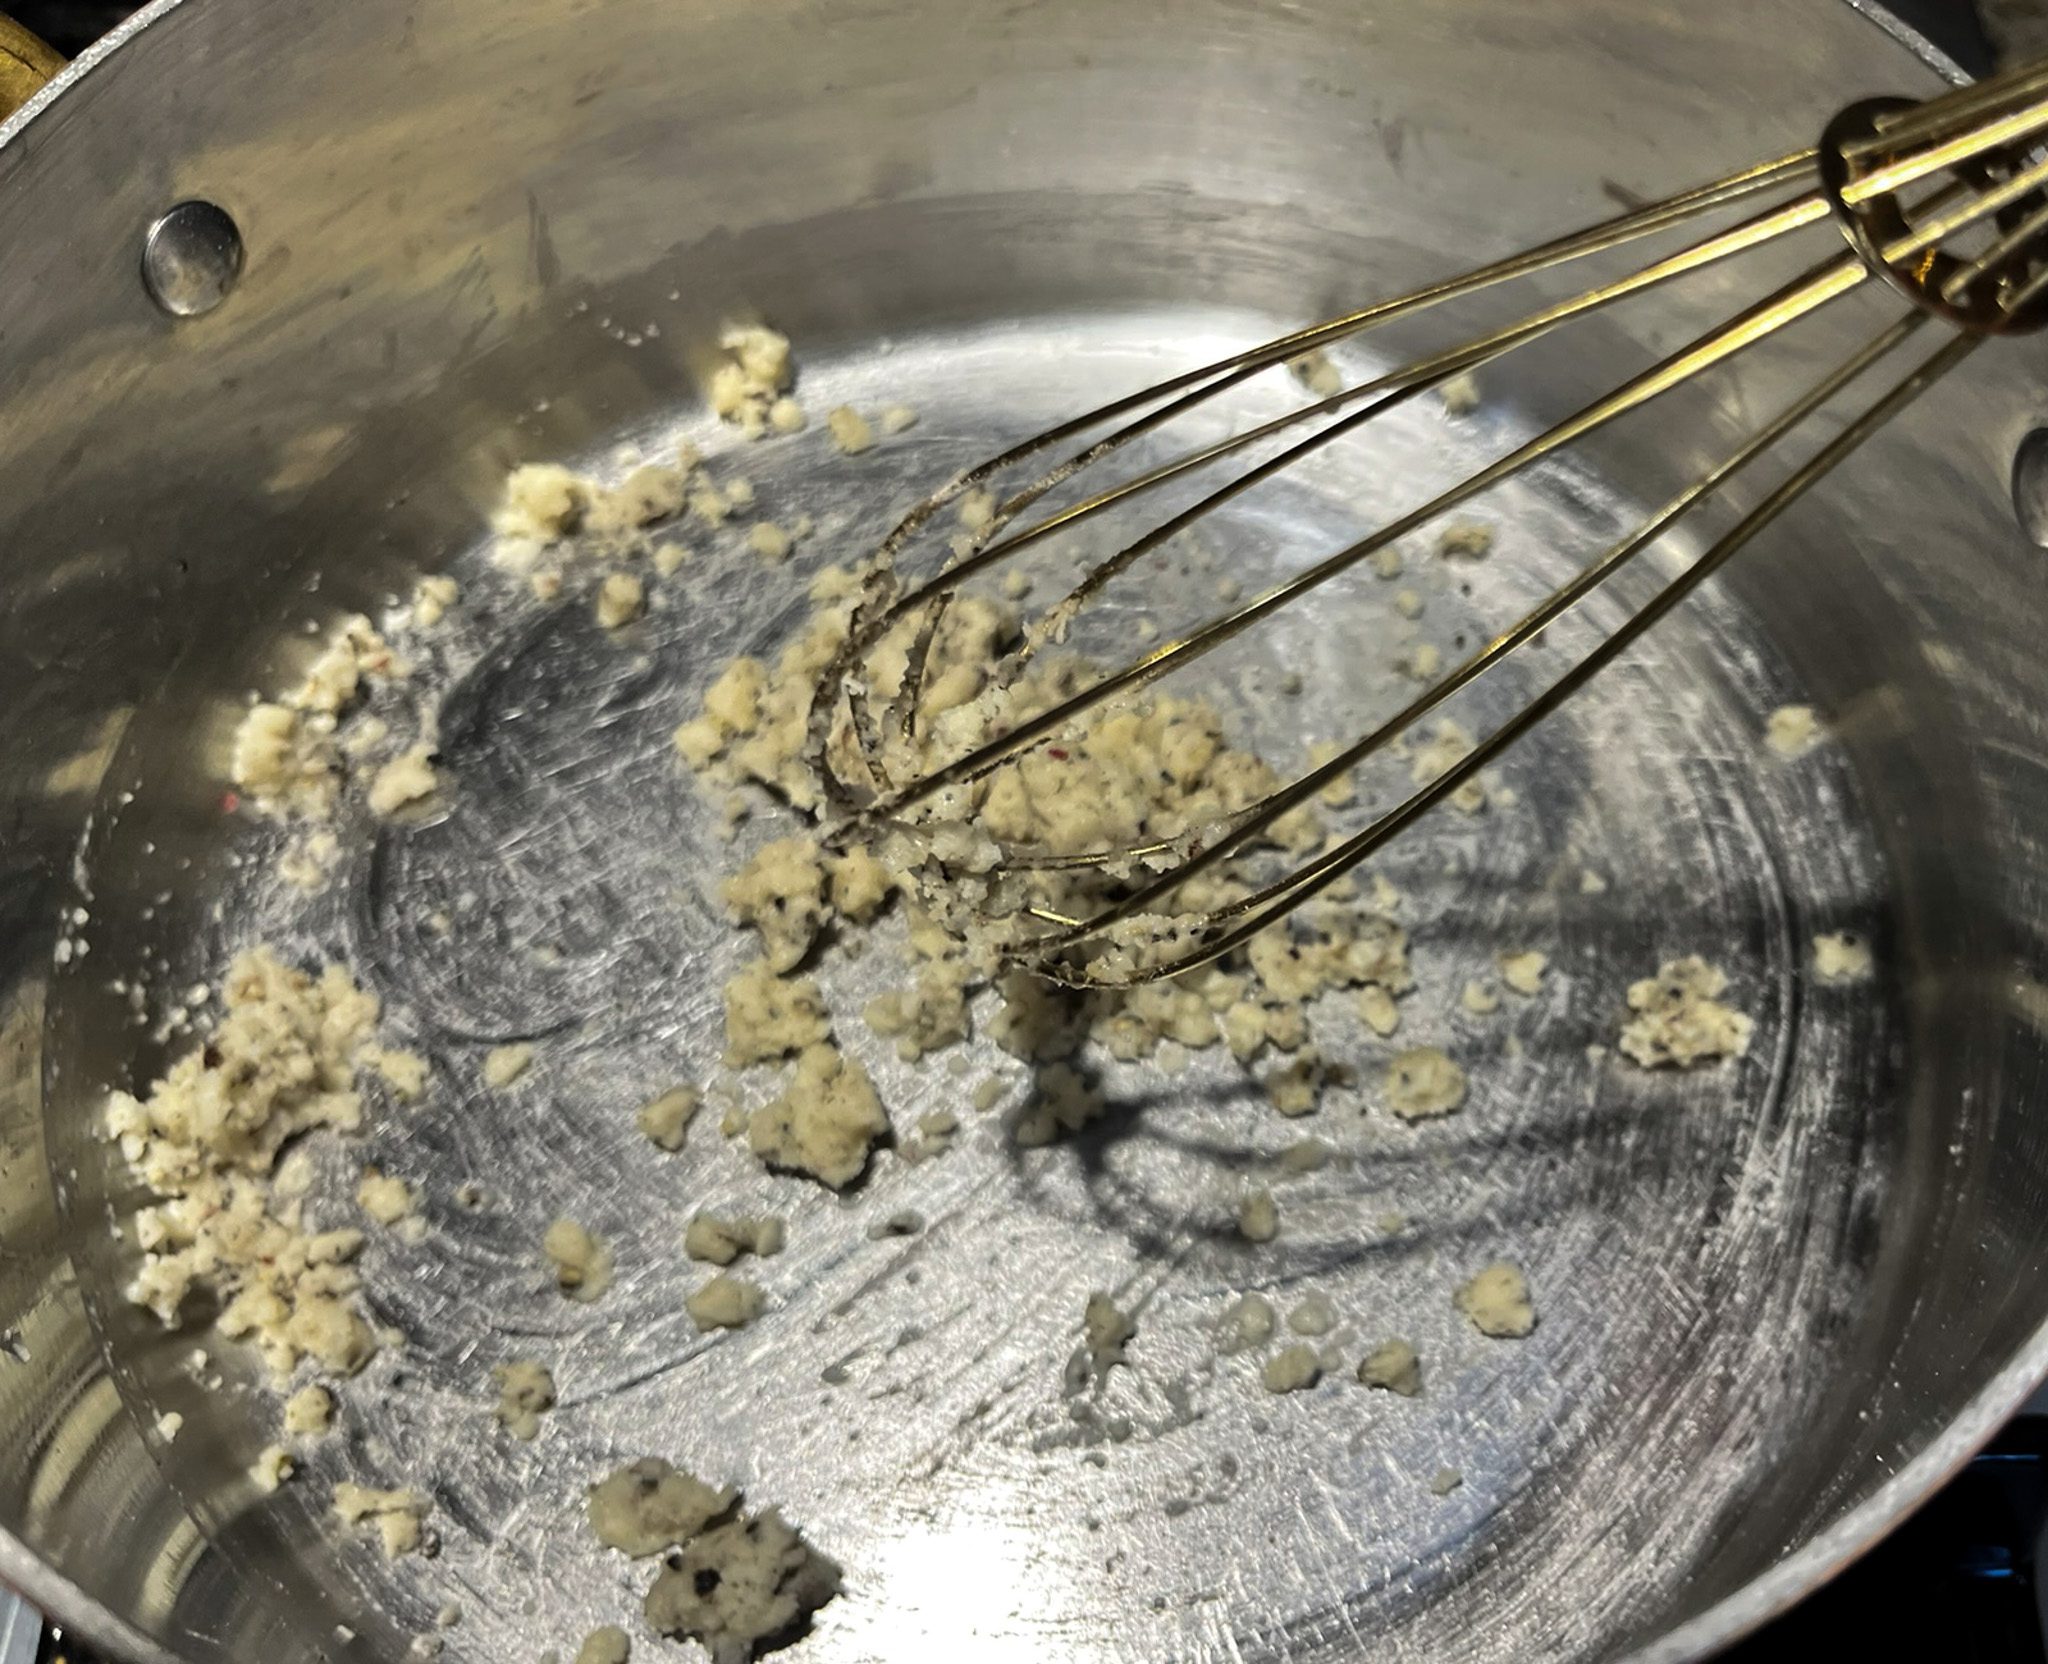
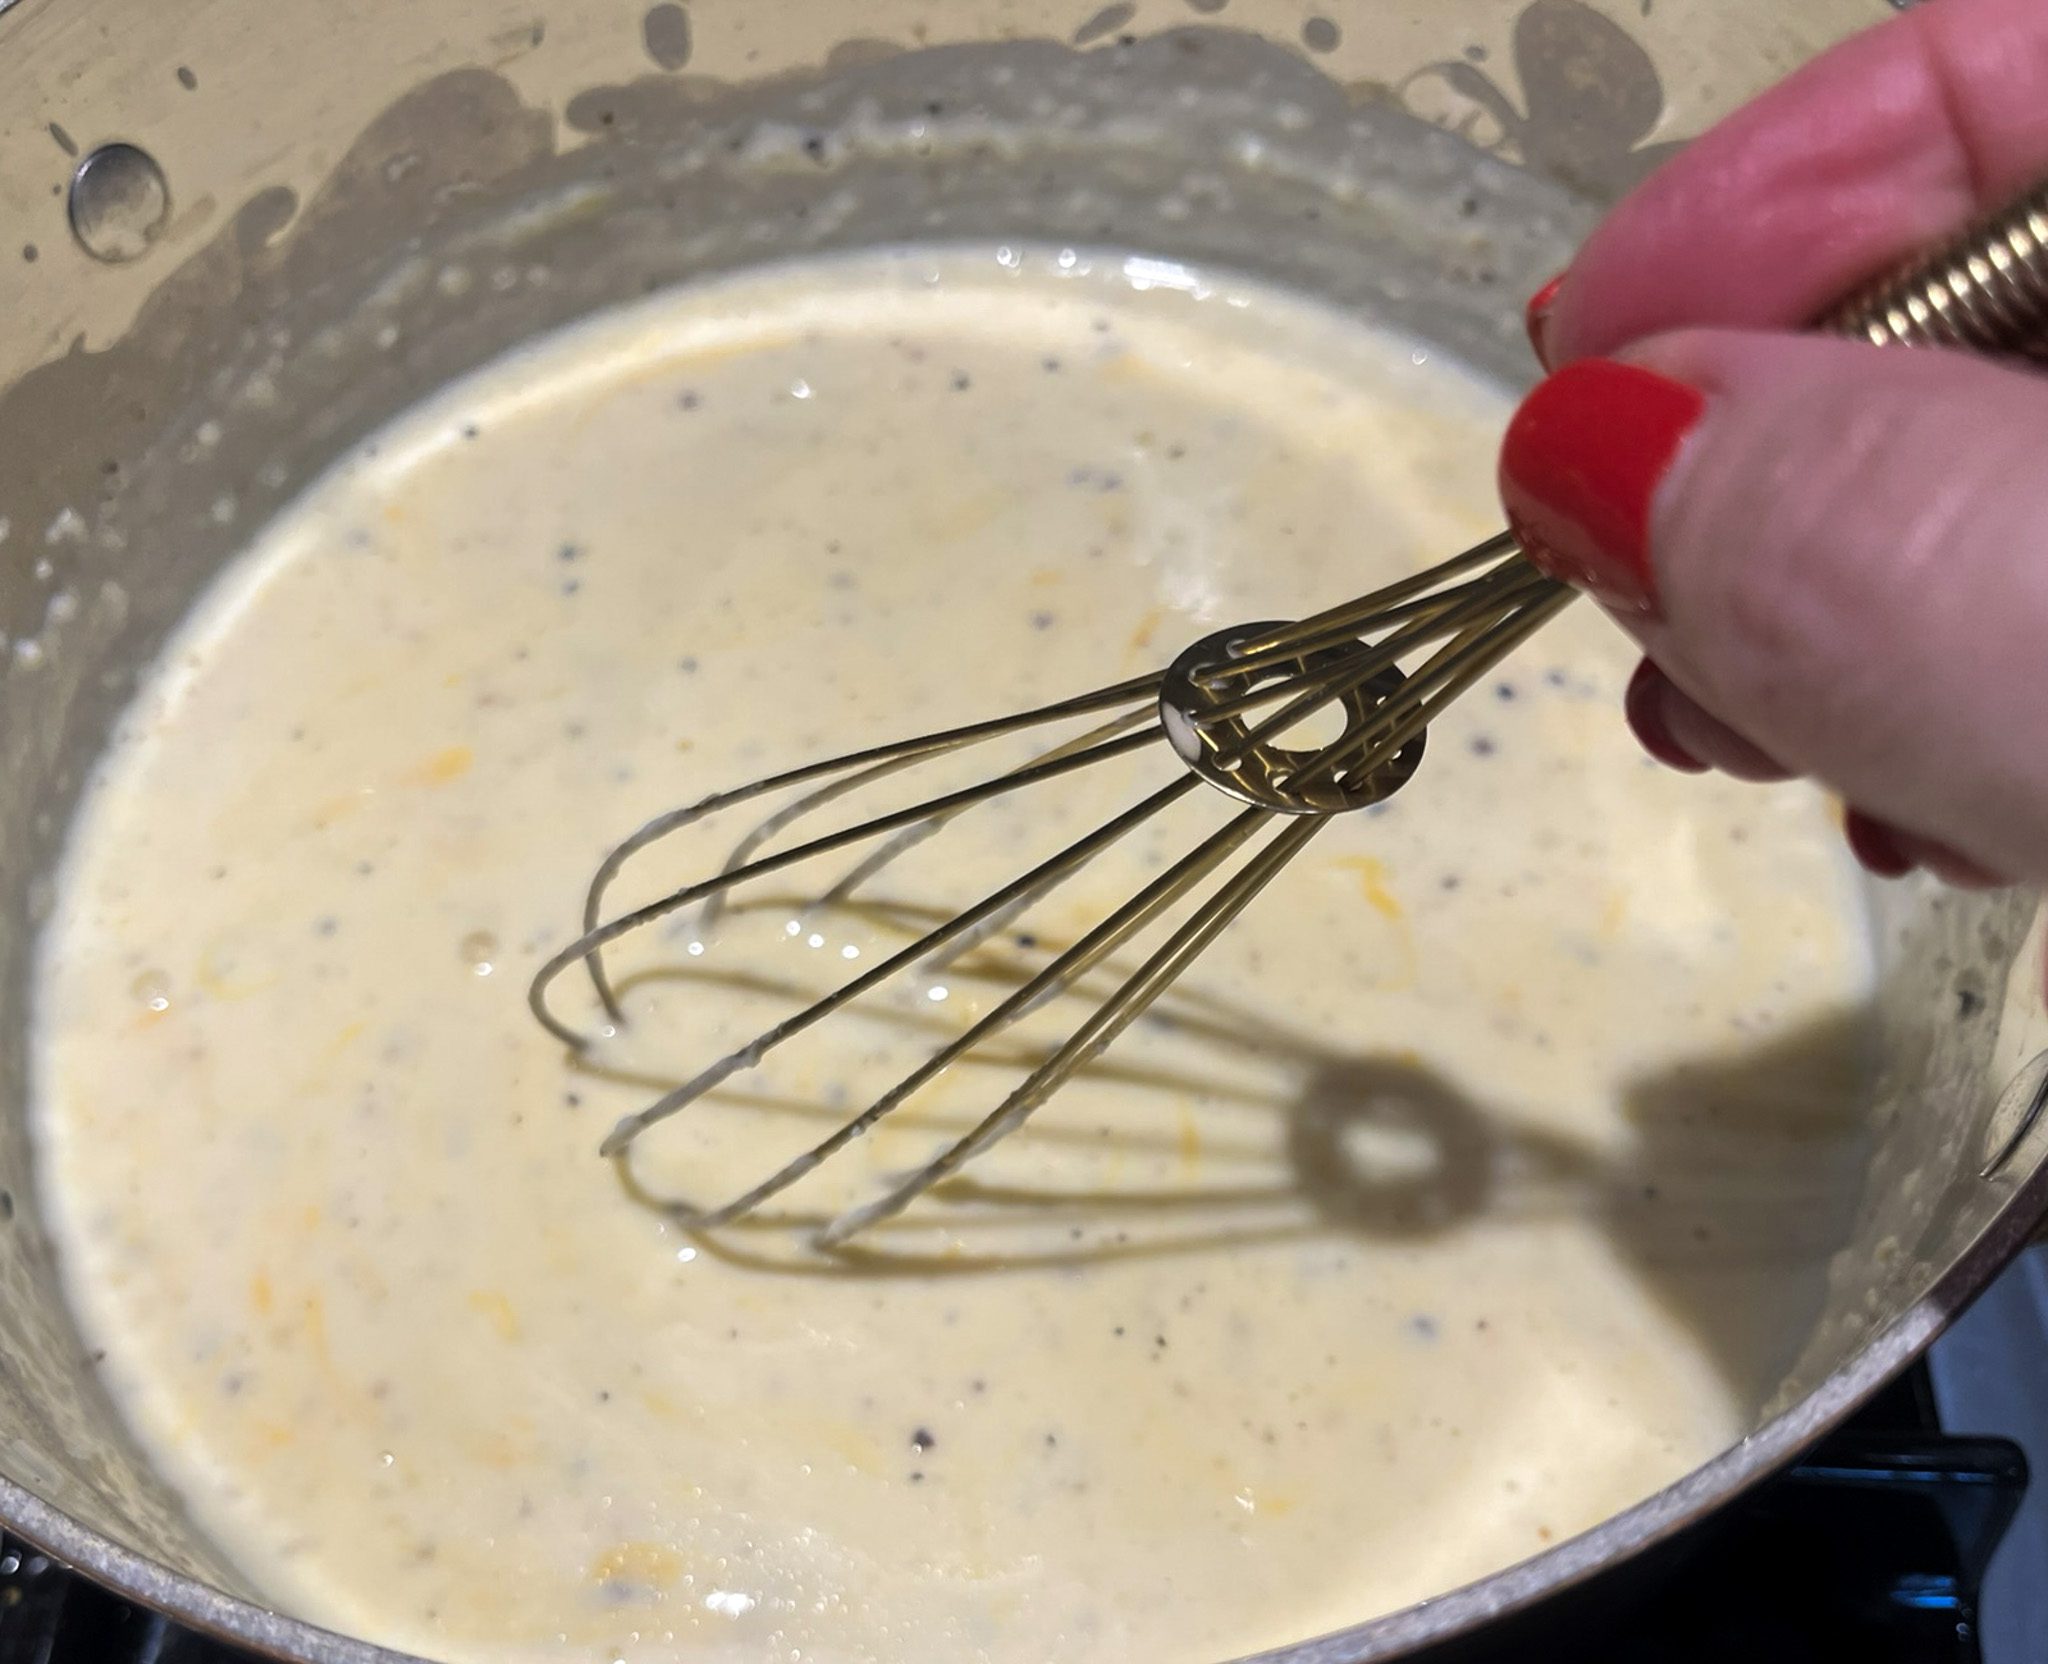
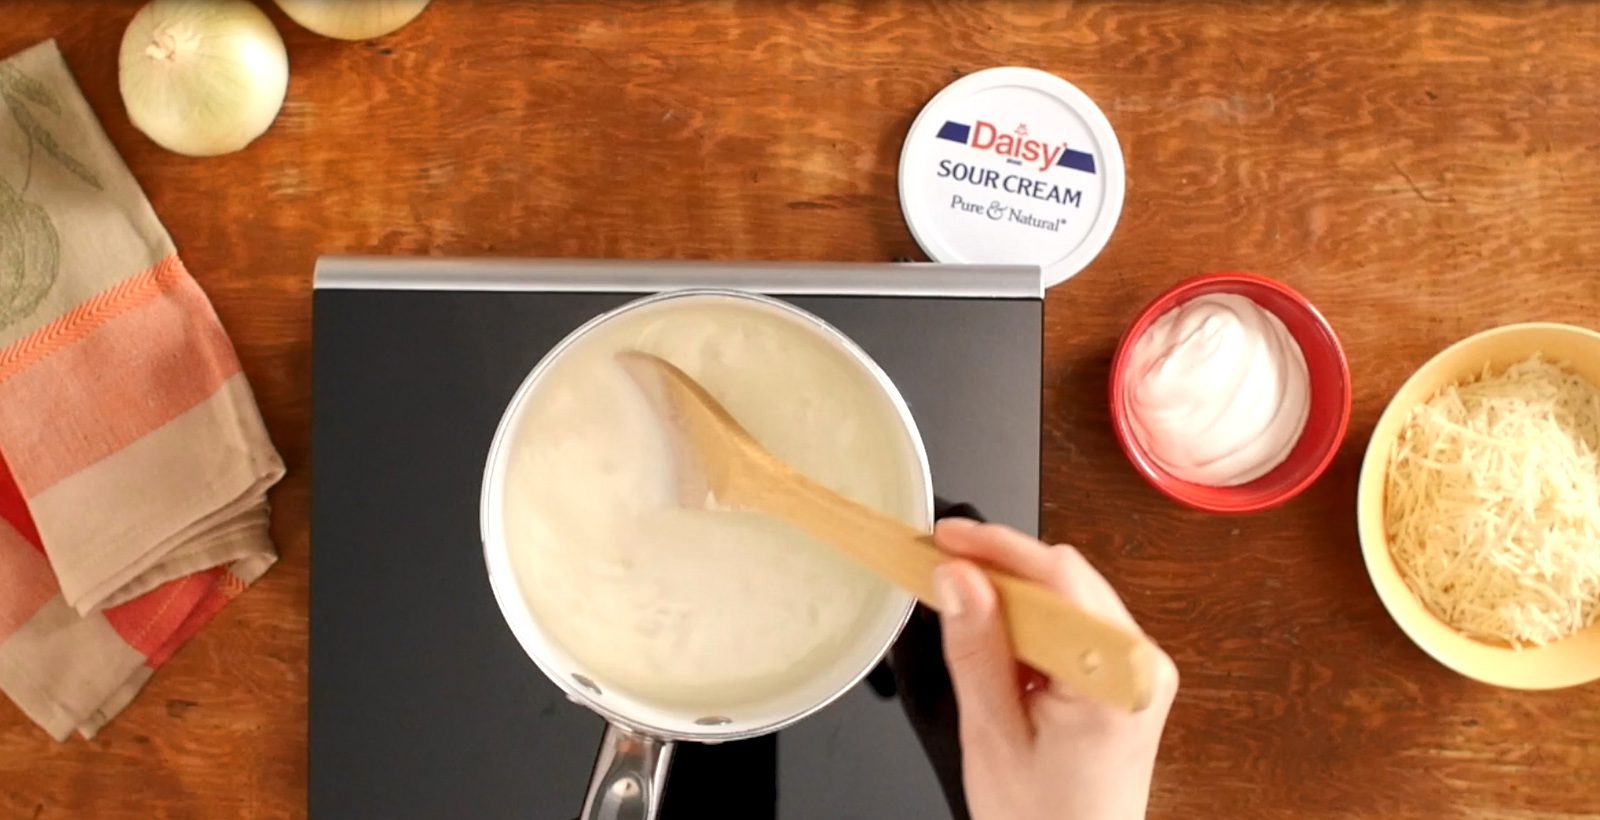
- Melt the butter in a saucepan on medium heat. Whisk in the flour constantly for 1 minute. Gradually add the milk (about ¼ cup at a time), whisking well after each addition. Cook 3-5 minutes, whisking constantly, until the mixture thickens. Remove from the heat.
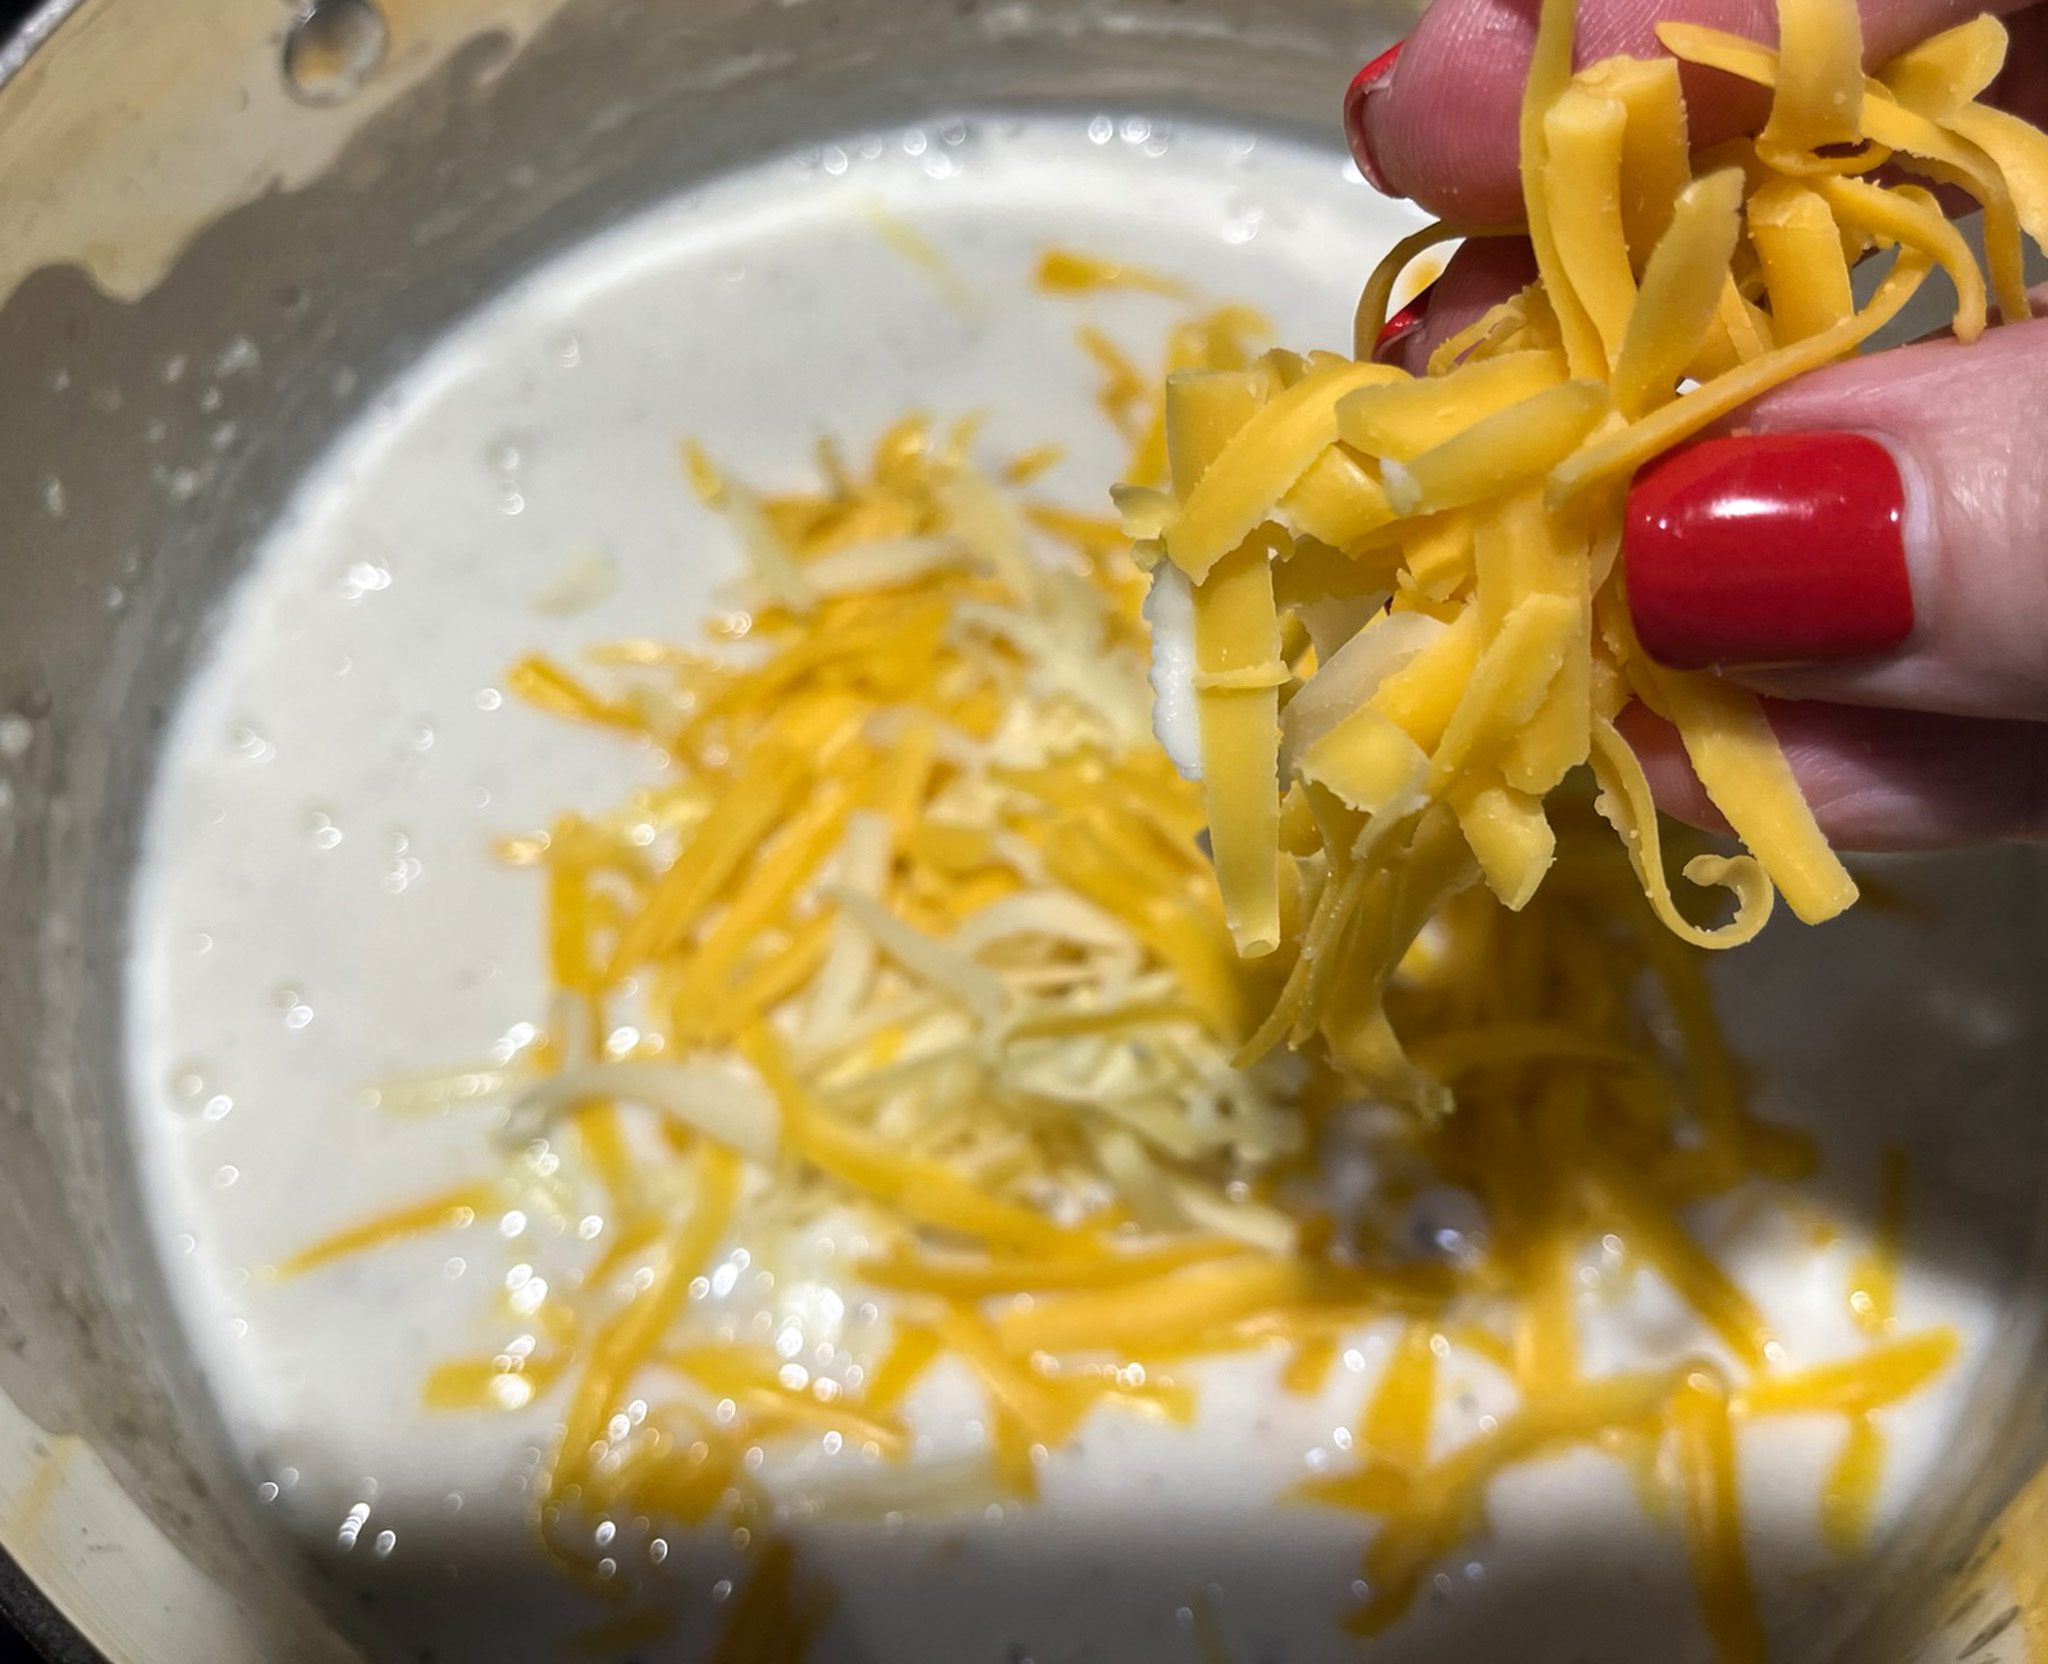
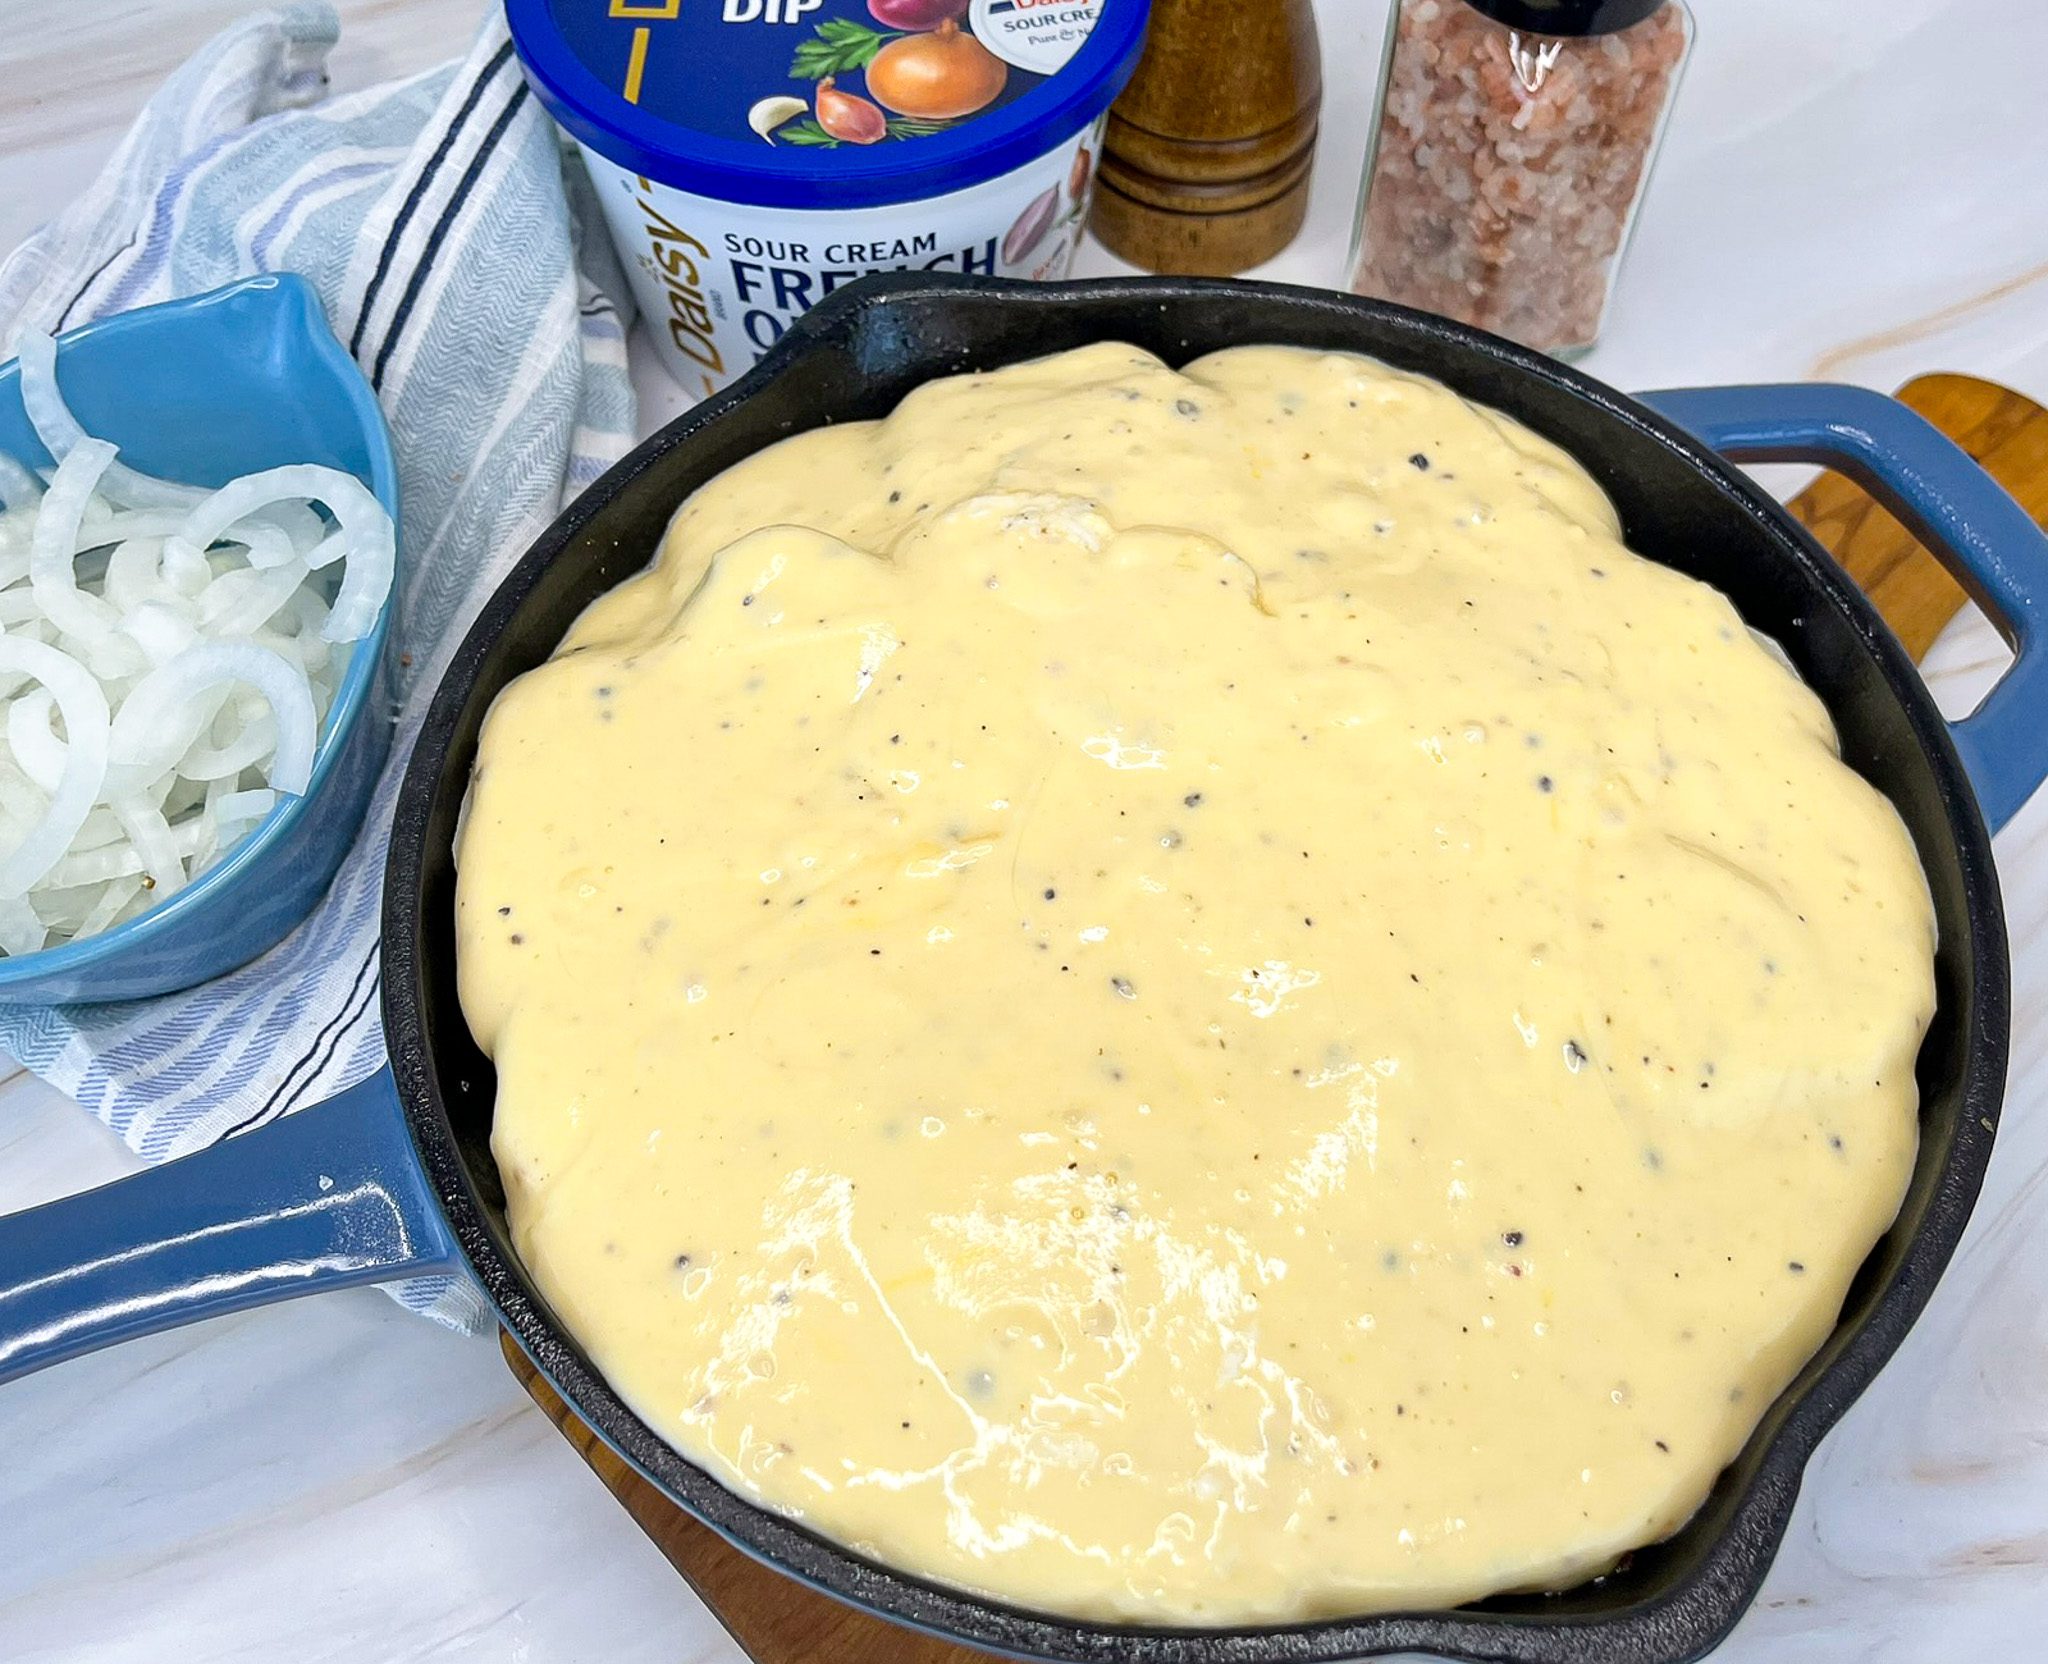
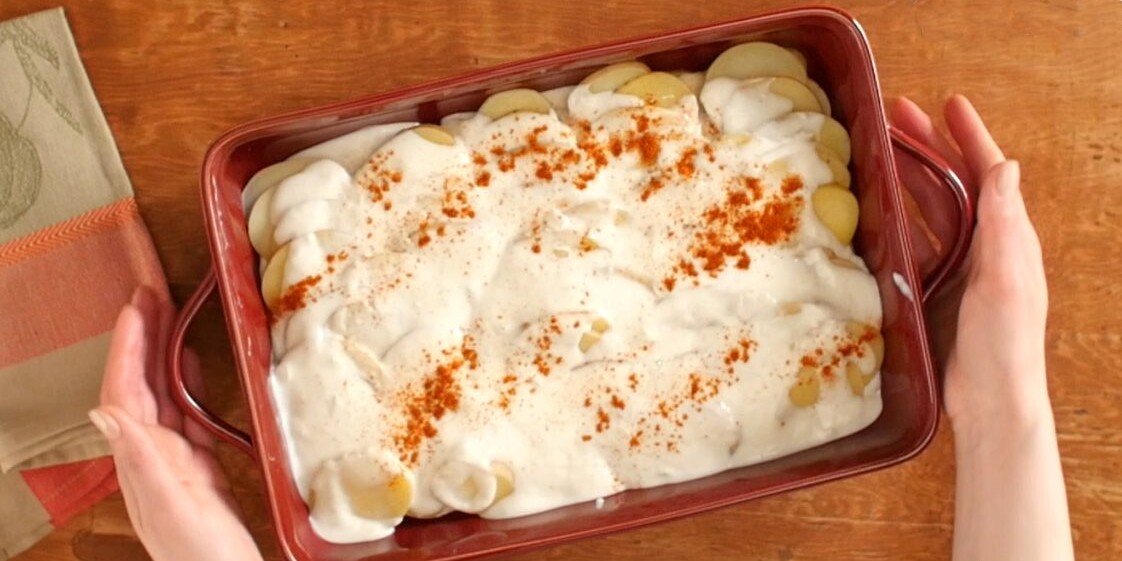
- Stir in cheese until melted. Add the French Onion dip and stir until combined. Pour over the potatoes and cover with aluminum foil that has been sprayed with nonstick spray.
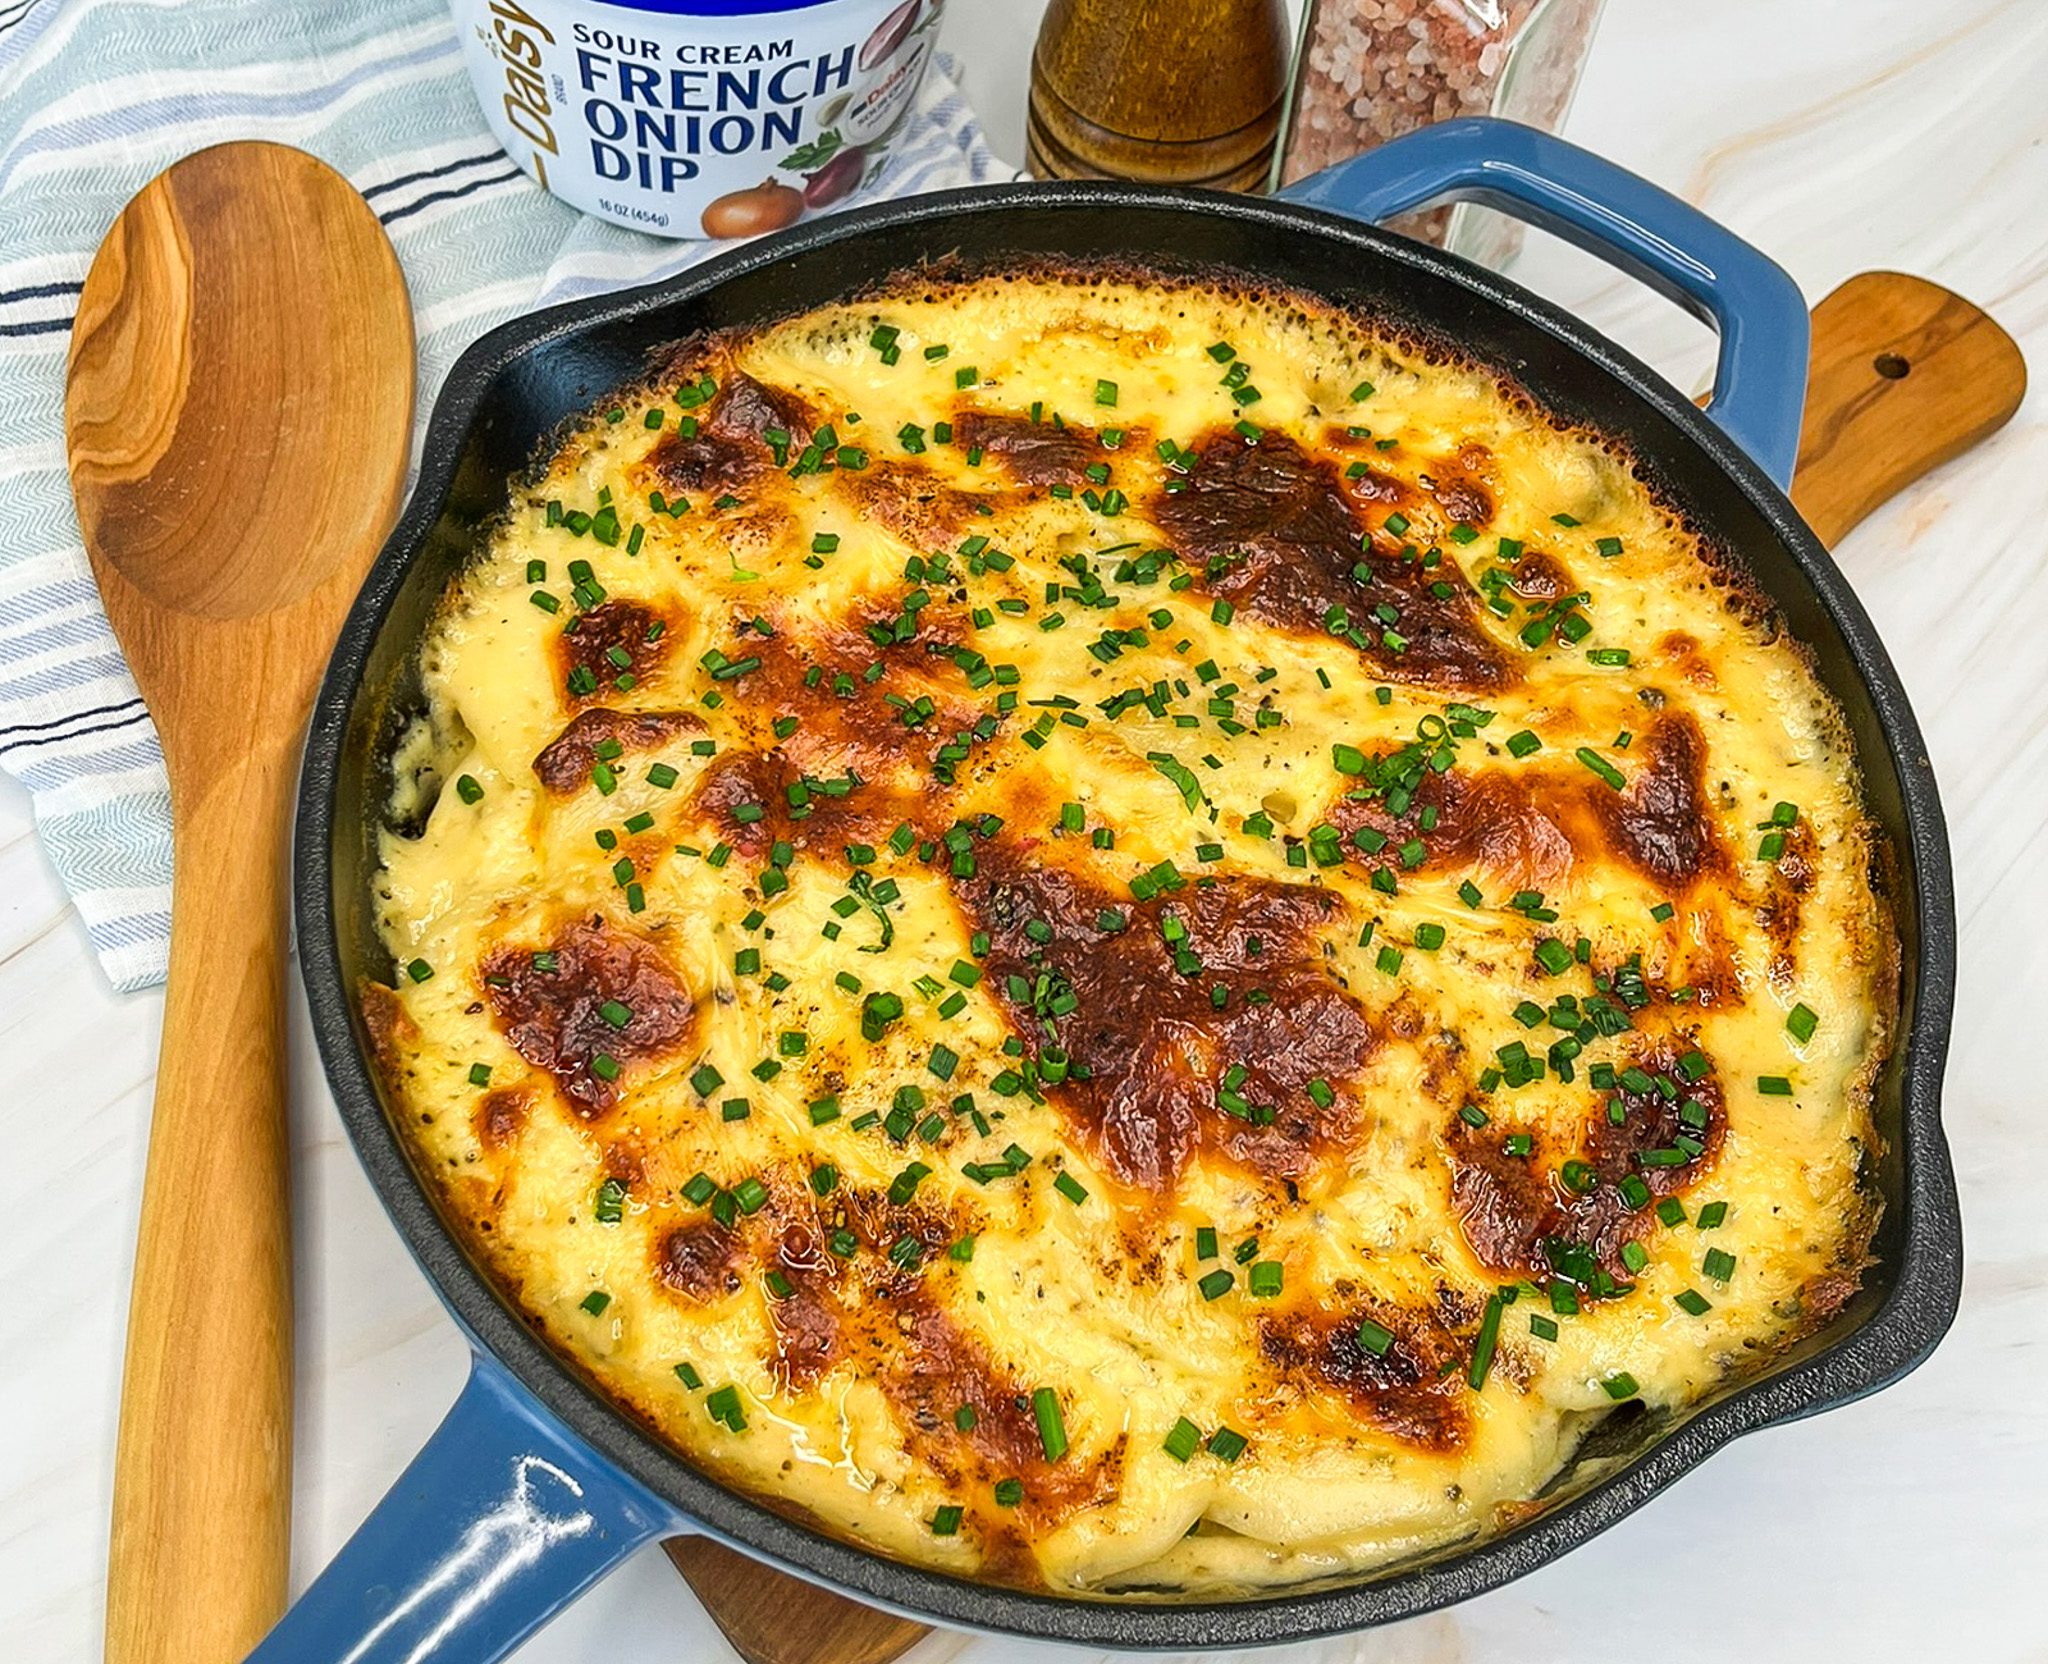
- Bake until the potatoes are tender and the sauce is bubbly (about 45 minutes). Uncover for last 10 minutes to allow the potatoes to brown.
- Let cool for 15 minutes over a wire rack. Garnish as desired and serve.
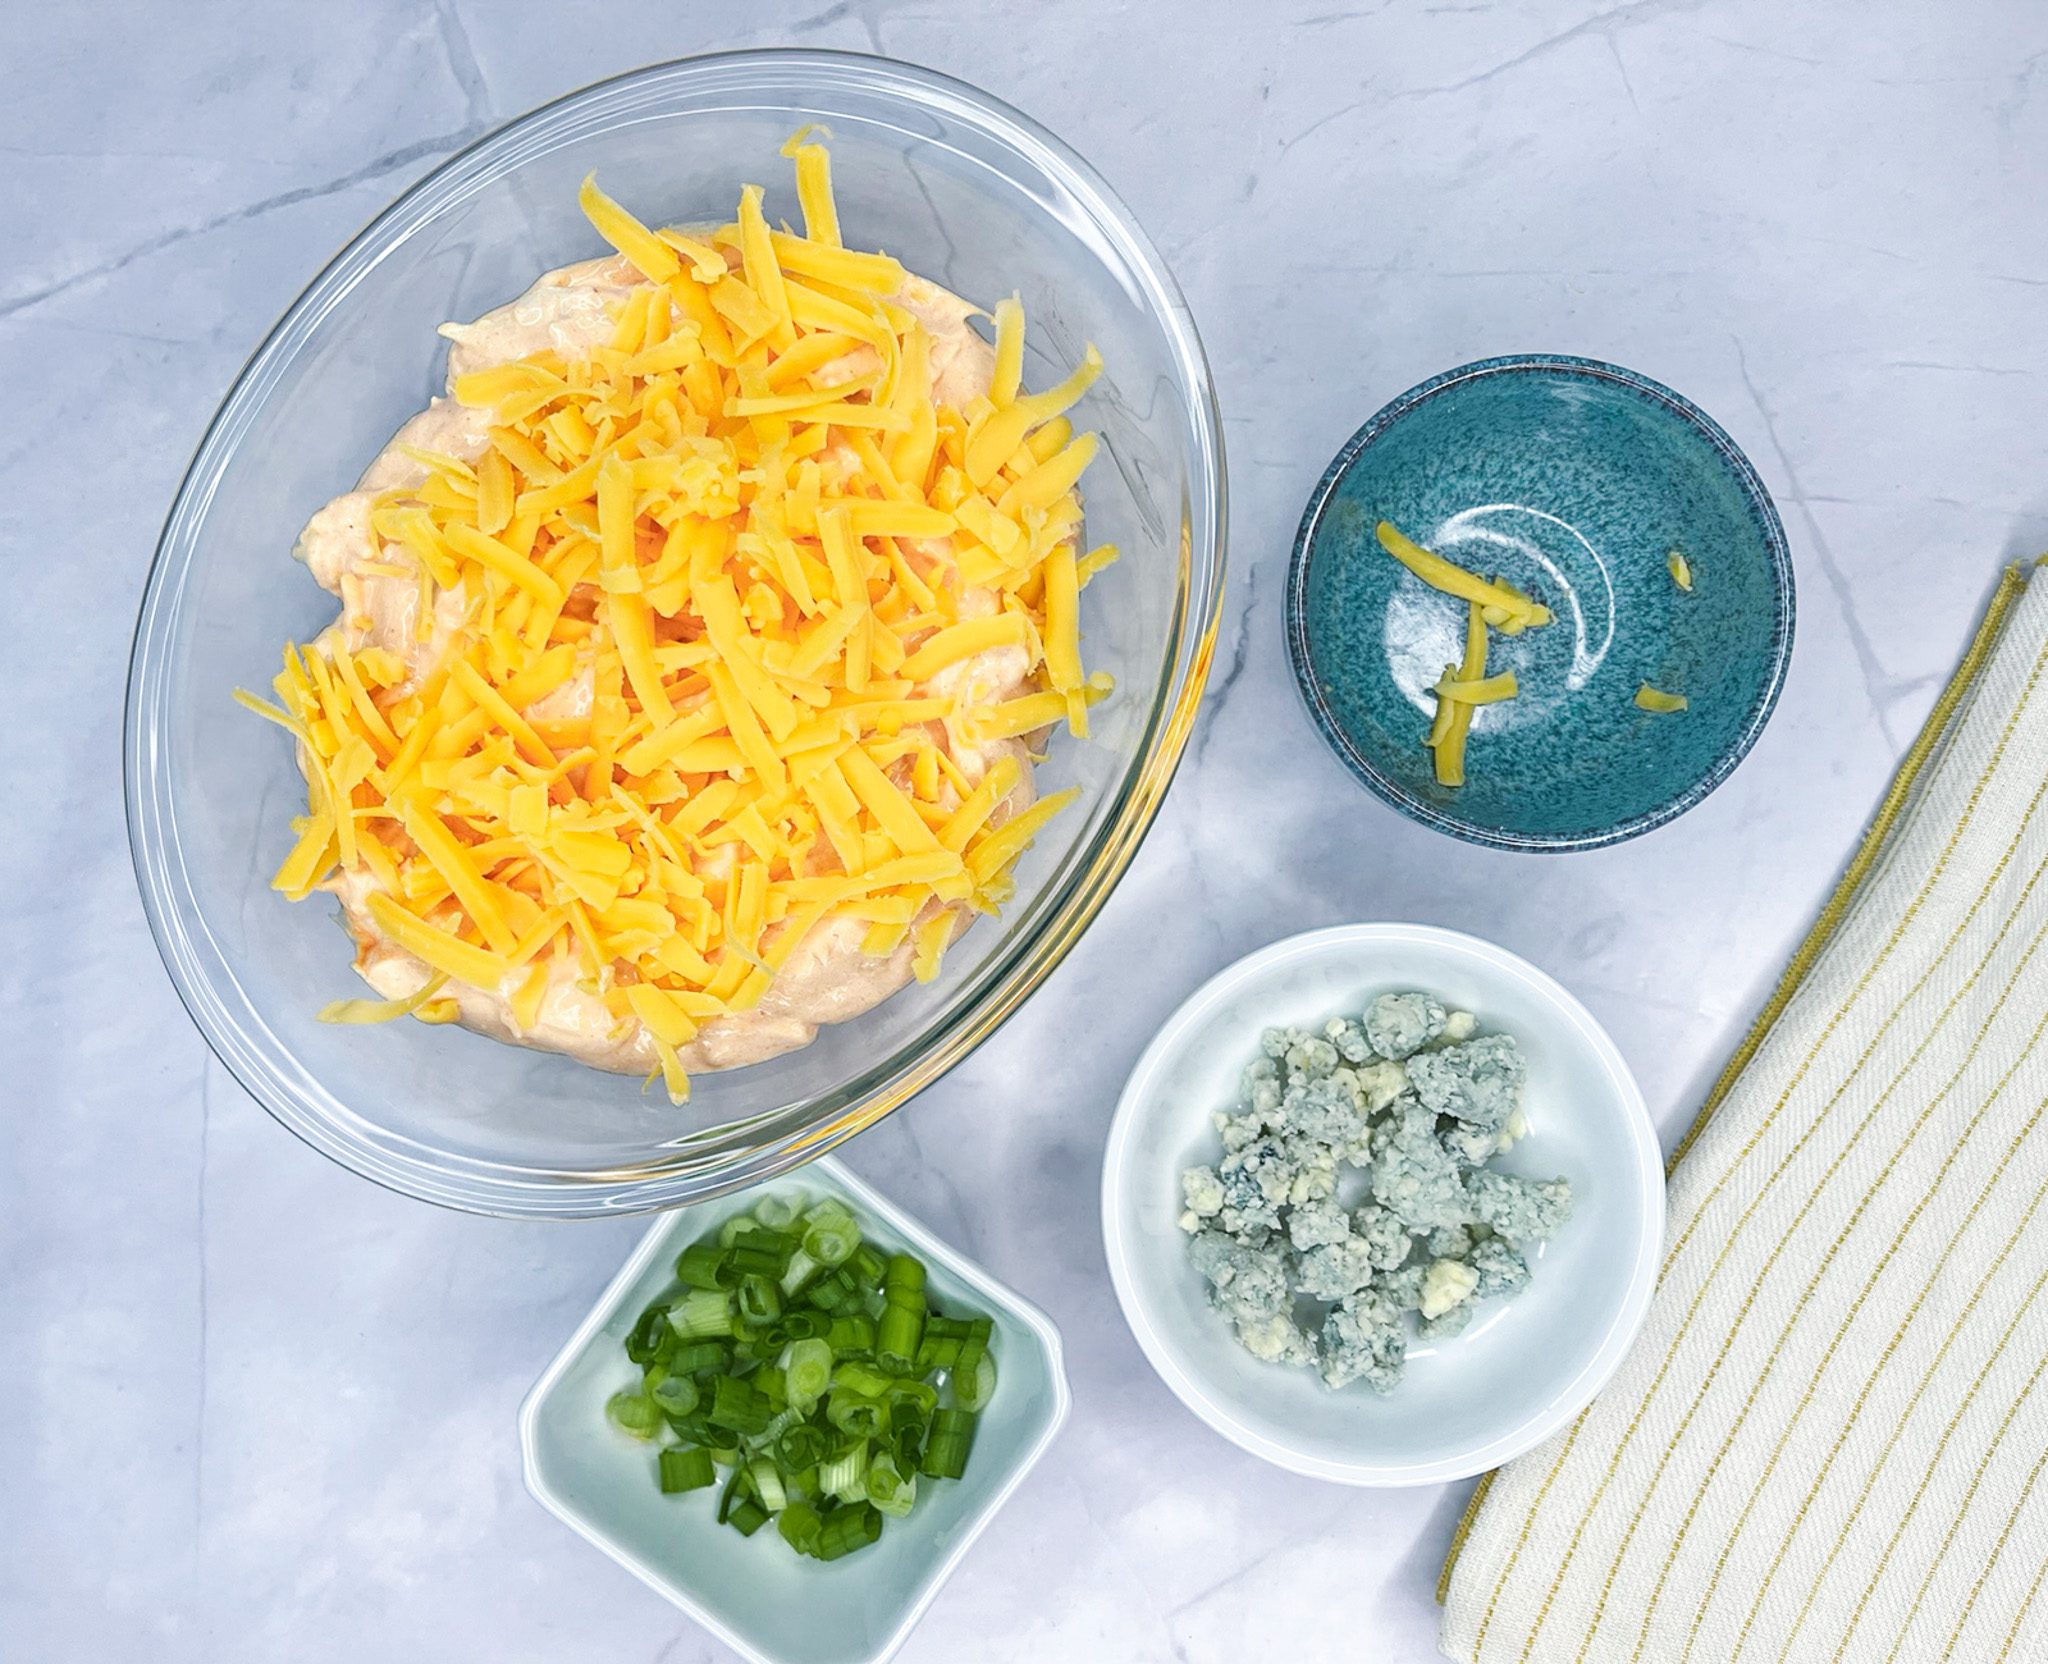
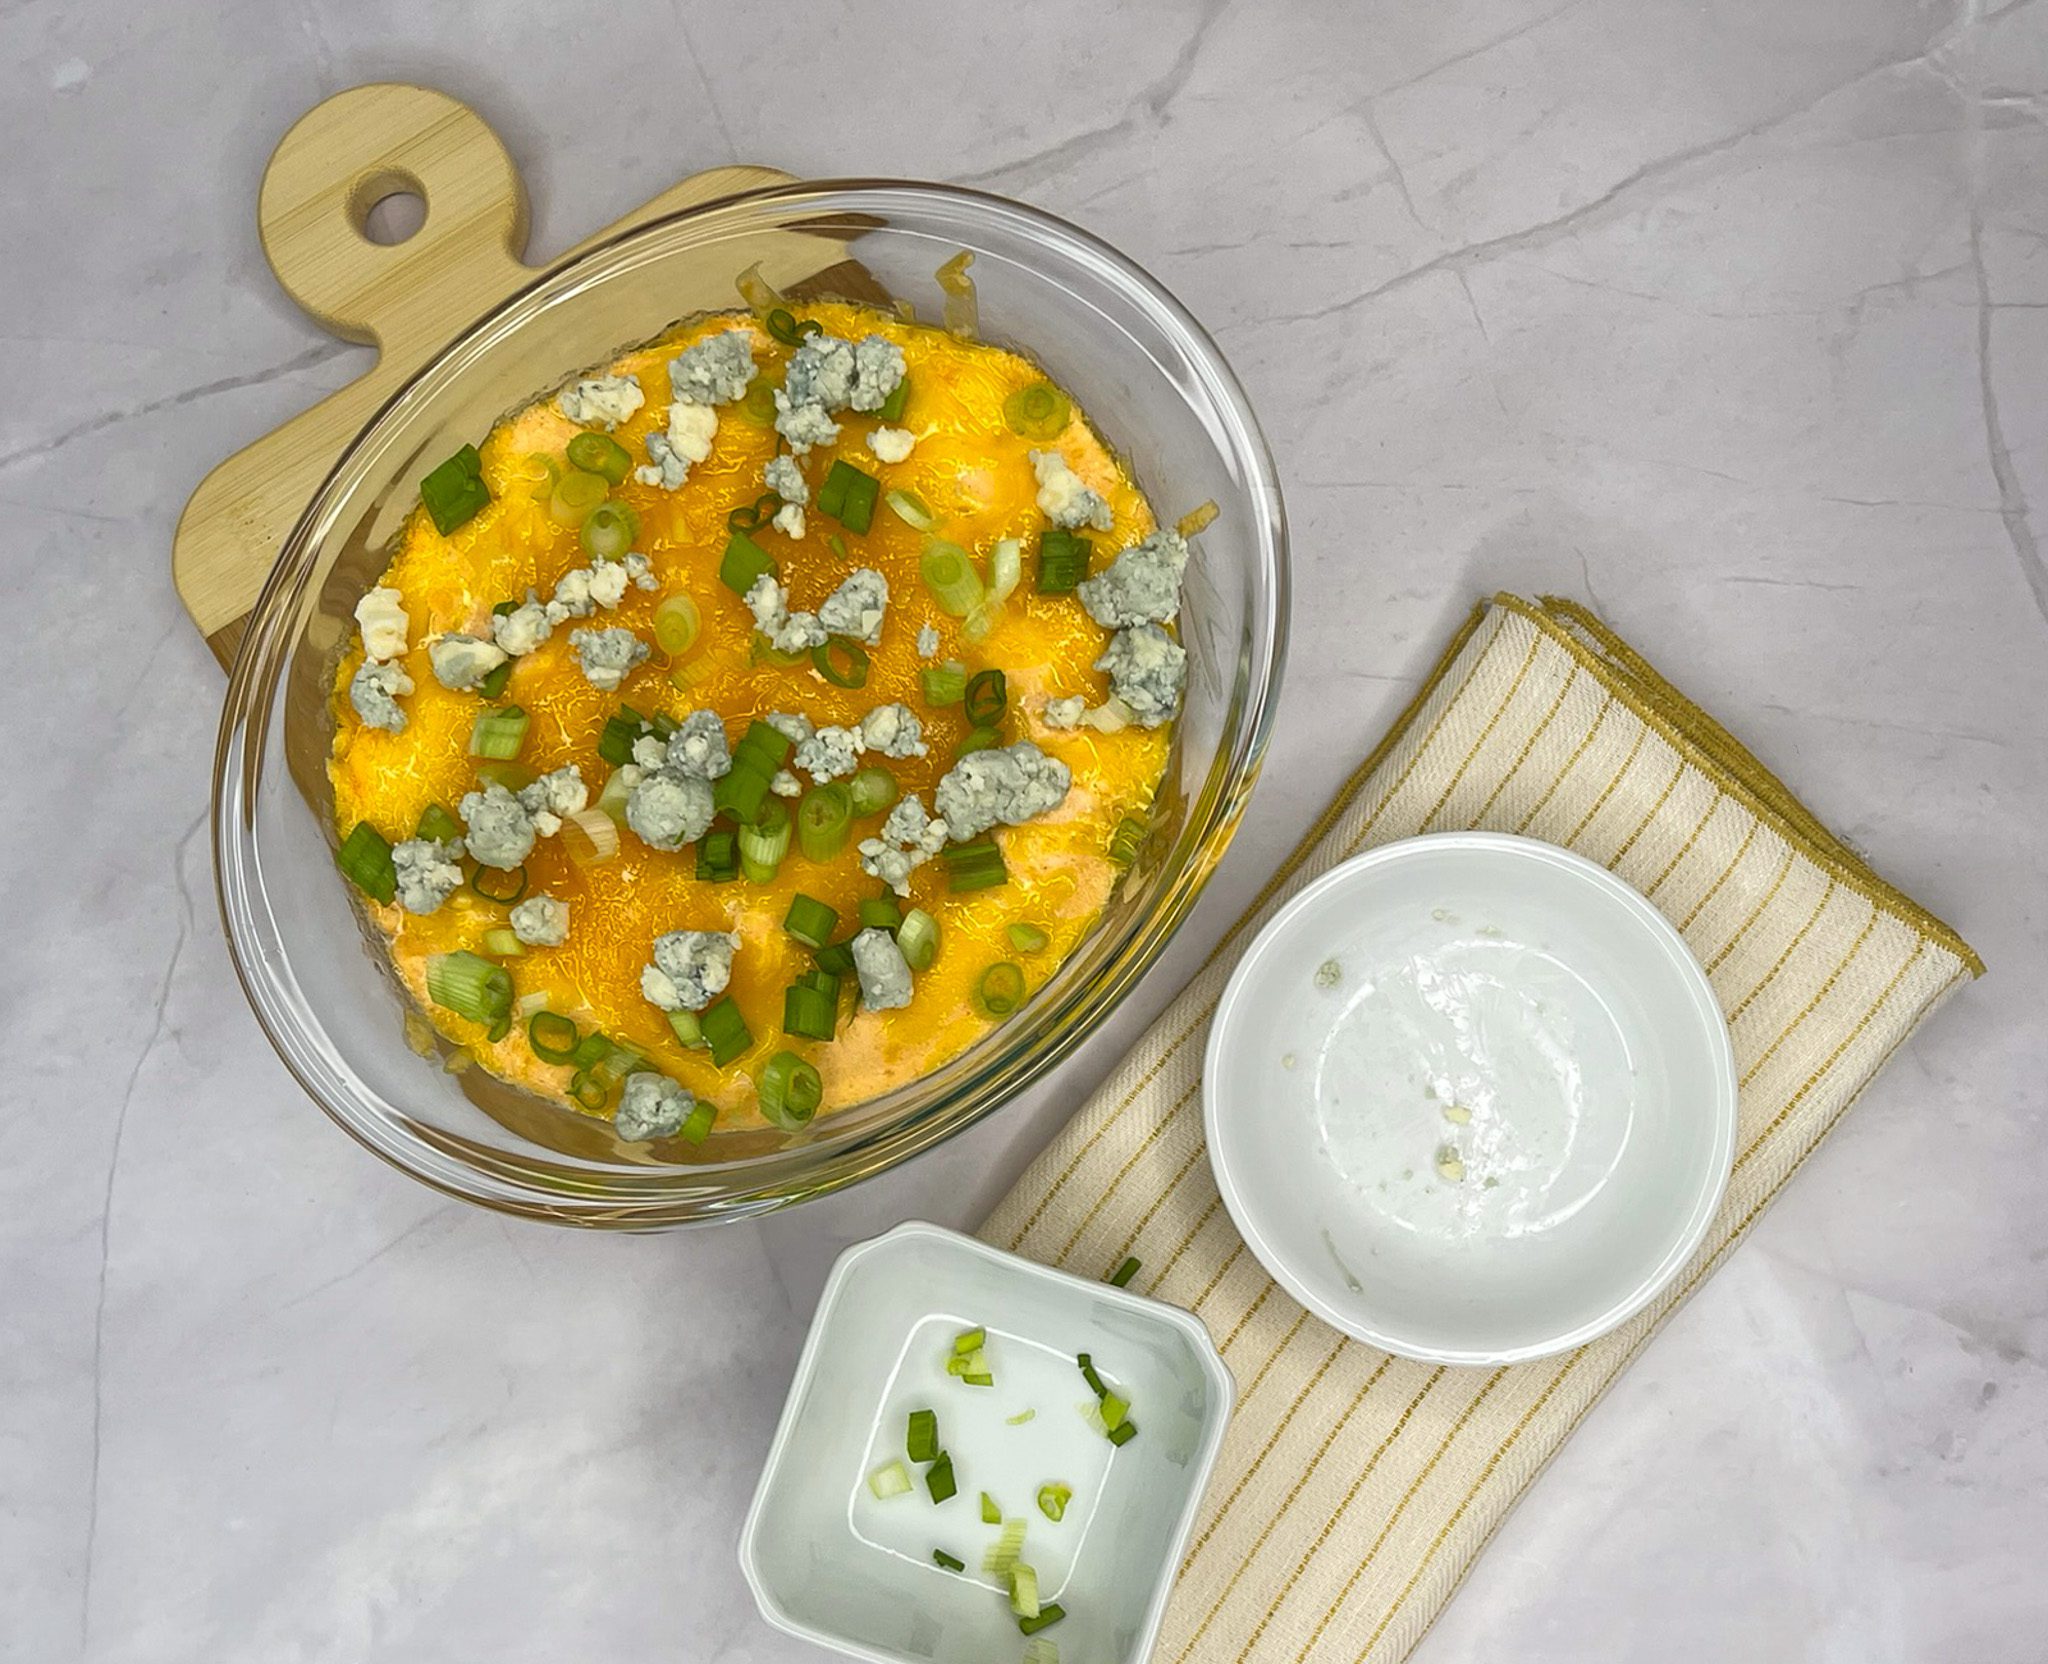
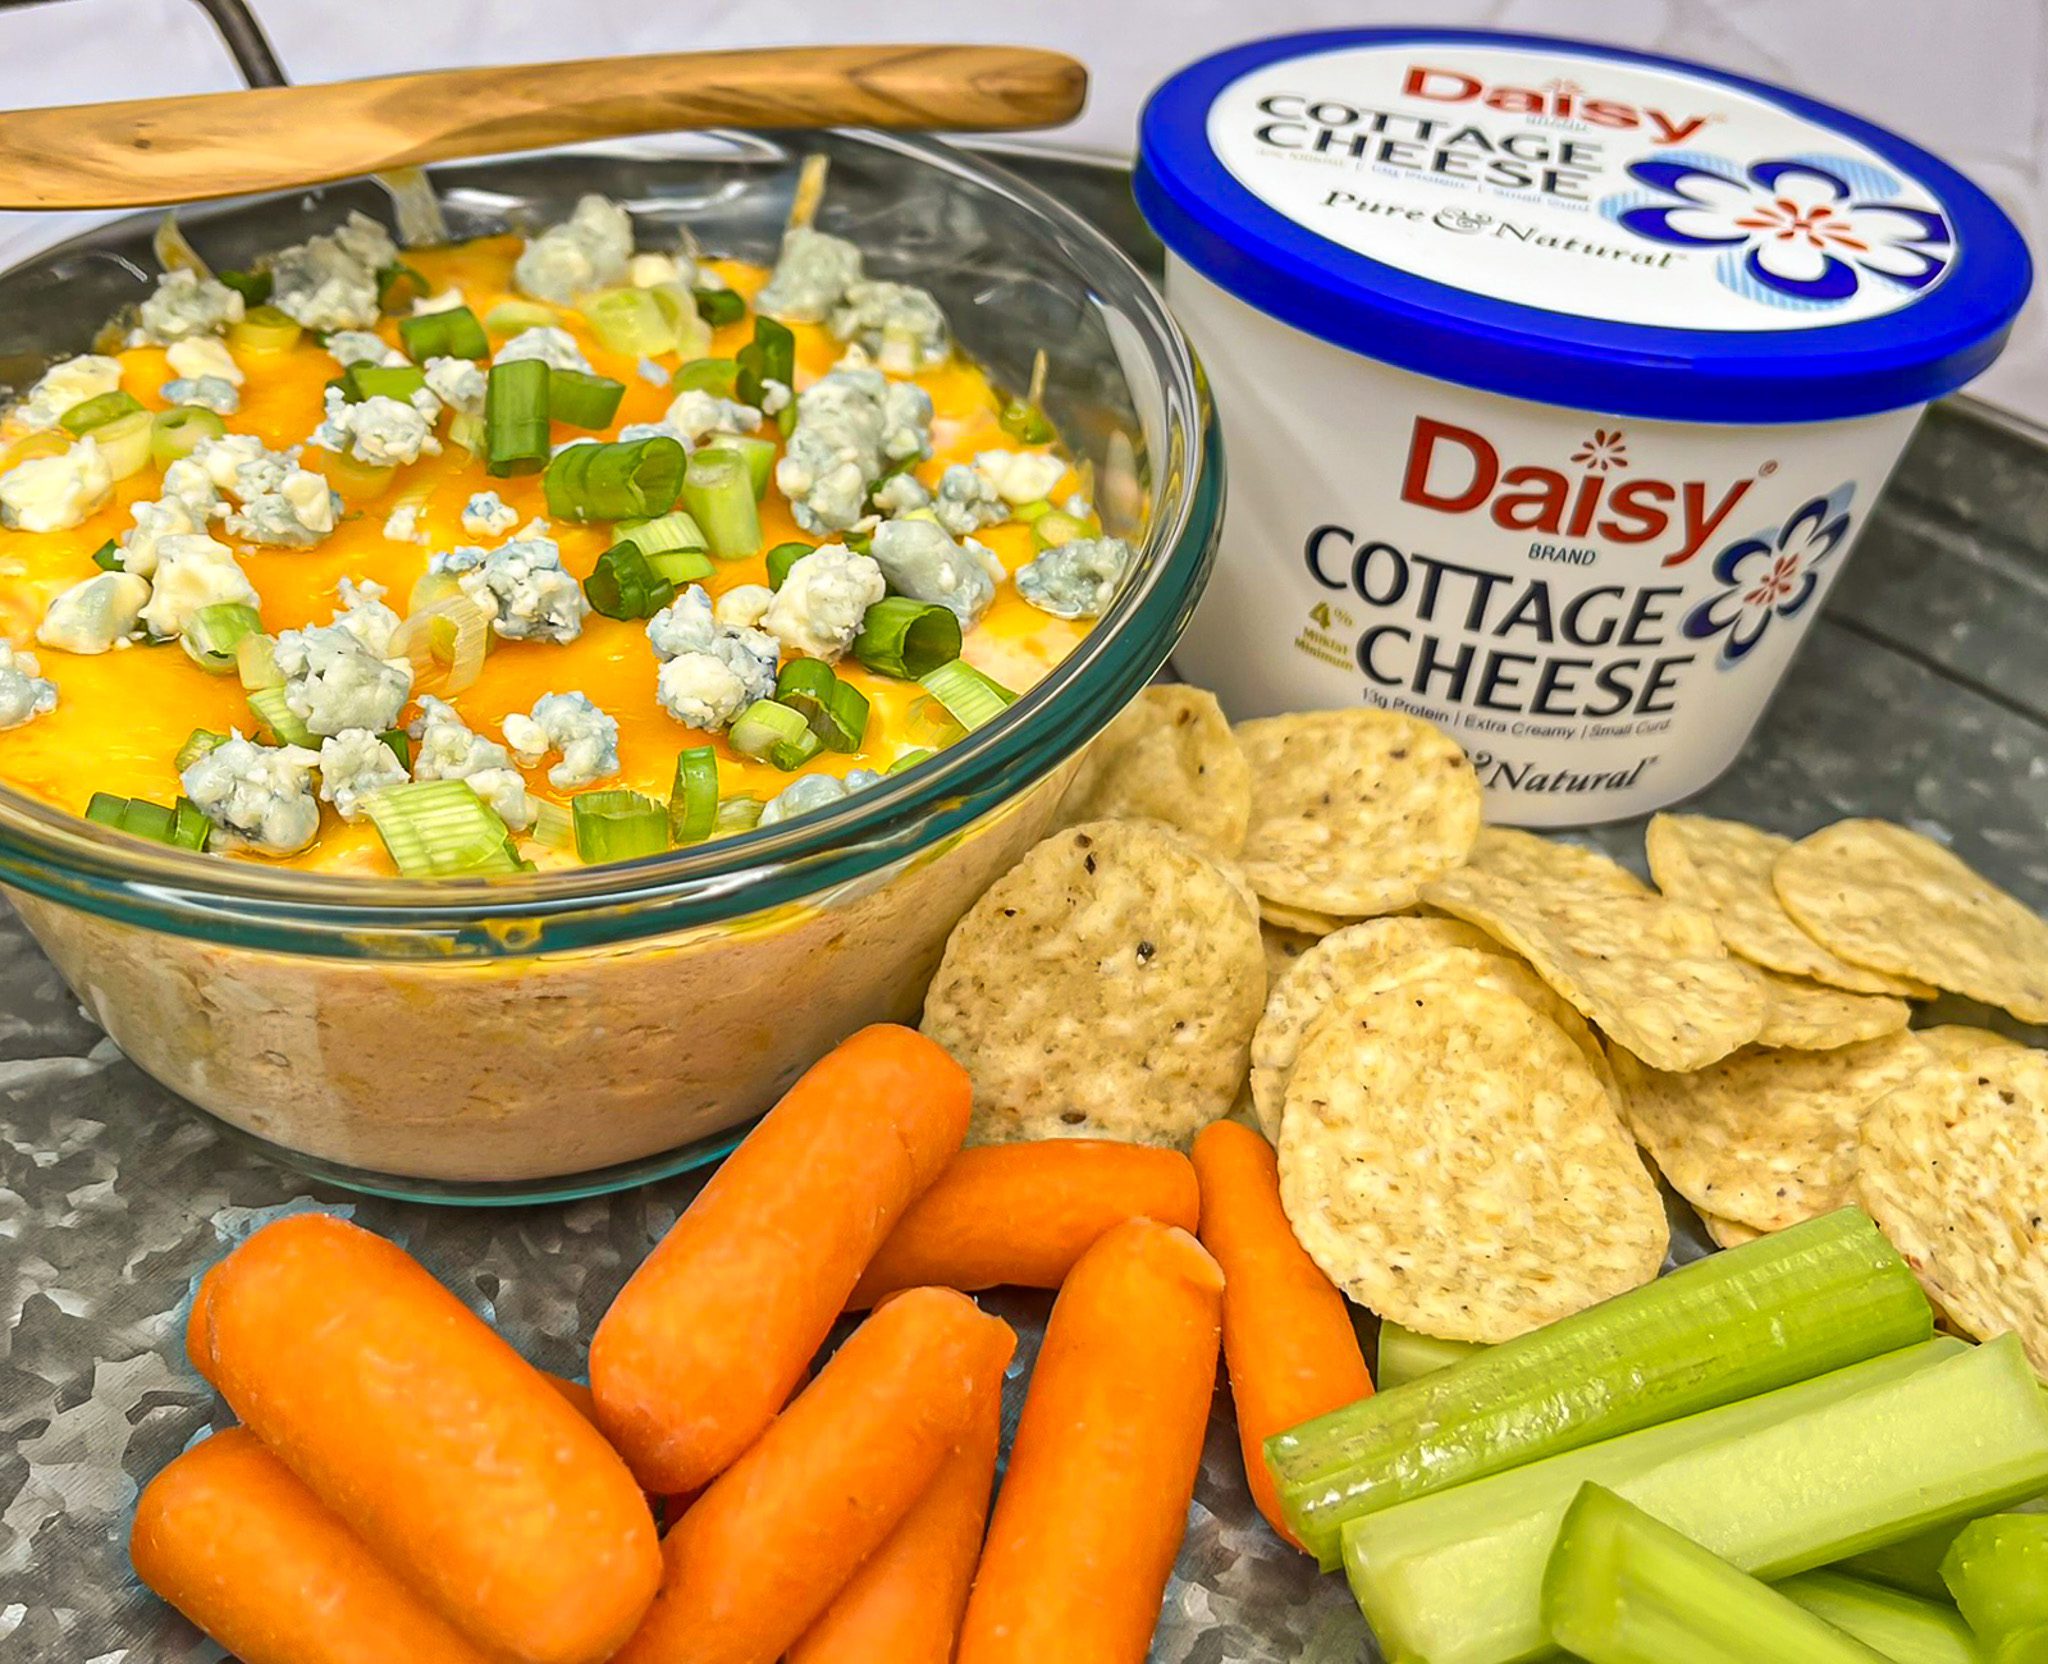
Lighter Buffalo Chicken Dip
Lighter Chicken Buffalo Dip
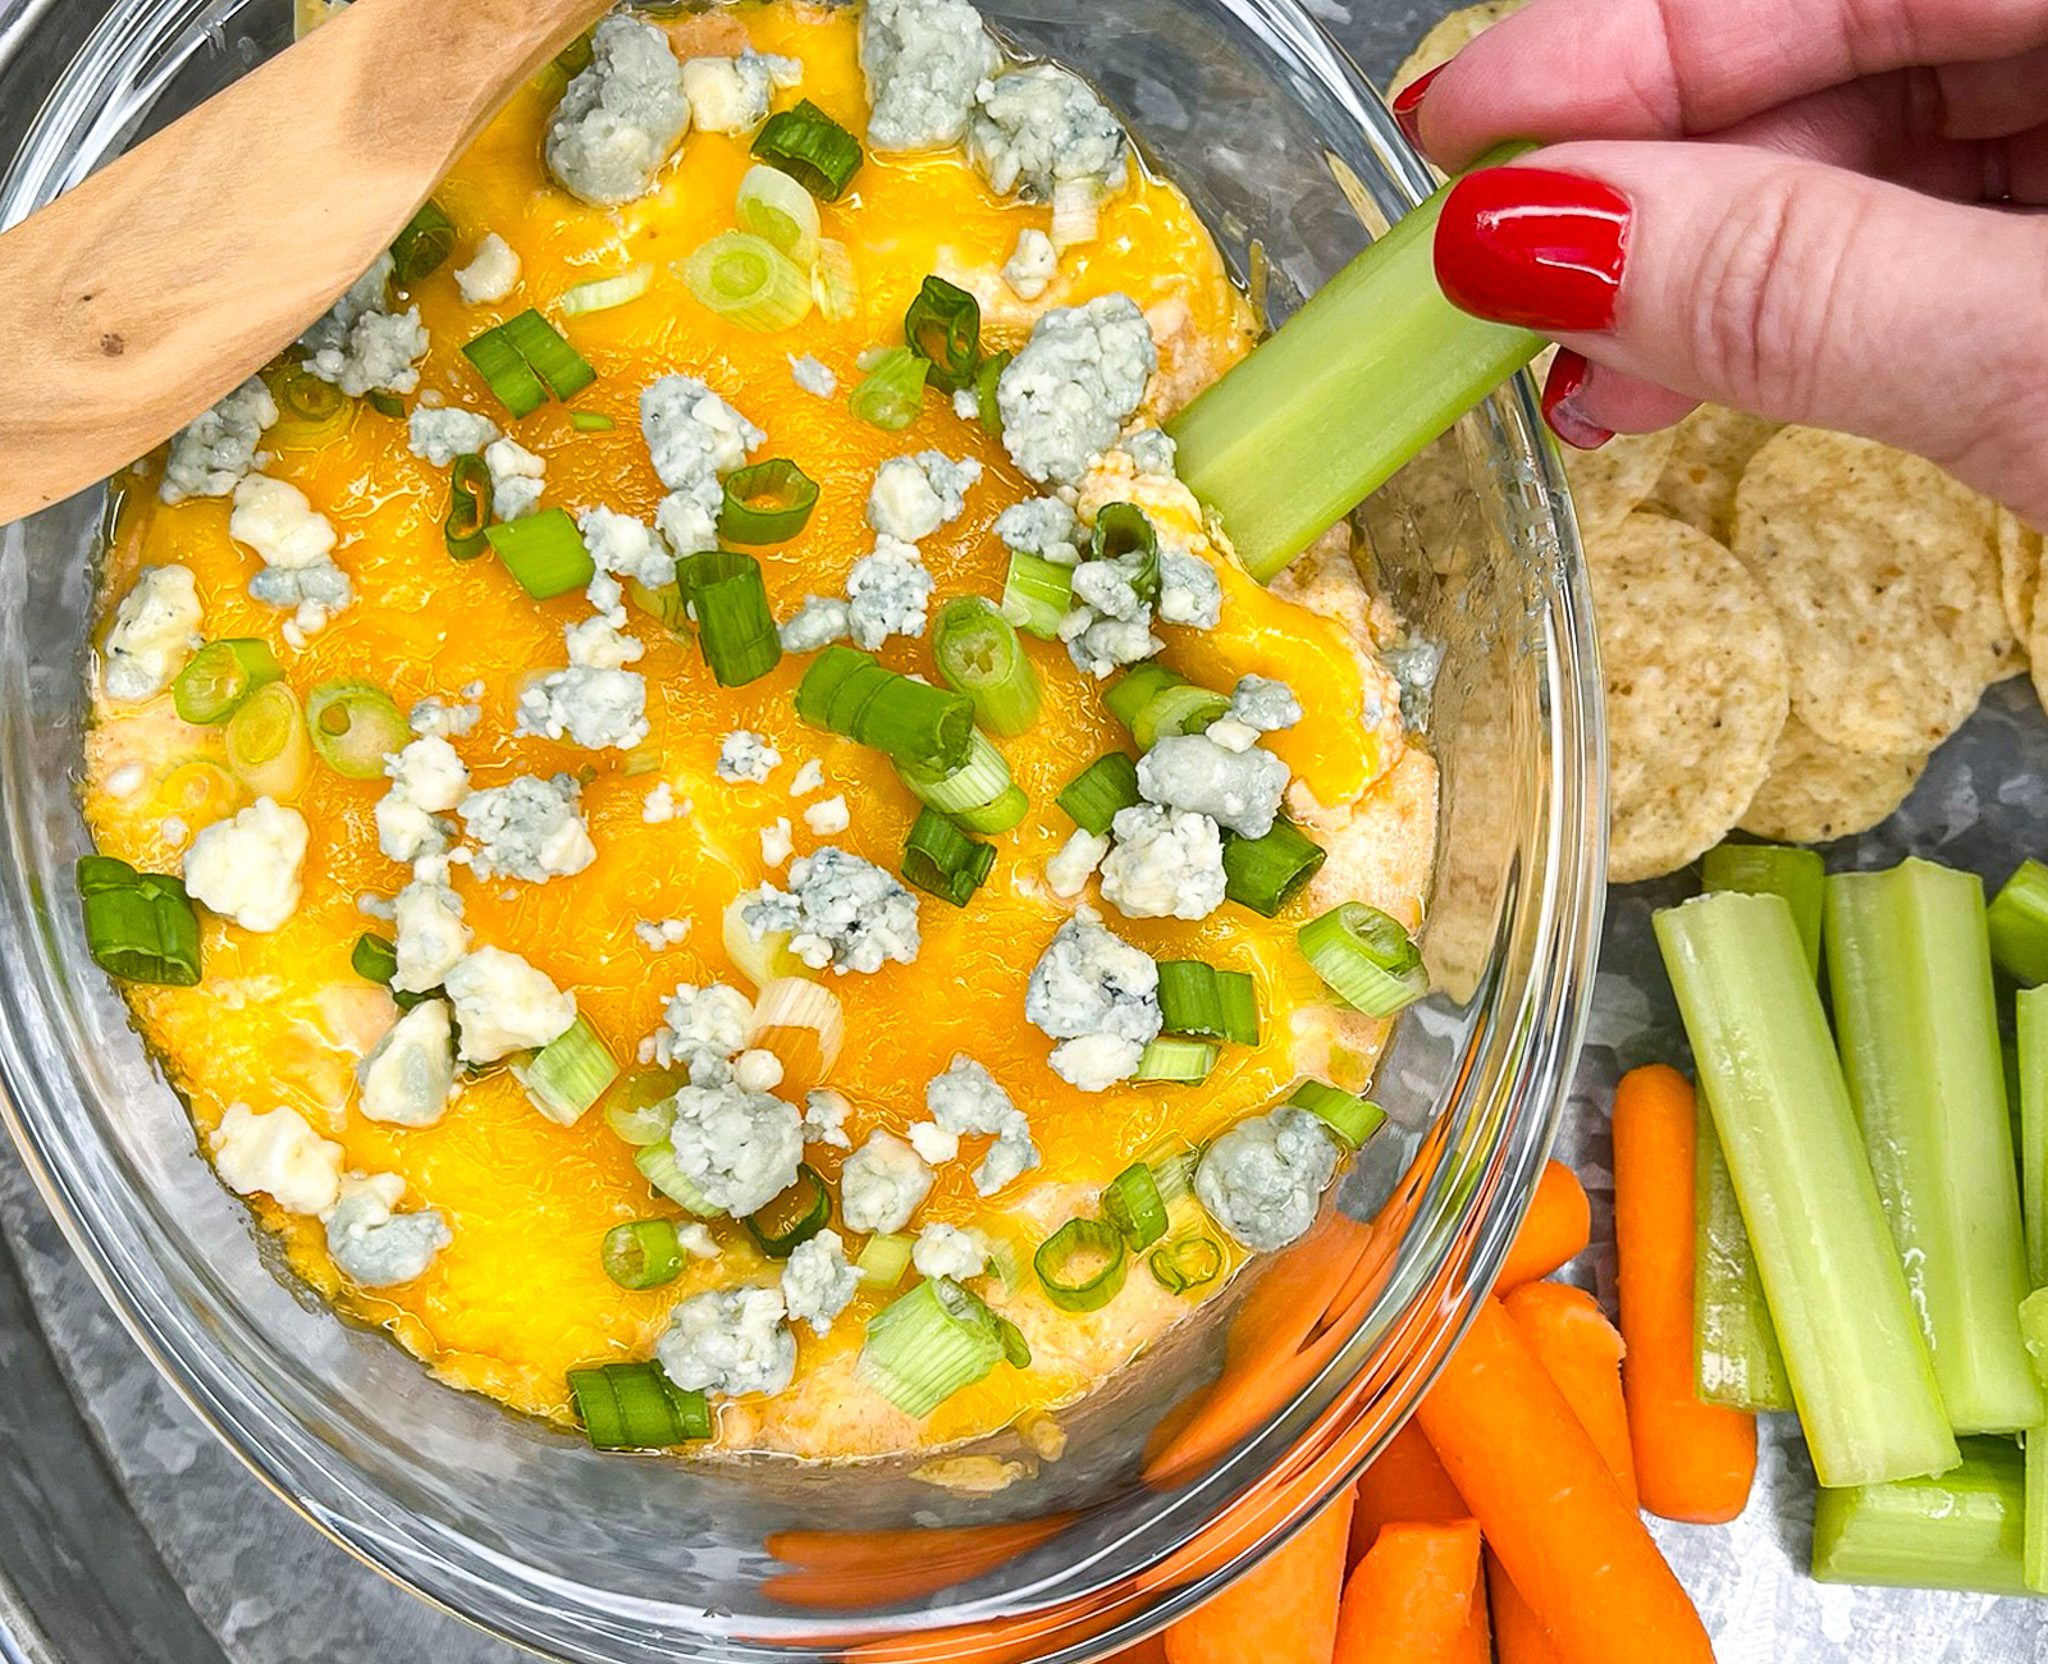
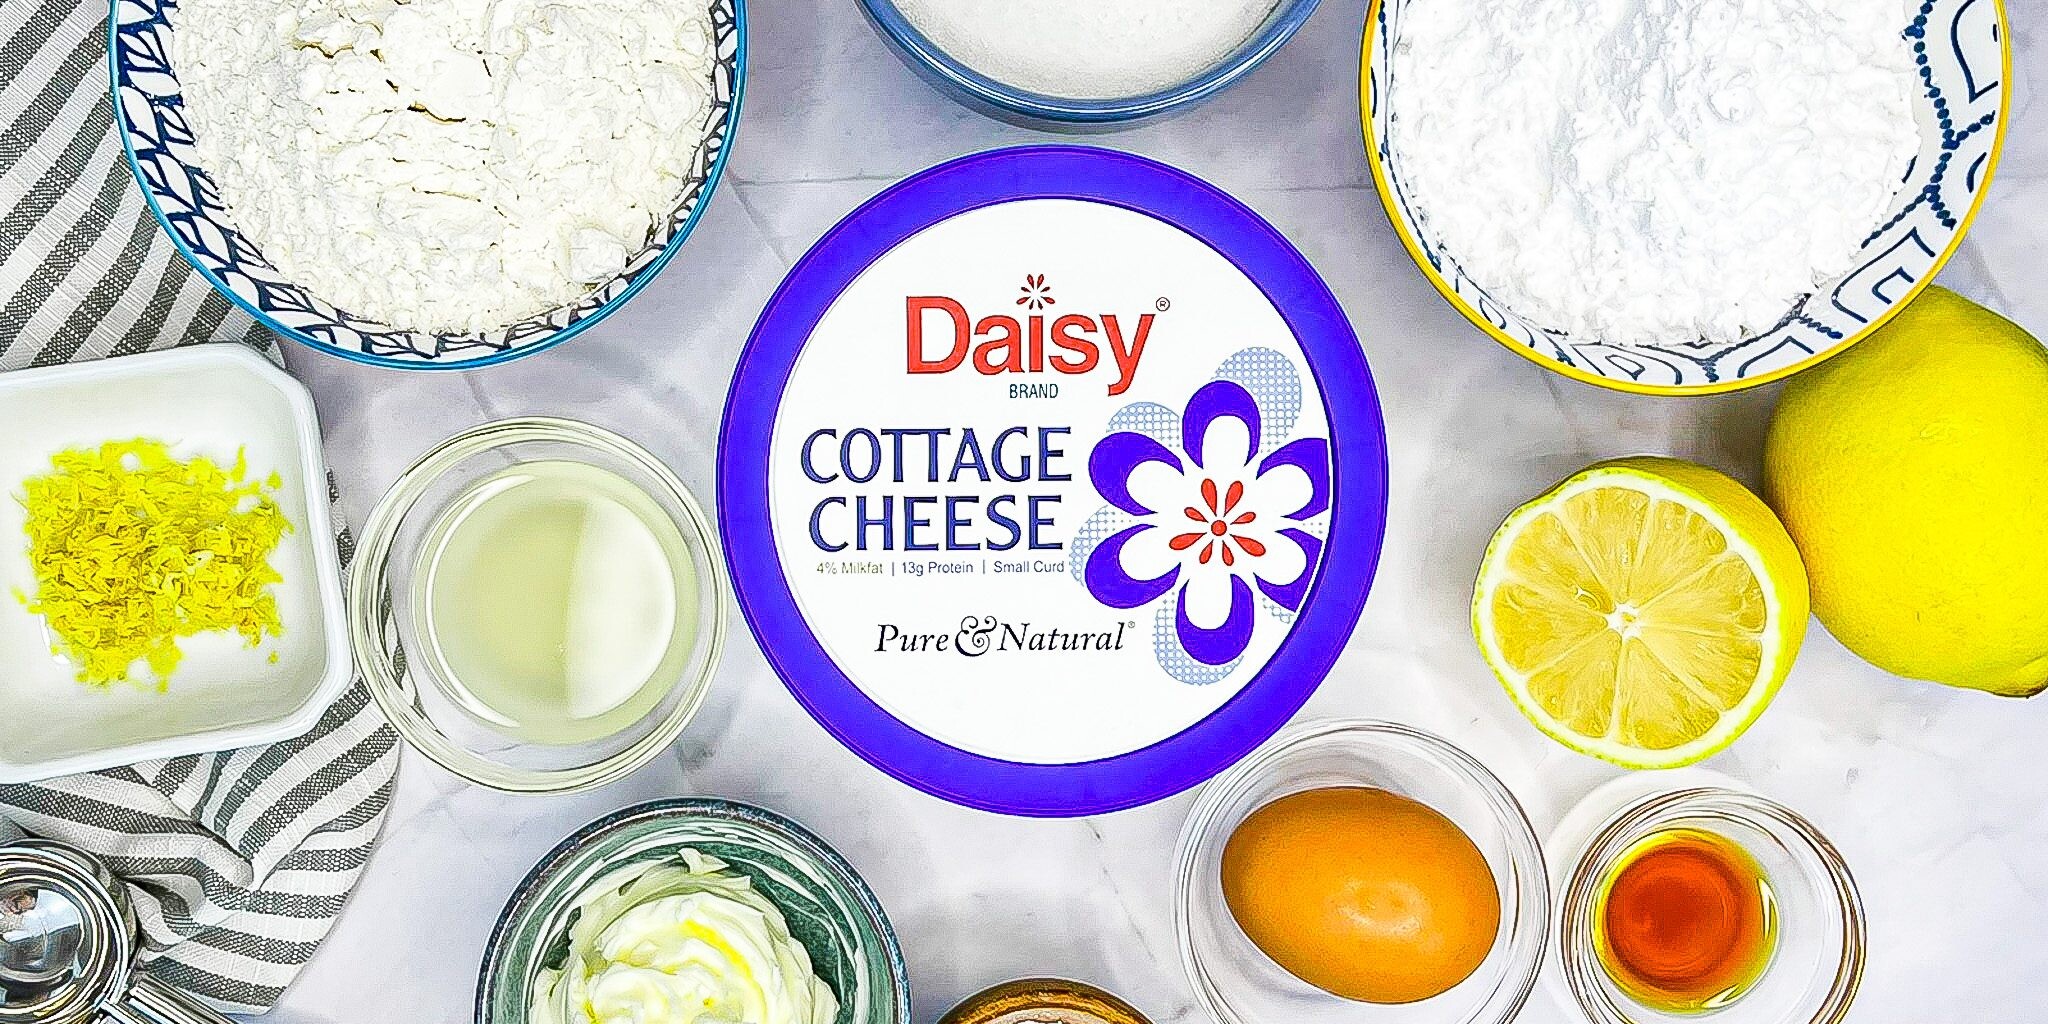
If you love classic buffalo chicken dip but want a lighter twist, this version made with Daisy Cottage Cheese is about to be your new favorite. It’s creamy, cheesy, and packed with bold buffalo flavor, just a little lighter and higher in protein than the traditional version.
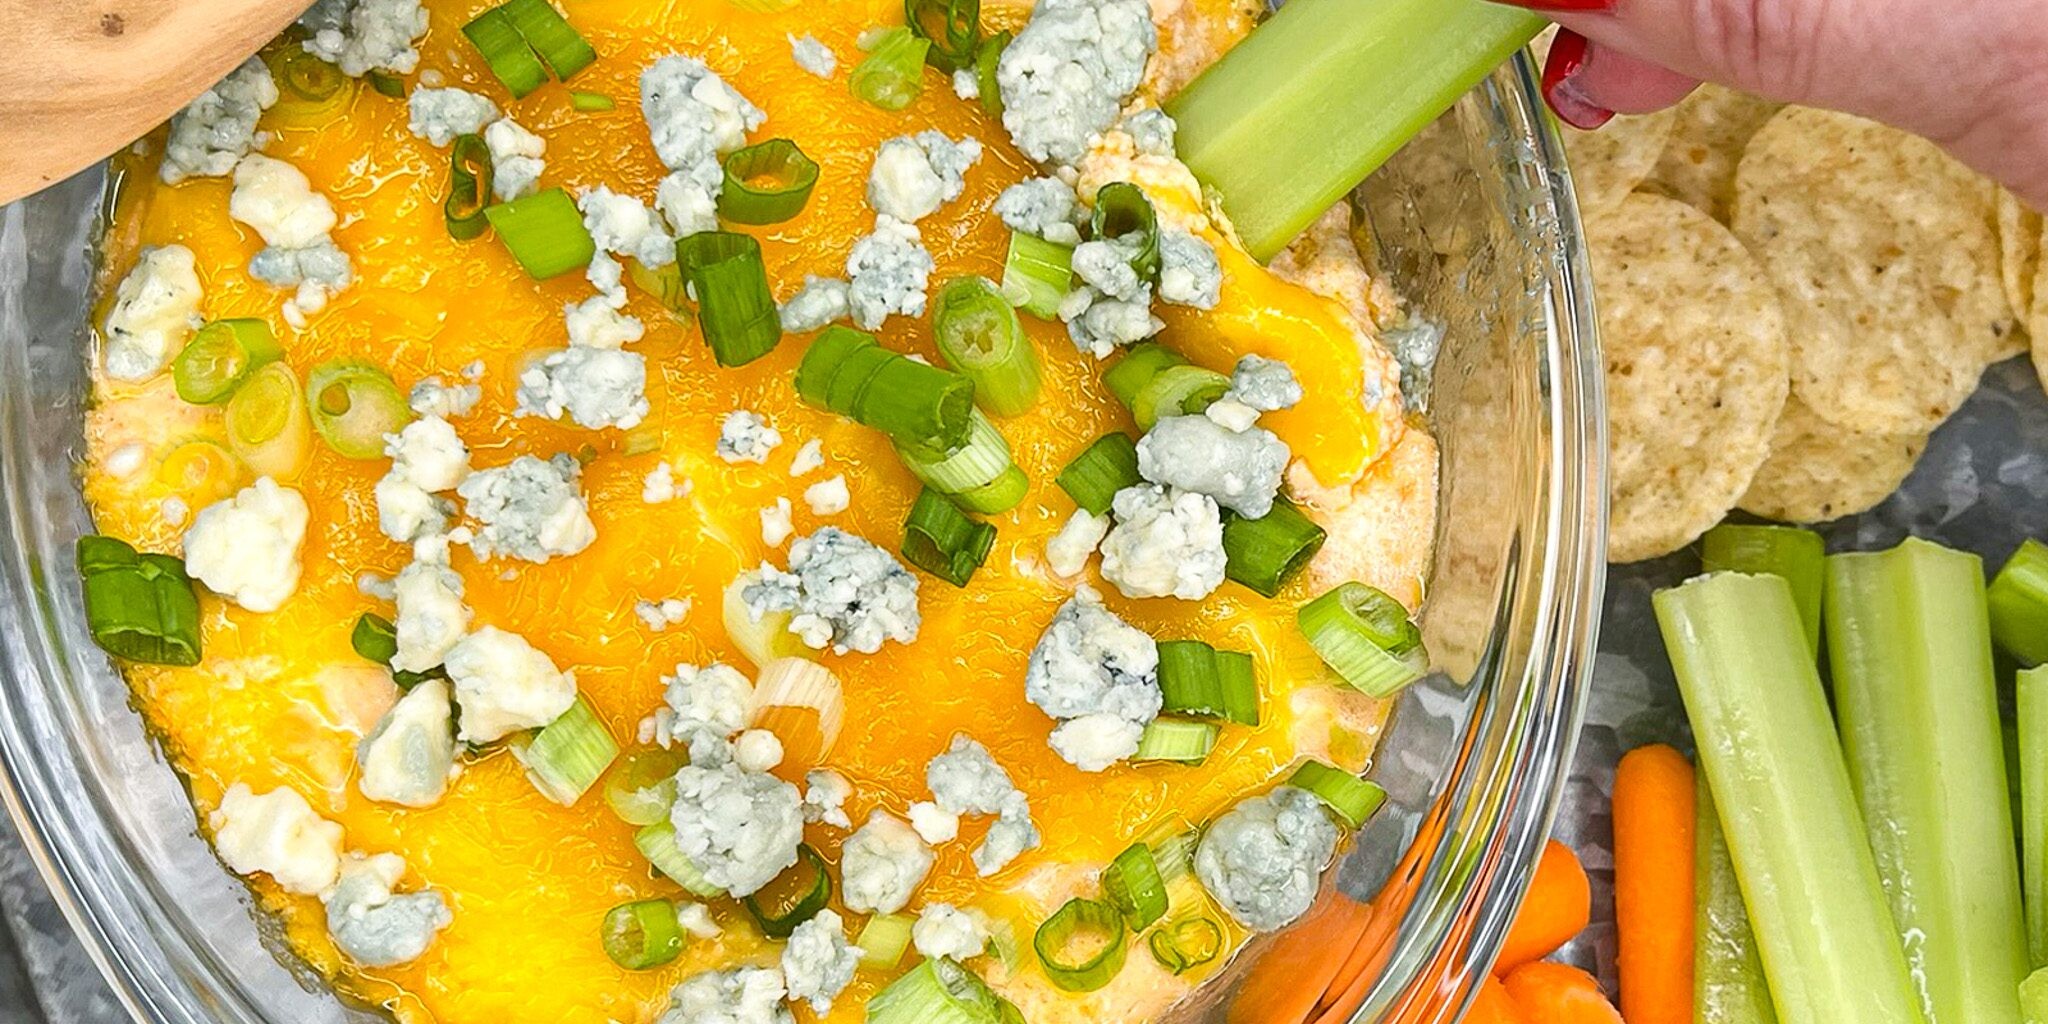
Blended until smooth, Daisy Cottage Cheese creates a rich, velvety base that keeps the dip luscious without feeling heavy. Stir in shredded chicken, your favorite buffalo sauce, and a sprinkle of cheese, then bake until hot and bubbly. The result? A crave-worthy dip that’s perfect for game day, parties, or anytime you’re in the mood for something spicy and satisfying.
Lighter Buffalo Chicken Dip Ingredients
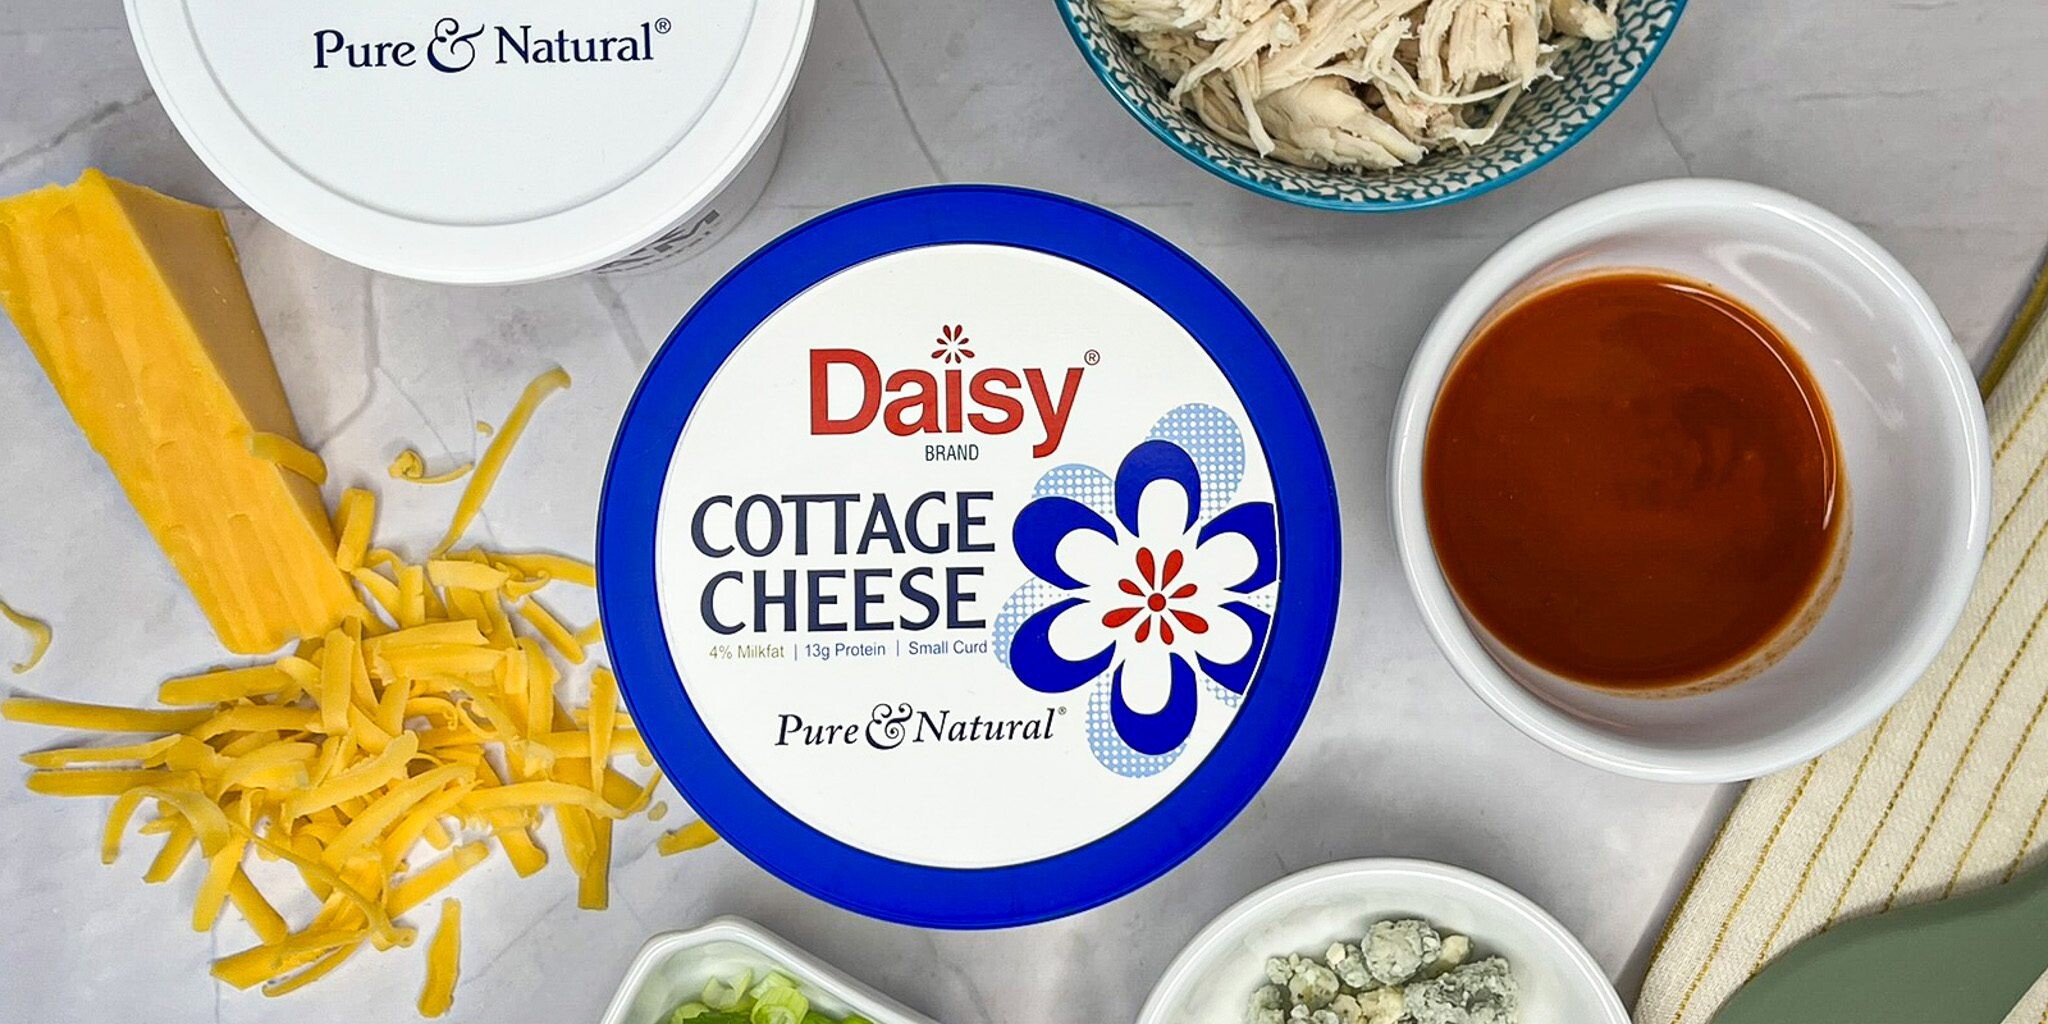
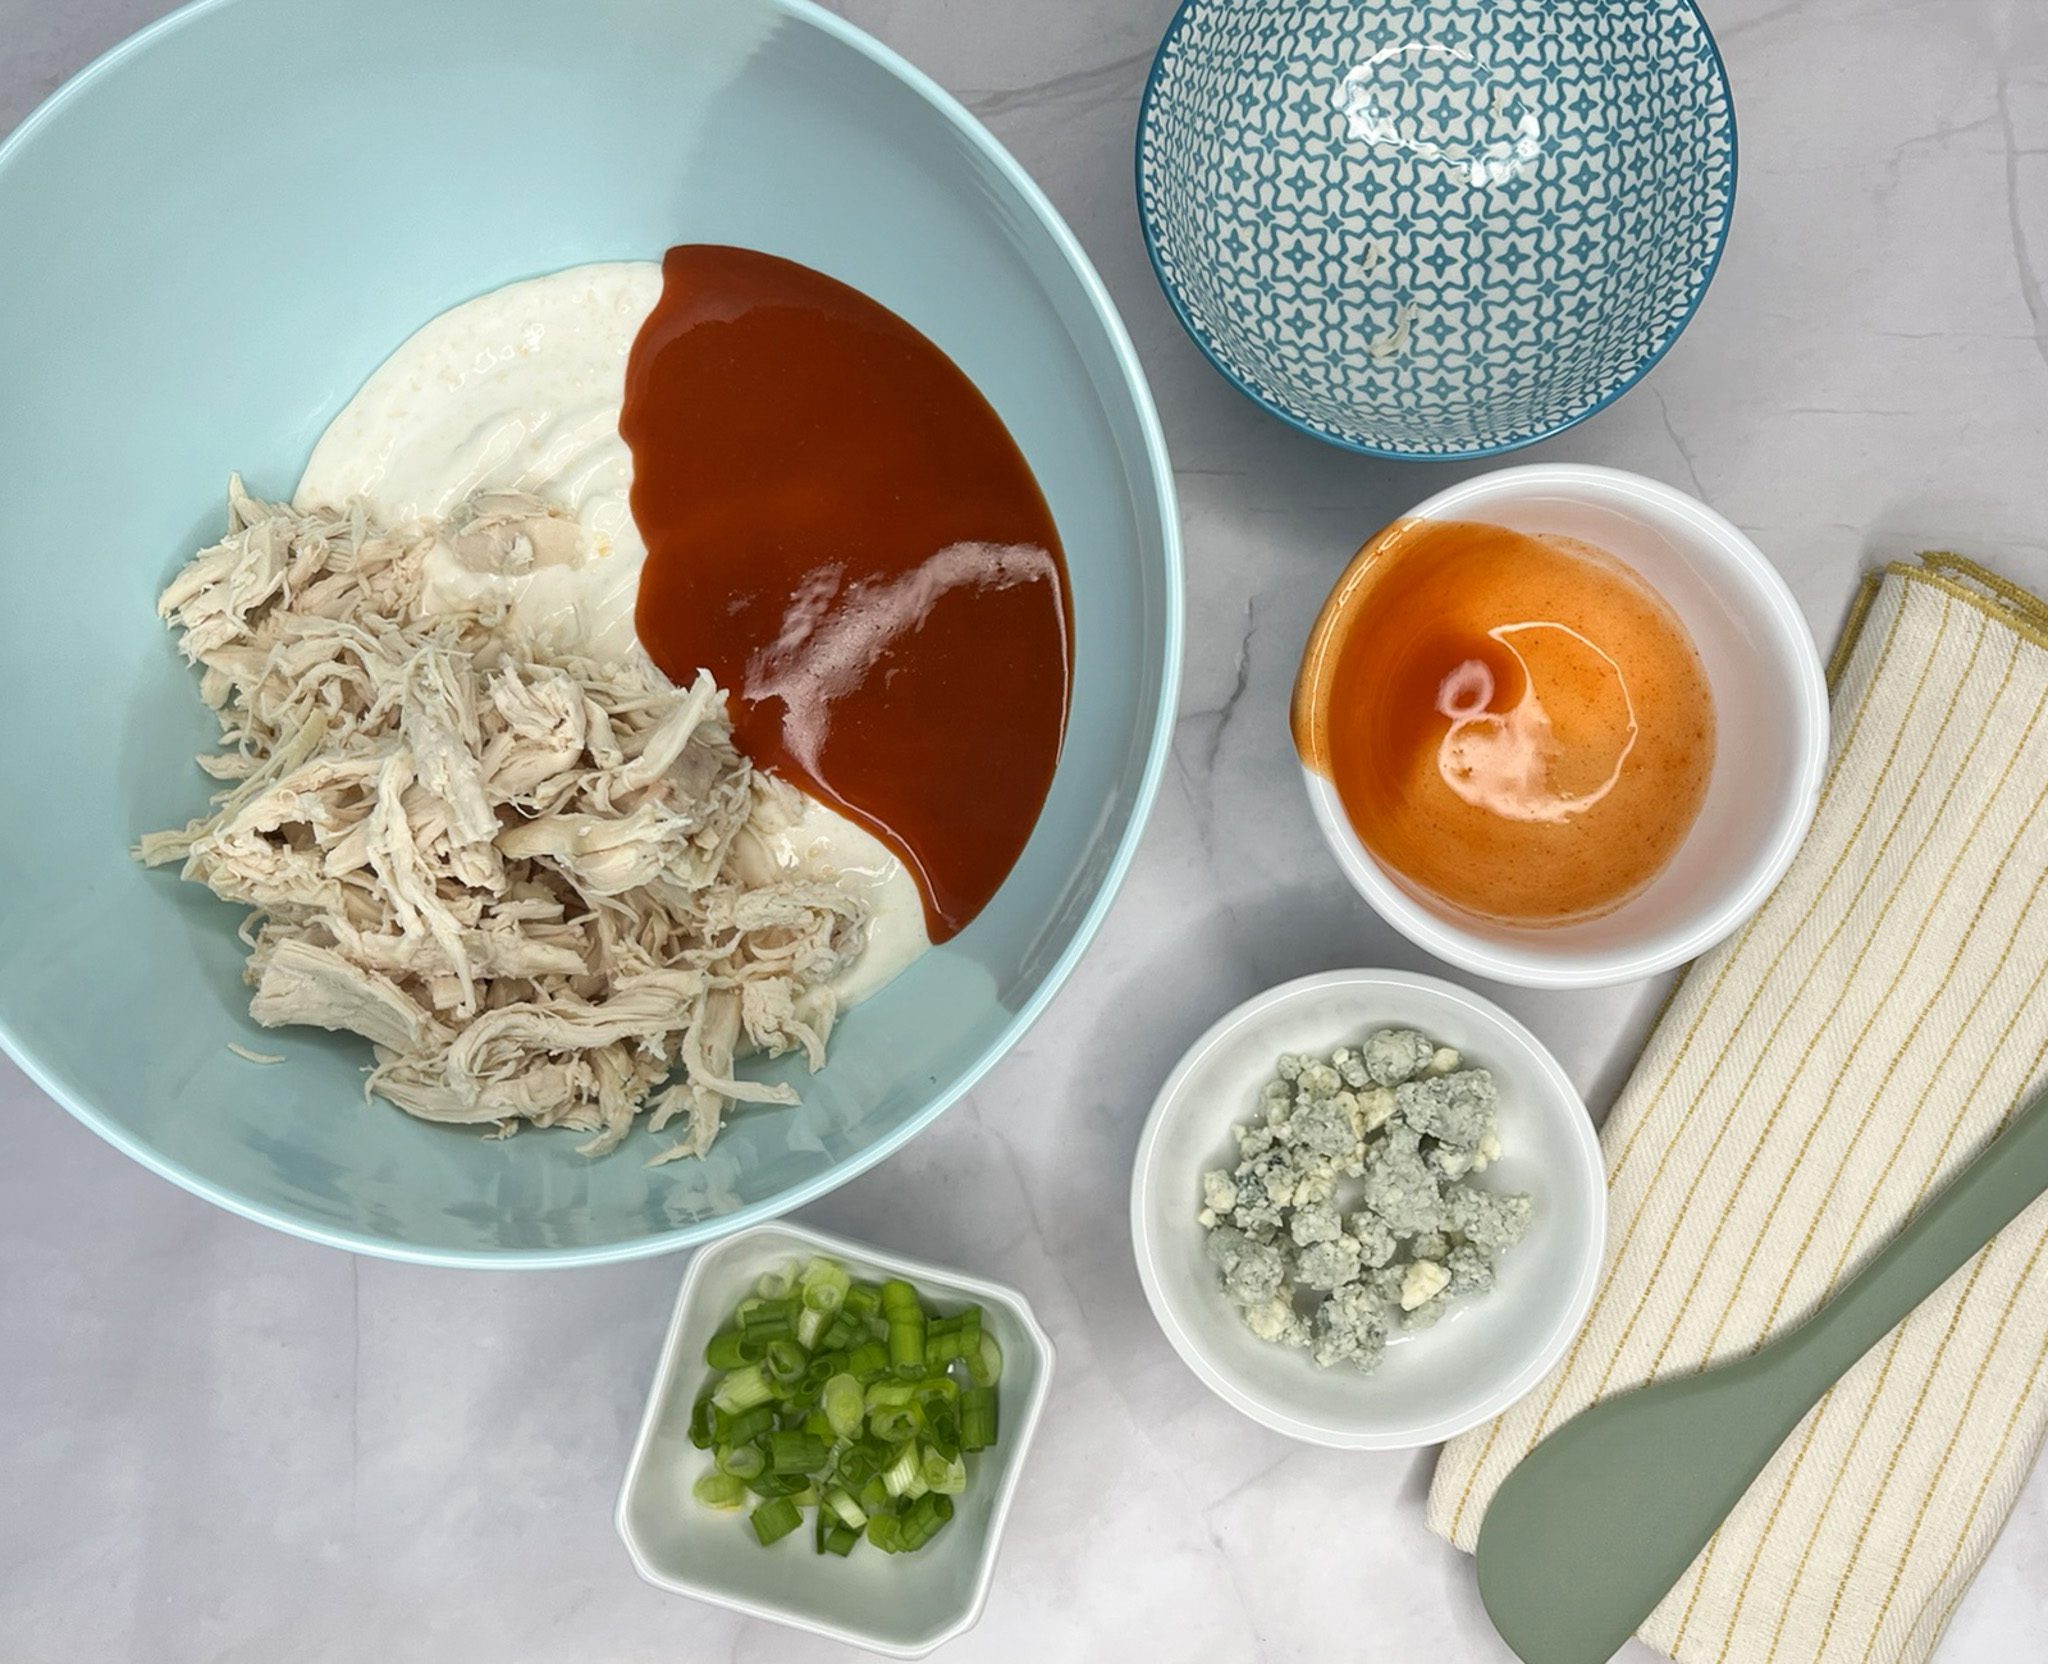
- Daisy Cottage Cheese (3/4 cup): Creates the creamy, velvety base of the dip that adds a whopping 20 grams of protein.
- Shredded Cheddar (3/4 cup): Melts smoothly with a gooey, rich texture and a strong, savory, tangy flavor.
- Daisy Sour Cream (1/4 cup): Adds creaminess and just a hint of tang to the dip.
- Shredded, Cooked Chicken (1 cup): Adds the classic protein and flavor to the dip. Left-over rotisserie chicken works great for this recipe.
- Buffalo Sauce (1/4 cup): Adds the classic flavor to the dip. It’s tangy, spicy, and buttery. Feel free to add more or less depending on your taste.
- Blue Cheese (1 tablespoon): Adds a tangy, pungent flavor that cuts through the rich and spicy dip. It adds depth of flavor and balances out the heat from the Buffalo sauce.
- Diced Green Onions (1 teaspoon): Introduces a pop of color and a mild onion flavor.
Substitutions, Variations, and Tips
- While cheddar is the classic choice, feel free to switch things up with Monterey Jack, Pepper Jack, Gruyère, Fontina, Gouda, or Swiss. They all melt beautifully and bring their own delicious flavor.
- Short on time? Rotisserie chicken works perfectly here. You can also use any leftover shredded chicken or other cooked proteins you have on hand.
- Want to deepen the flavor? Add a few dashes of chipotle hot sauce for smoky heat or a swirl of sriracha for a fun twist.
- Not a fan of blue cheese? Try goat cheese or feta for a different tangy kick.
- No green onions? Fresh chives make a great substitute.
- For an extra boost of flavor, stir in ¼ teaspoon of garlic powder or celery salt.
- Love a little texture? Sprinkle toasted breadcrumbs or crushed butter crackers over the top before baking. You can also fold in a few tablespoons of diced celery for a fresh, crunchy bite.
- Have leftovers? Reheat gently in the microwave at 50% power in 30-second intervals, stirring between each, until warm and creamy again.

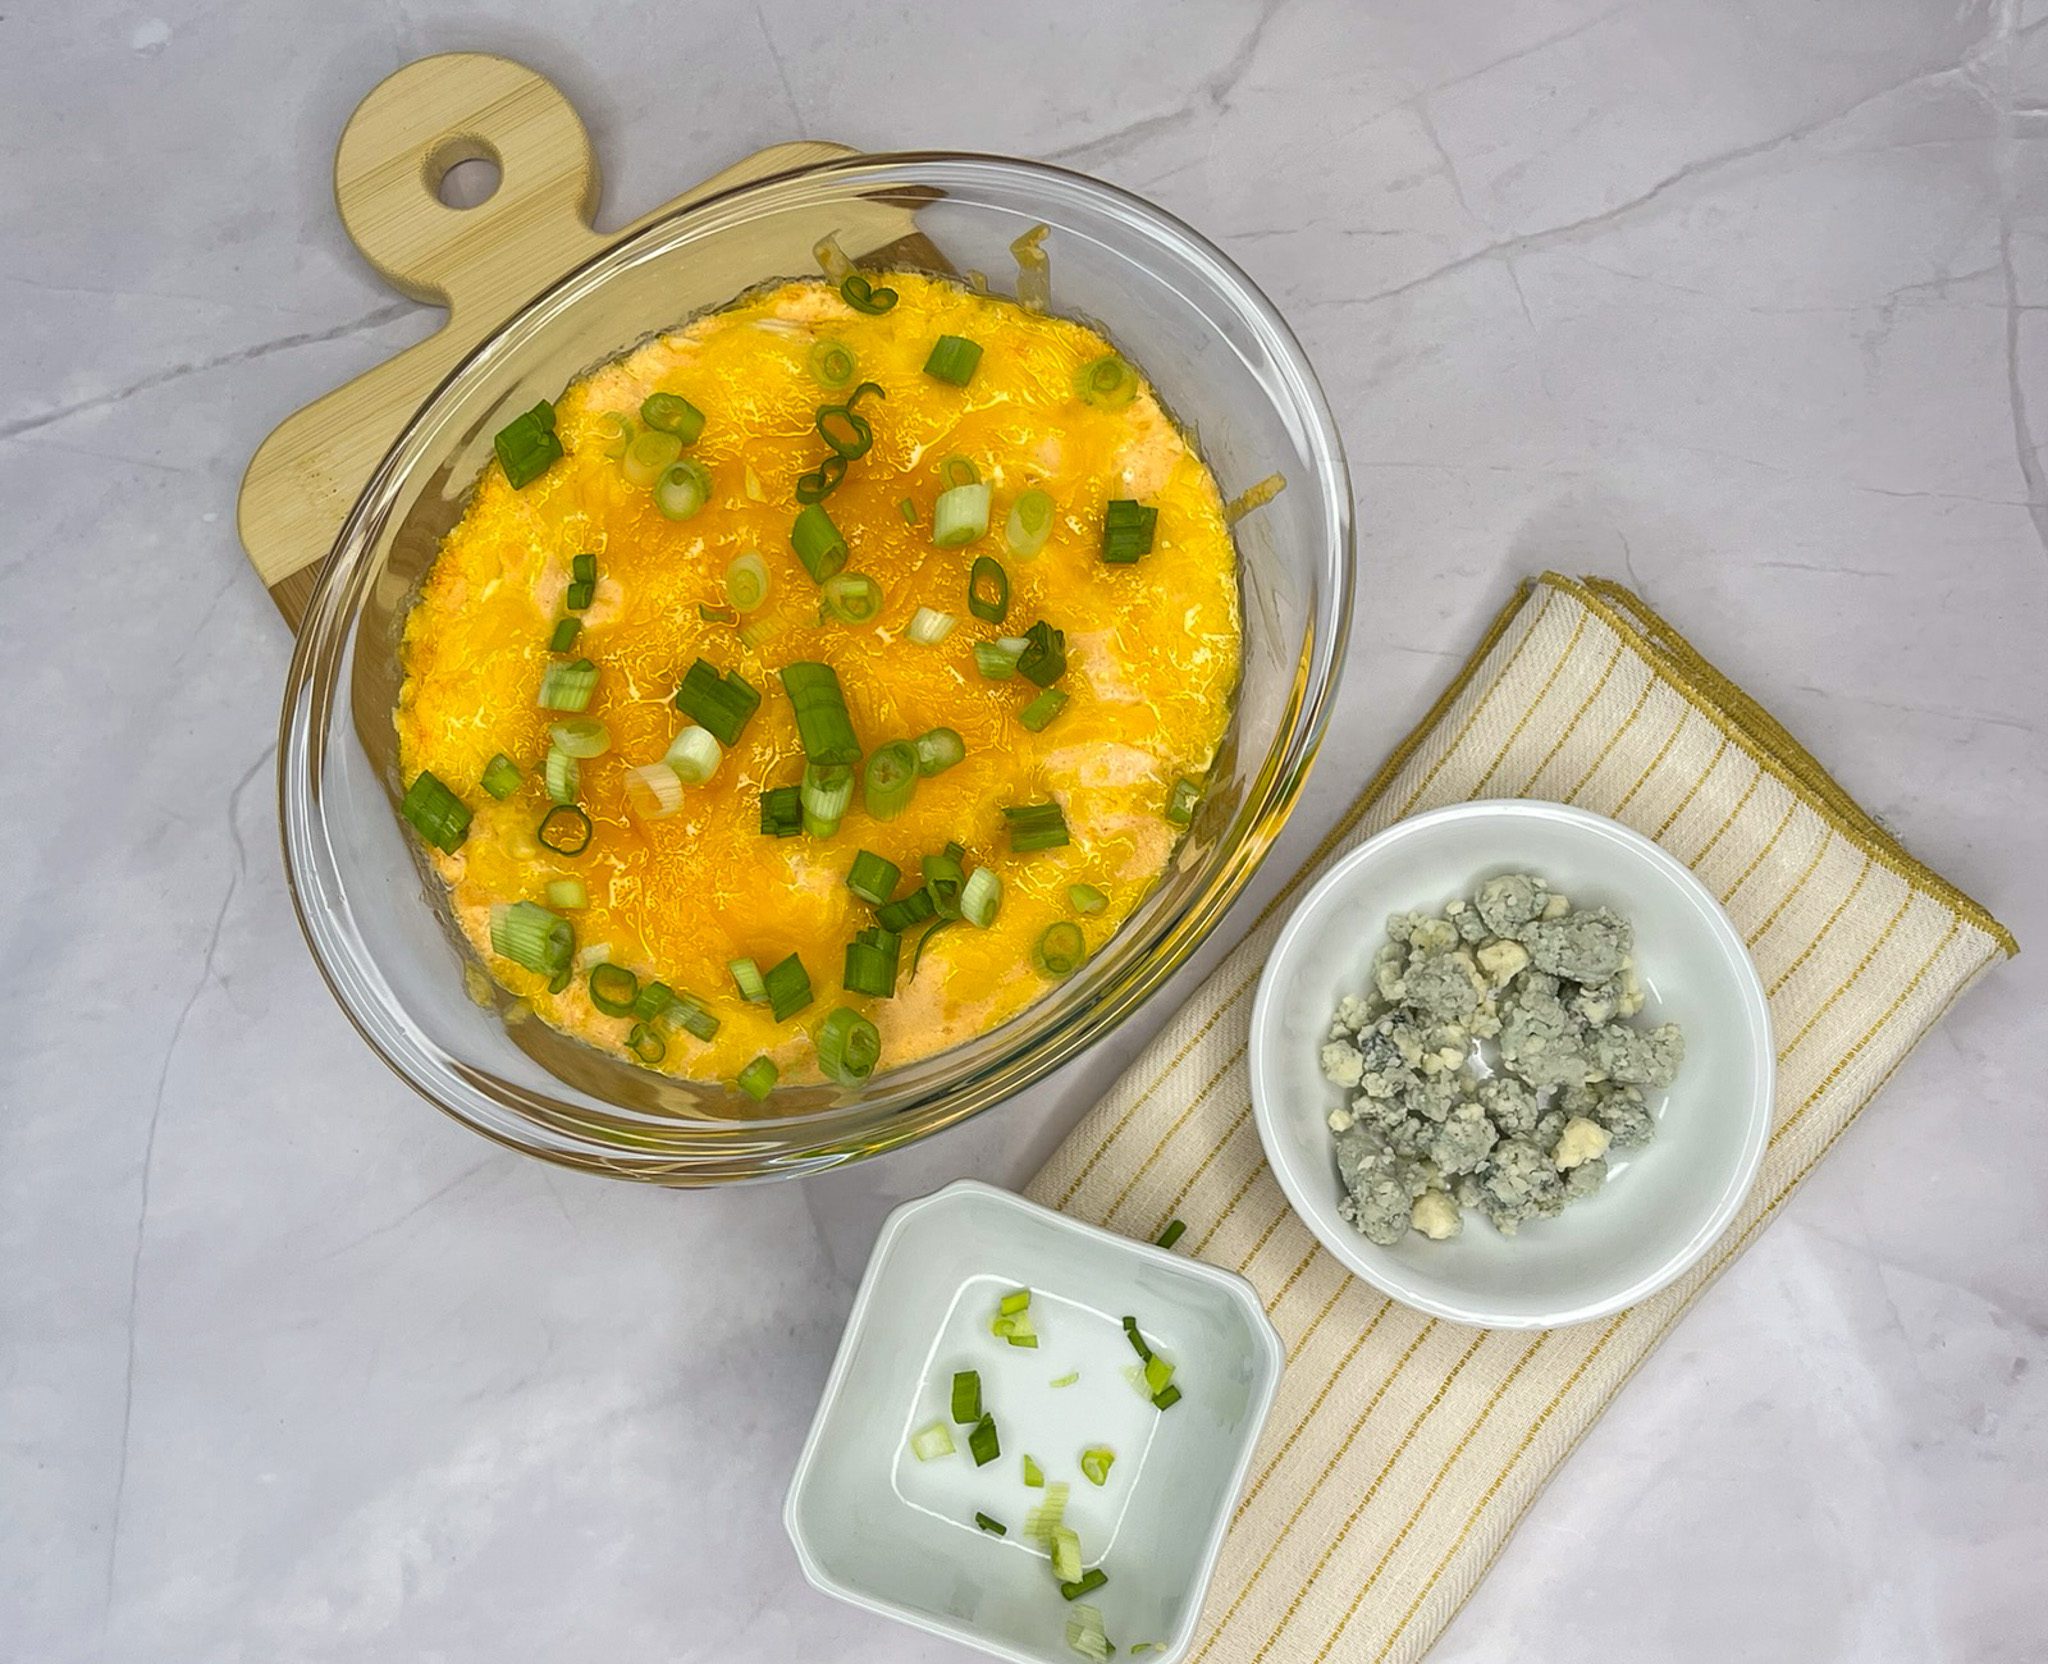
How to Make Lighter Buffalo Chicken Dip
- Preheat the oven to 350°F.
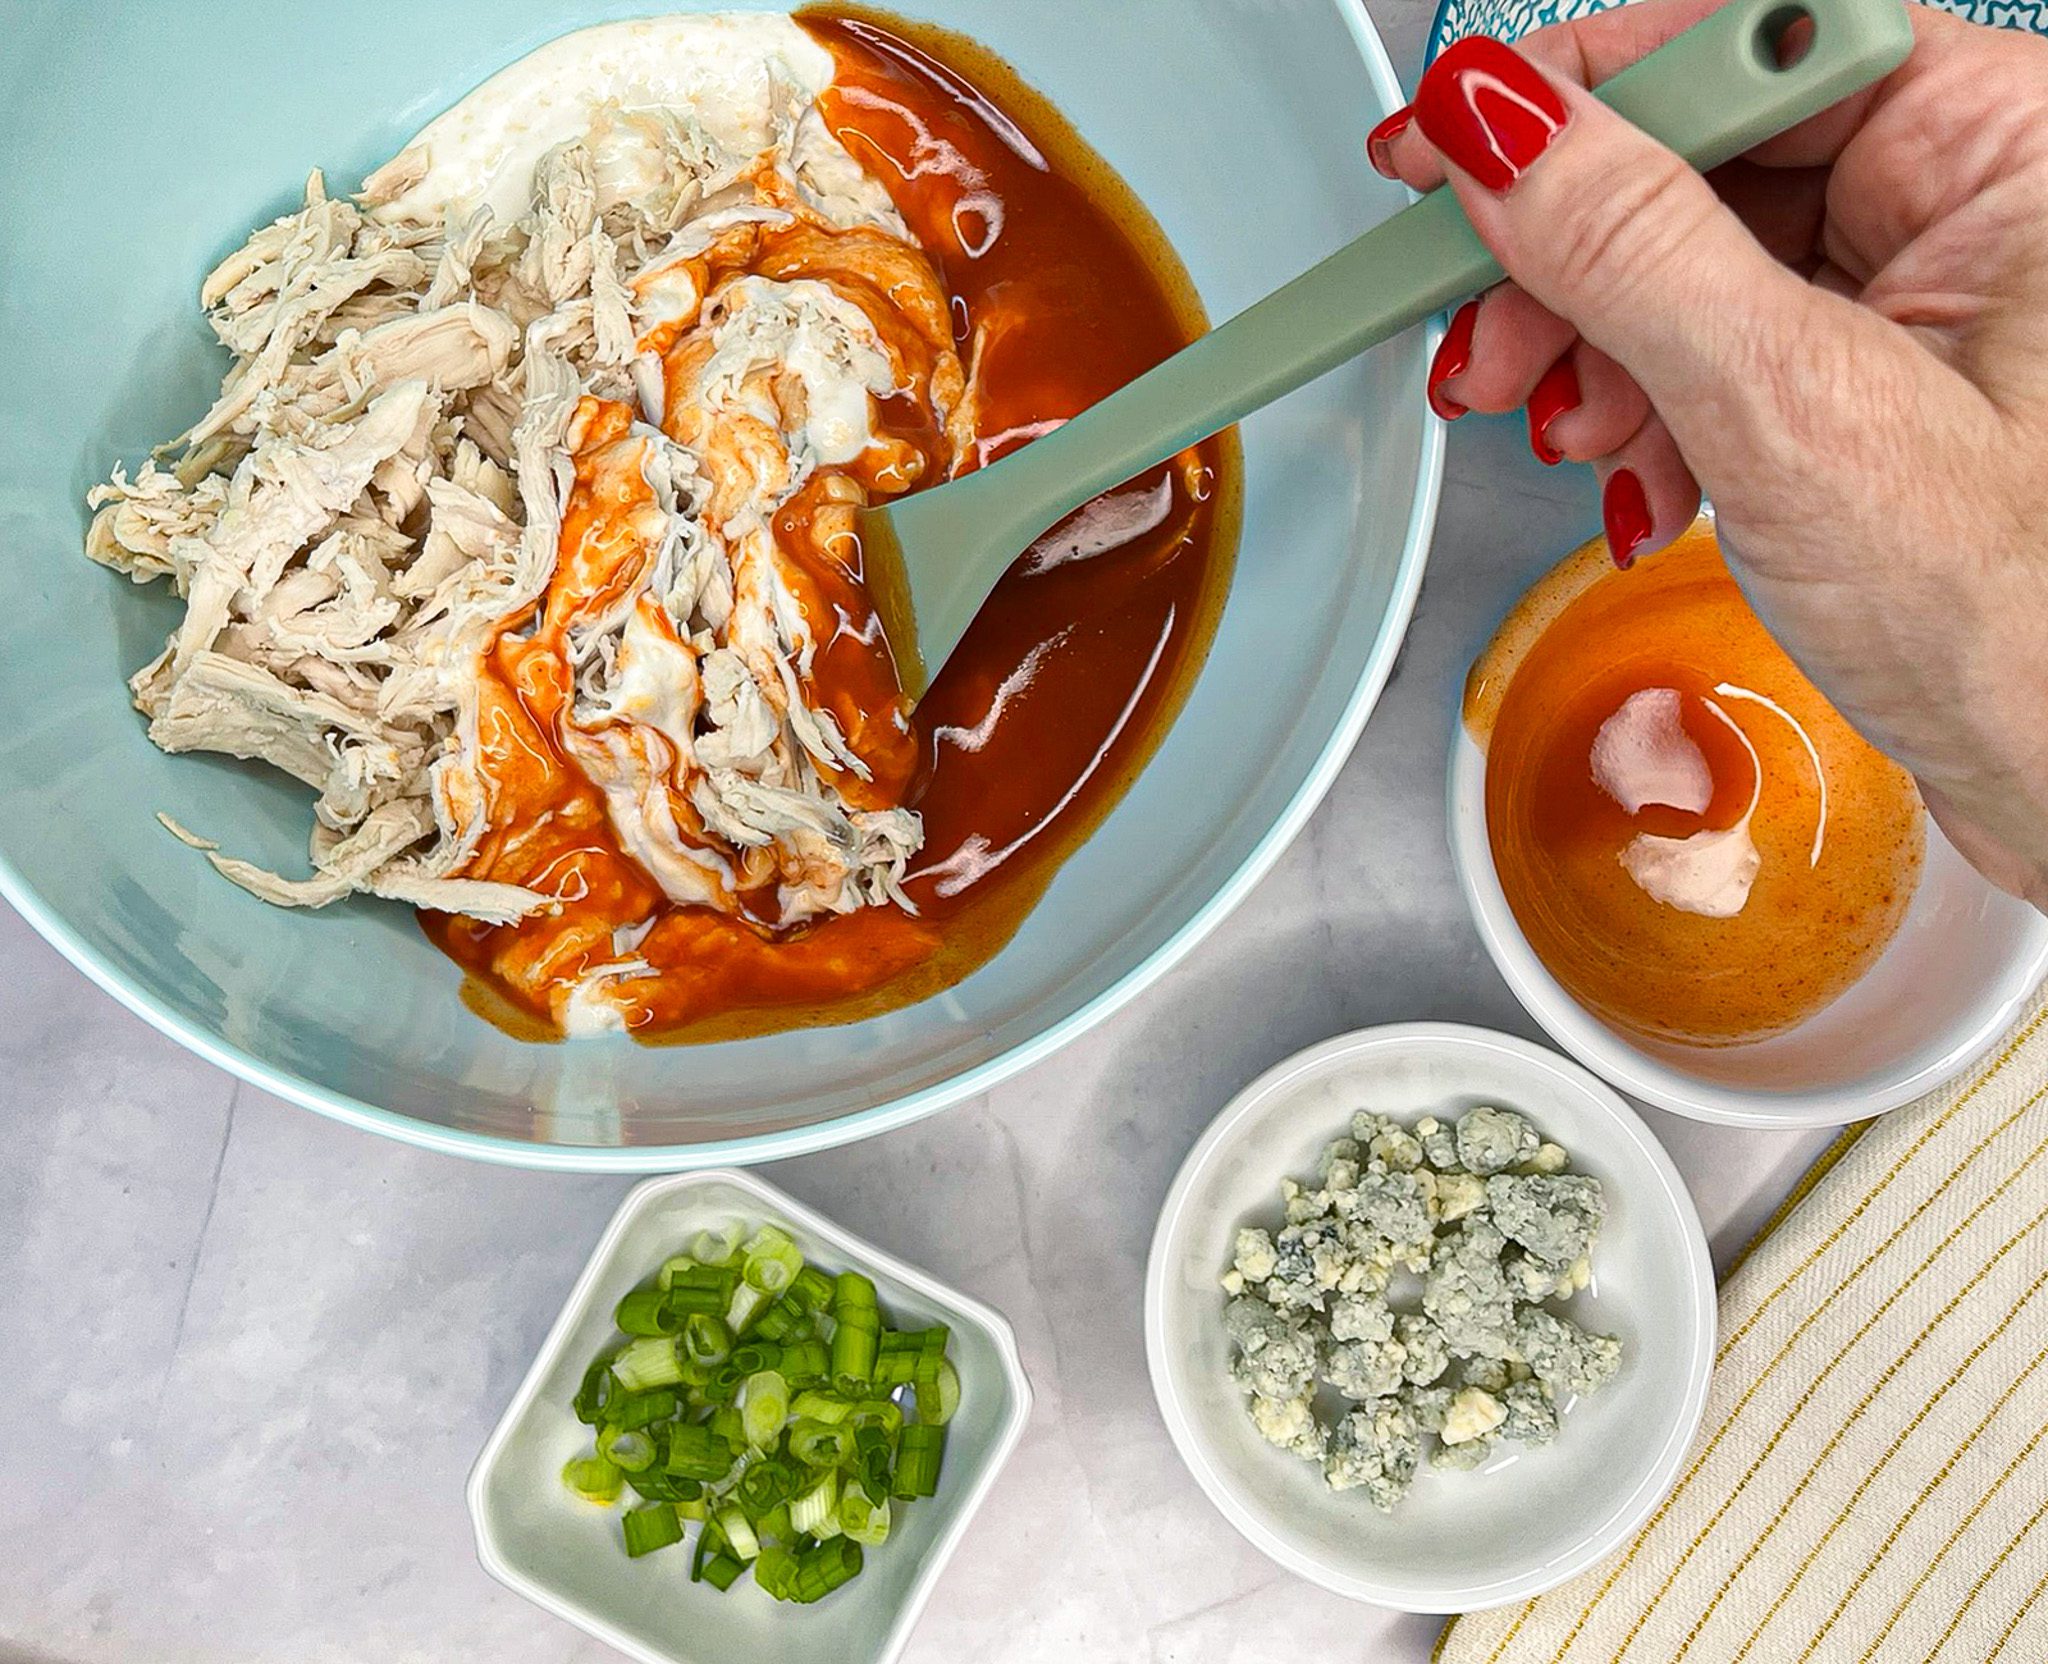
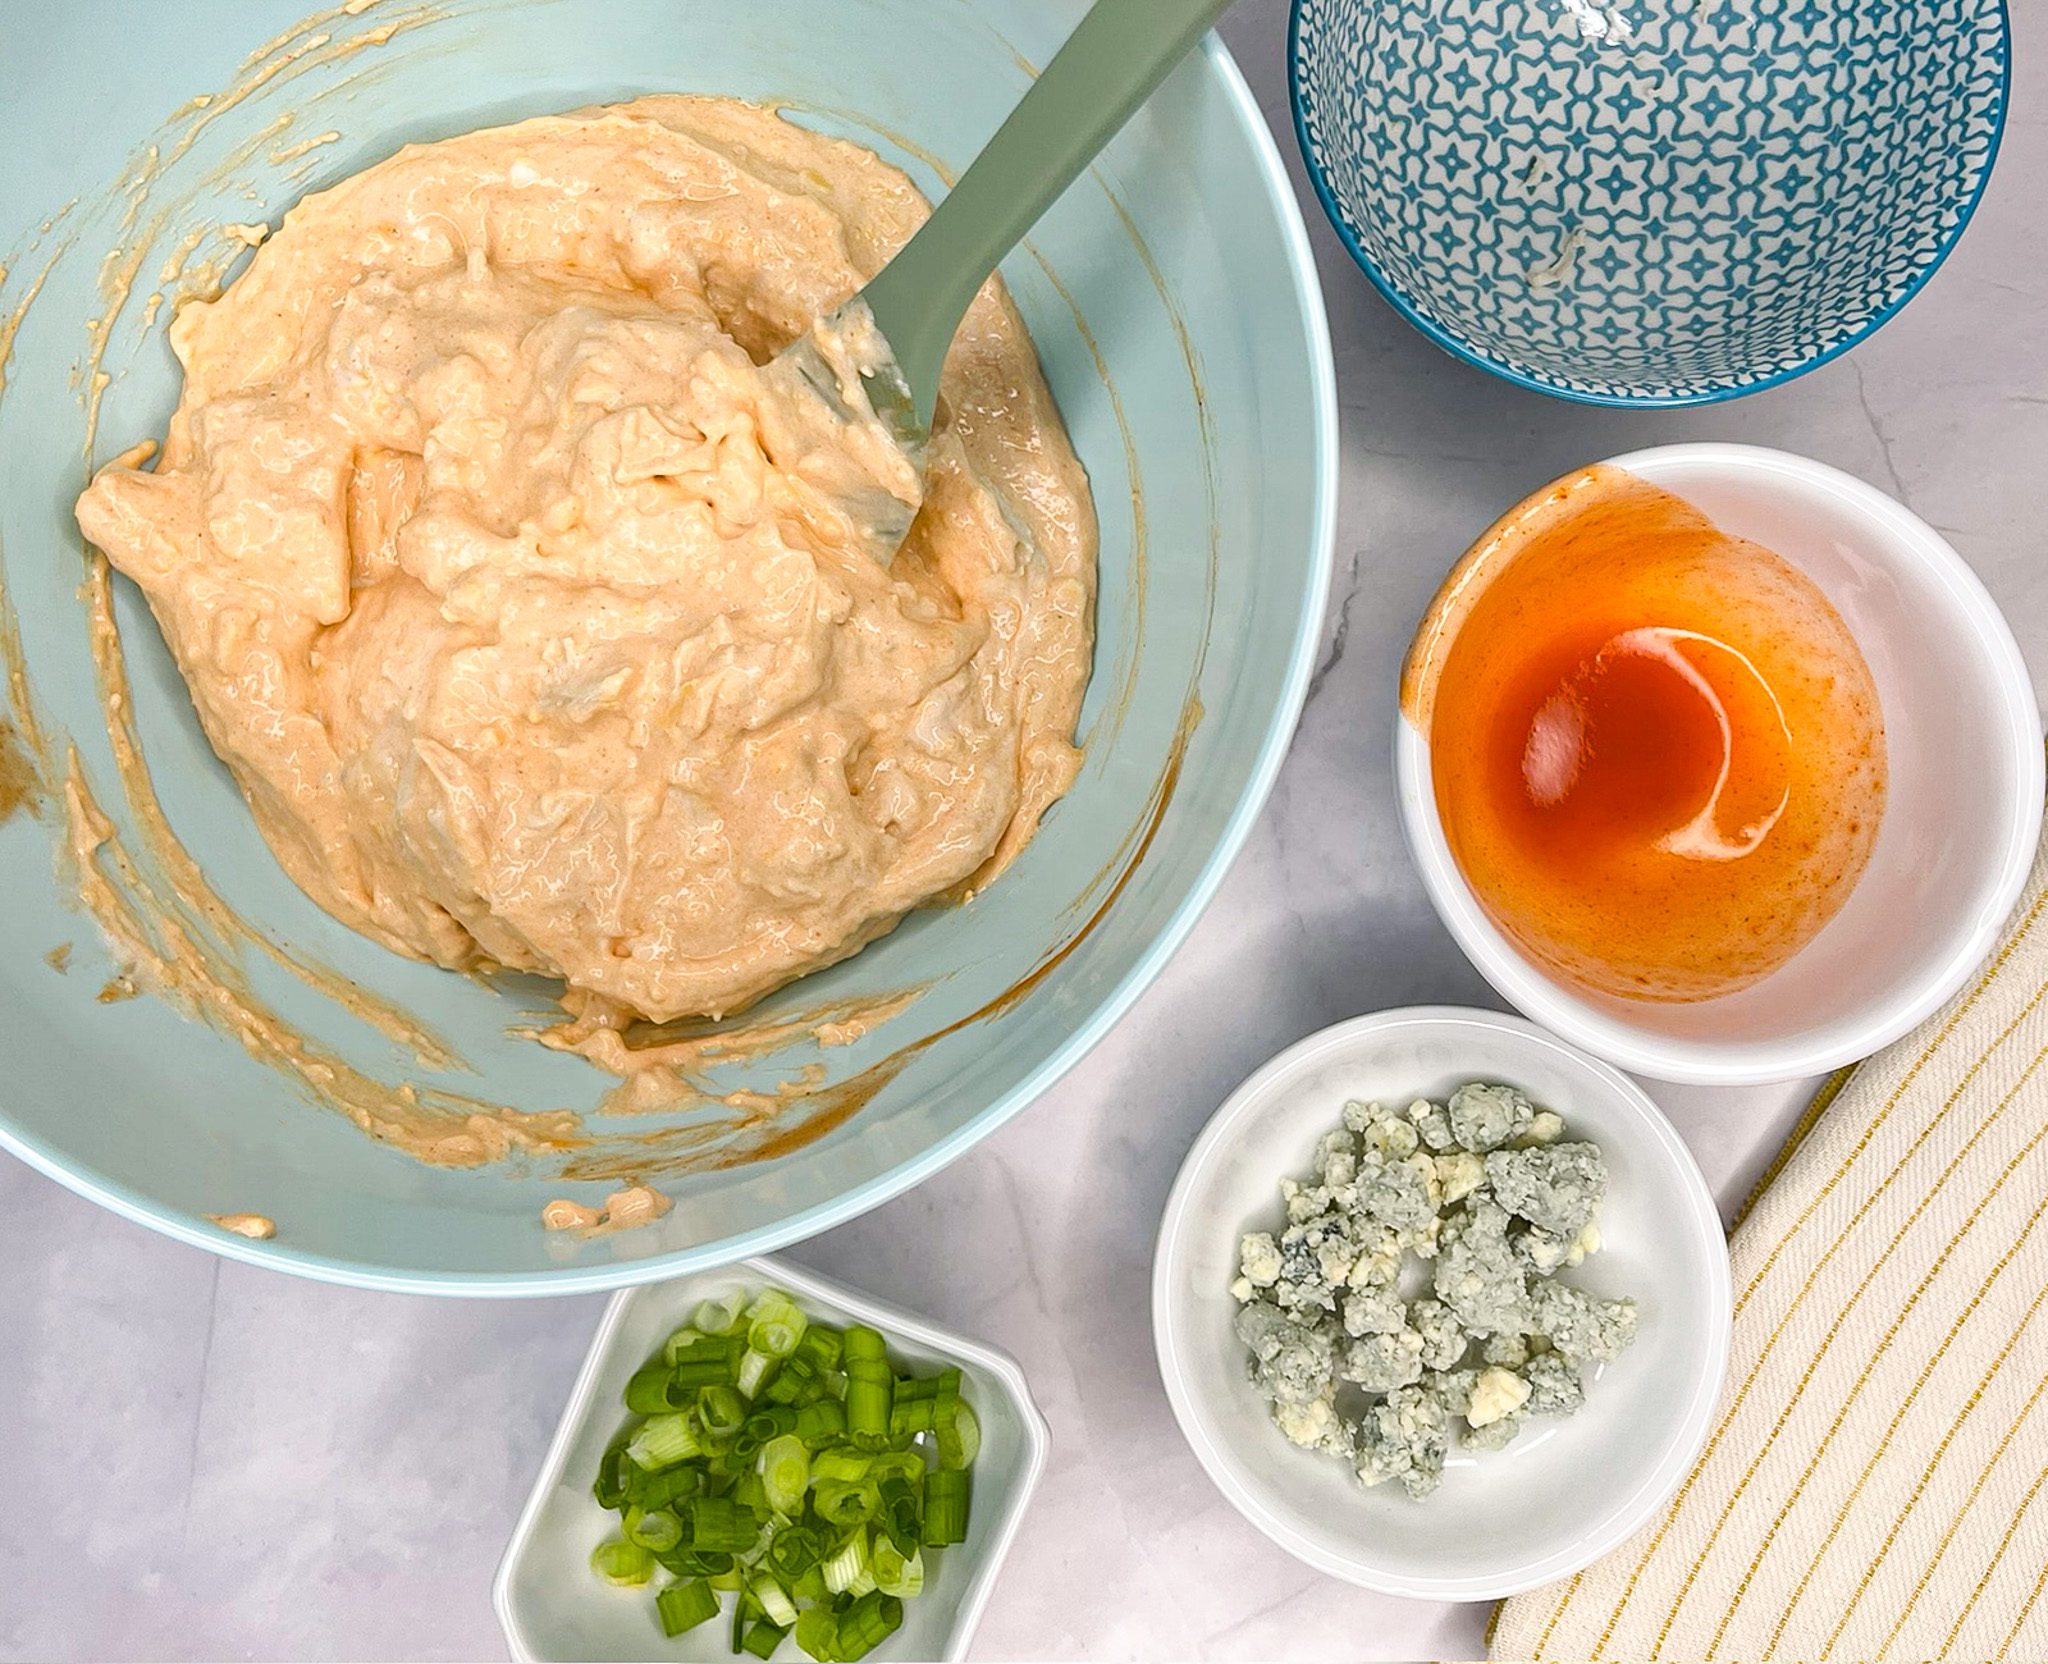
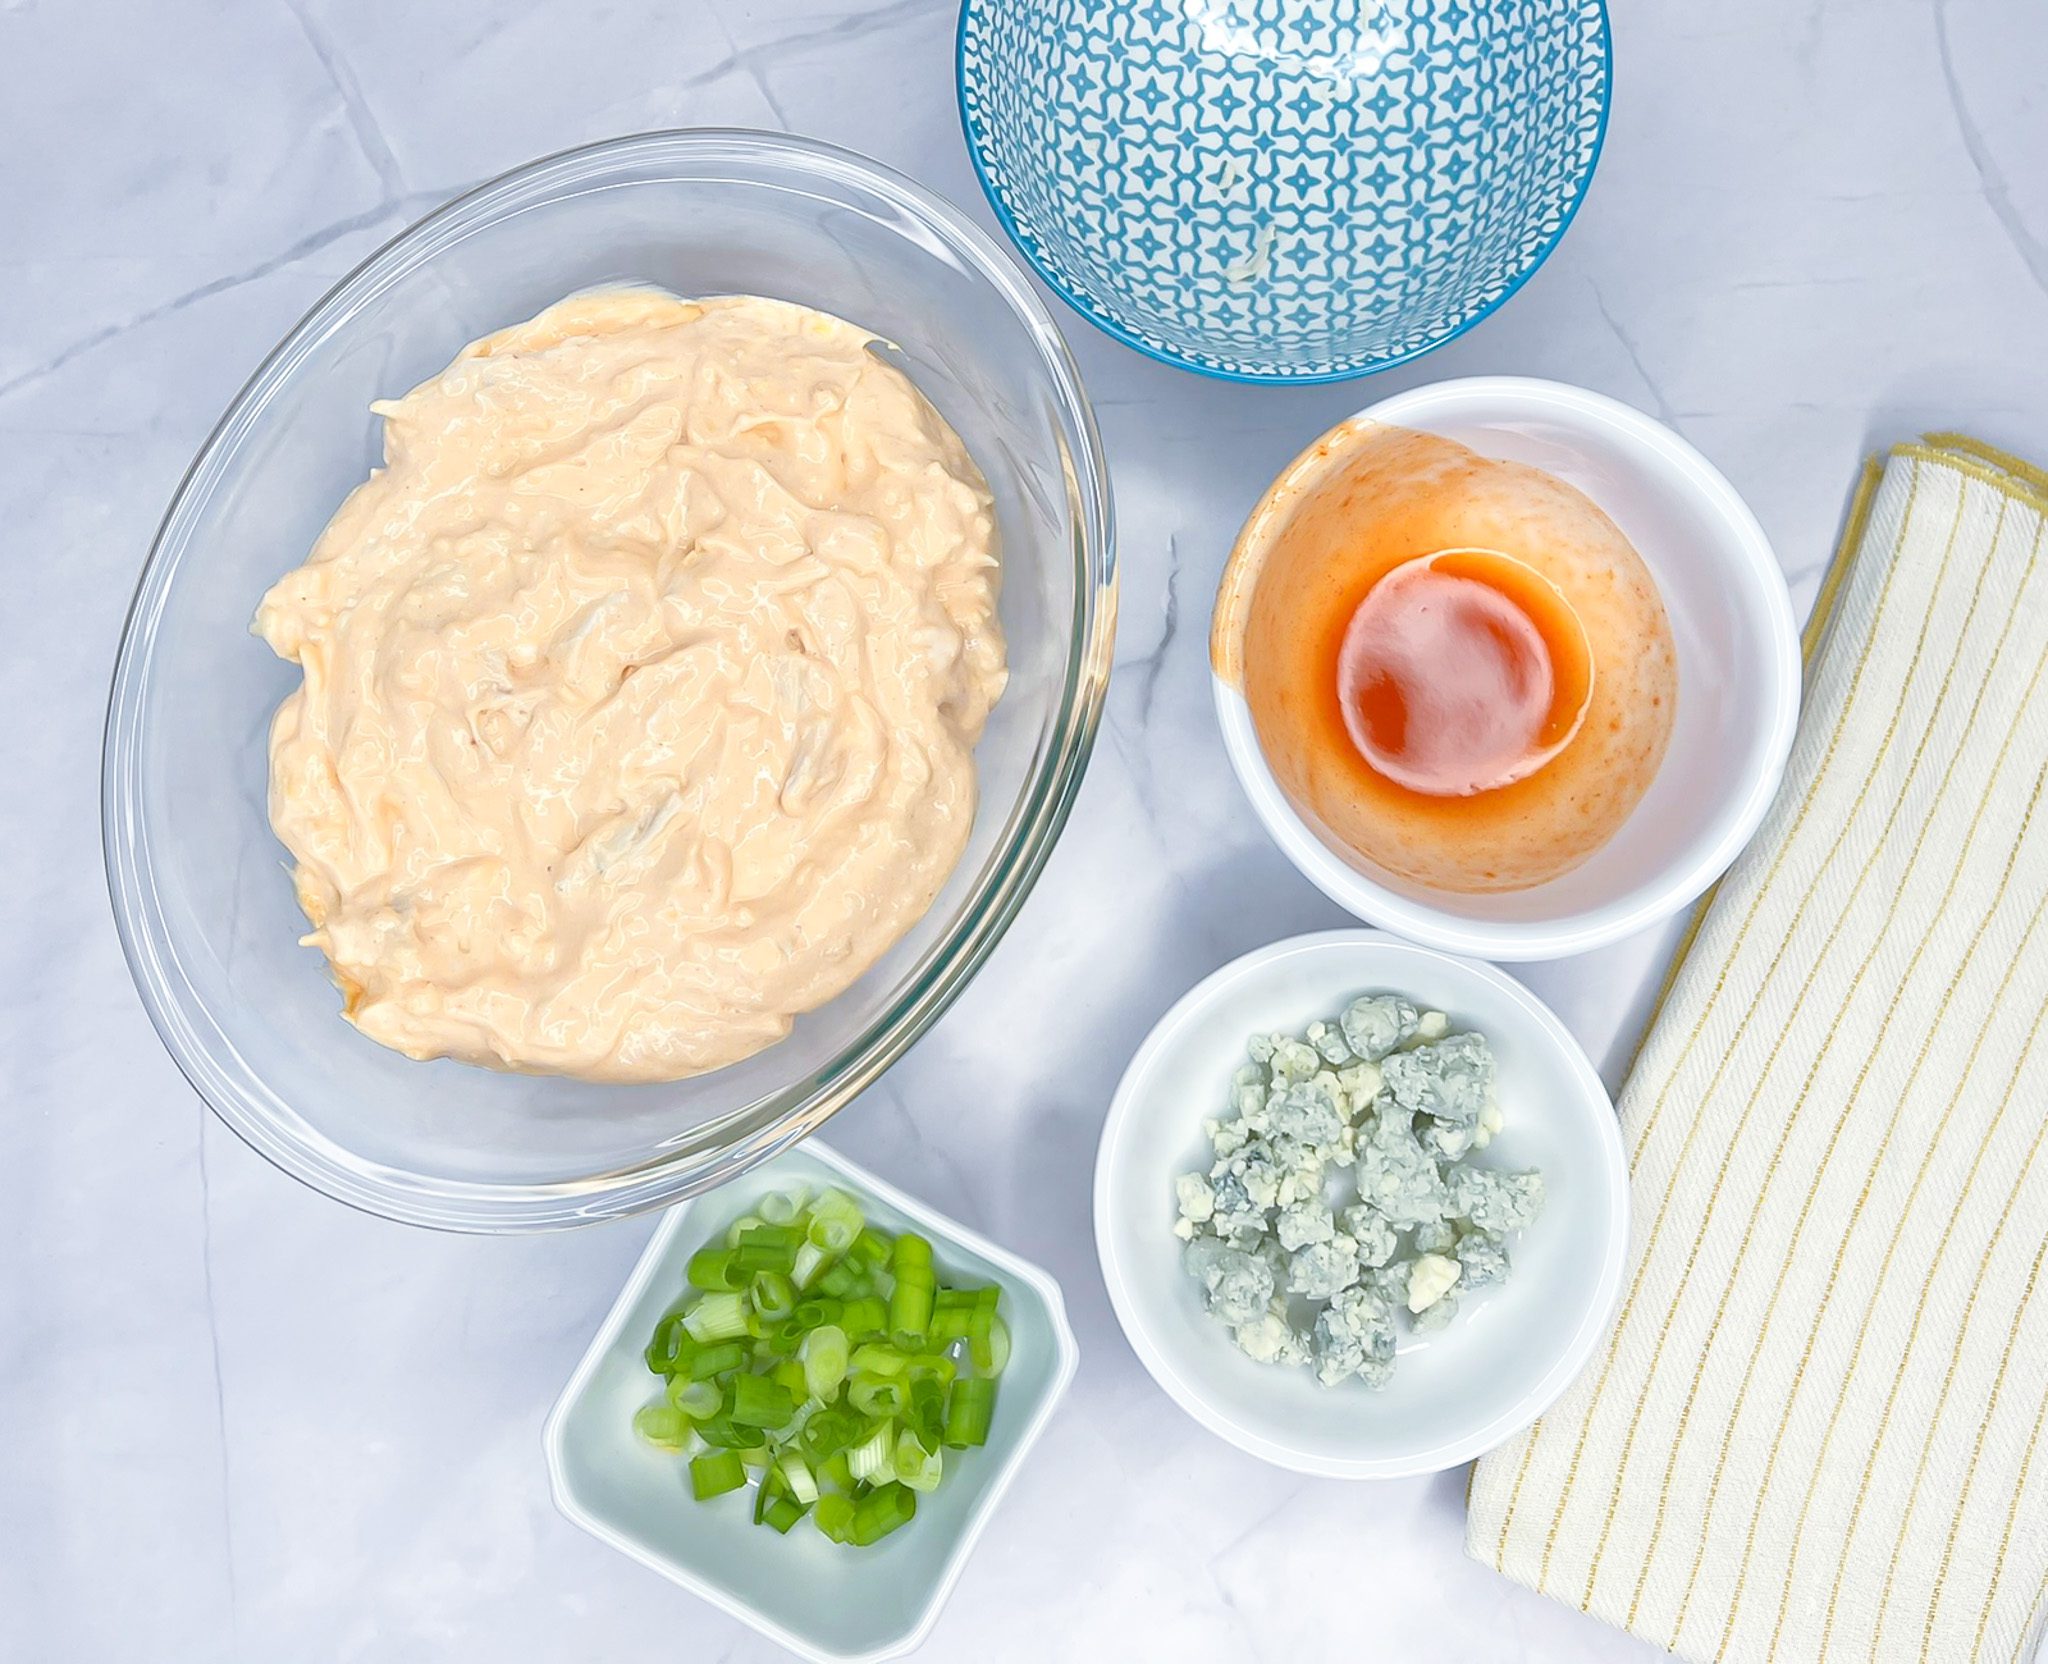
- Process the cottage cheese, ½ cup cheddar cheese, and sour cream in a food processor until smooth. Transfer to a mixing bowl.
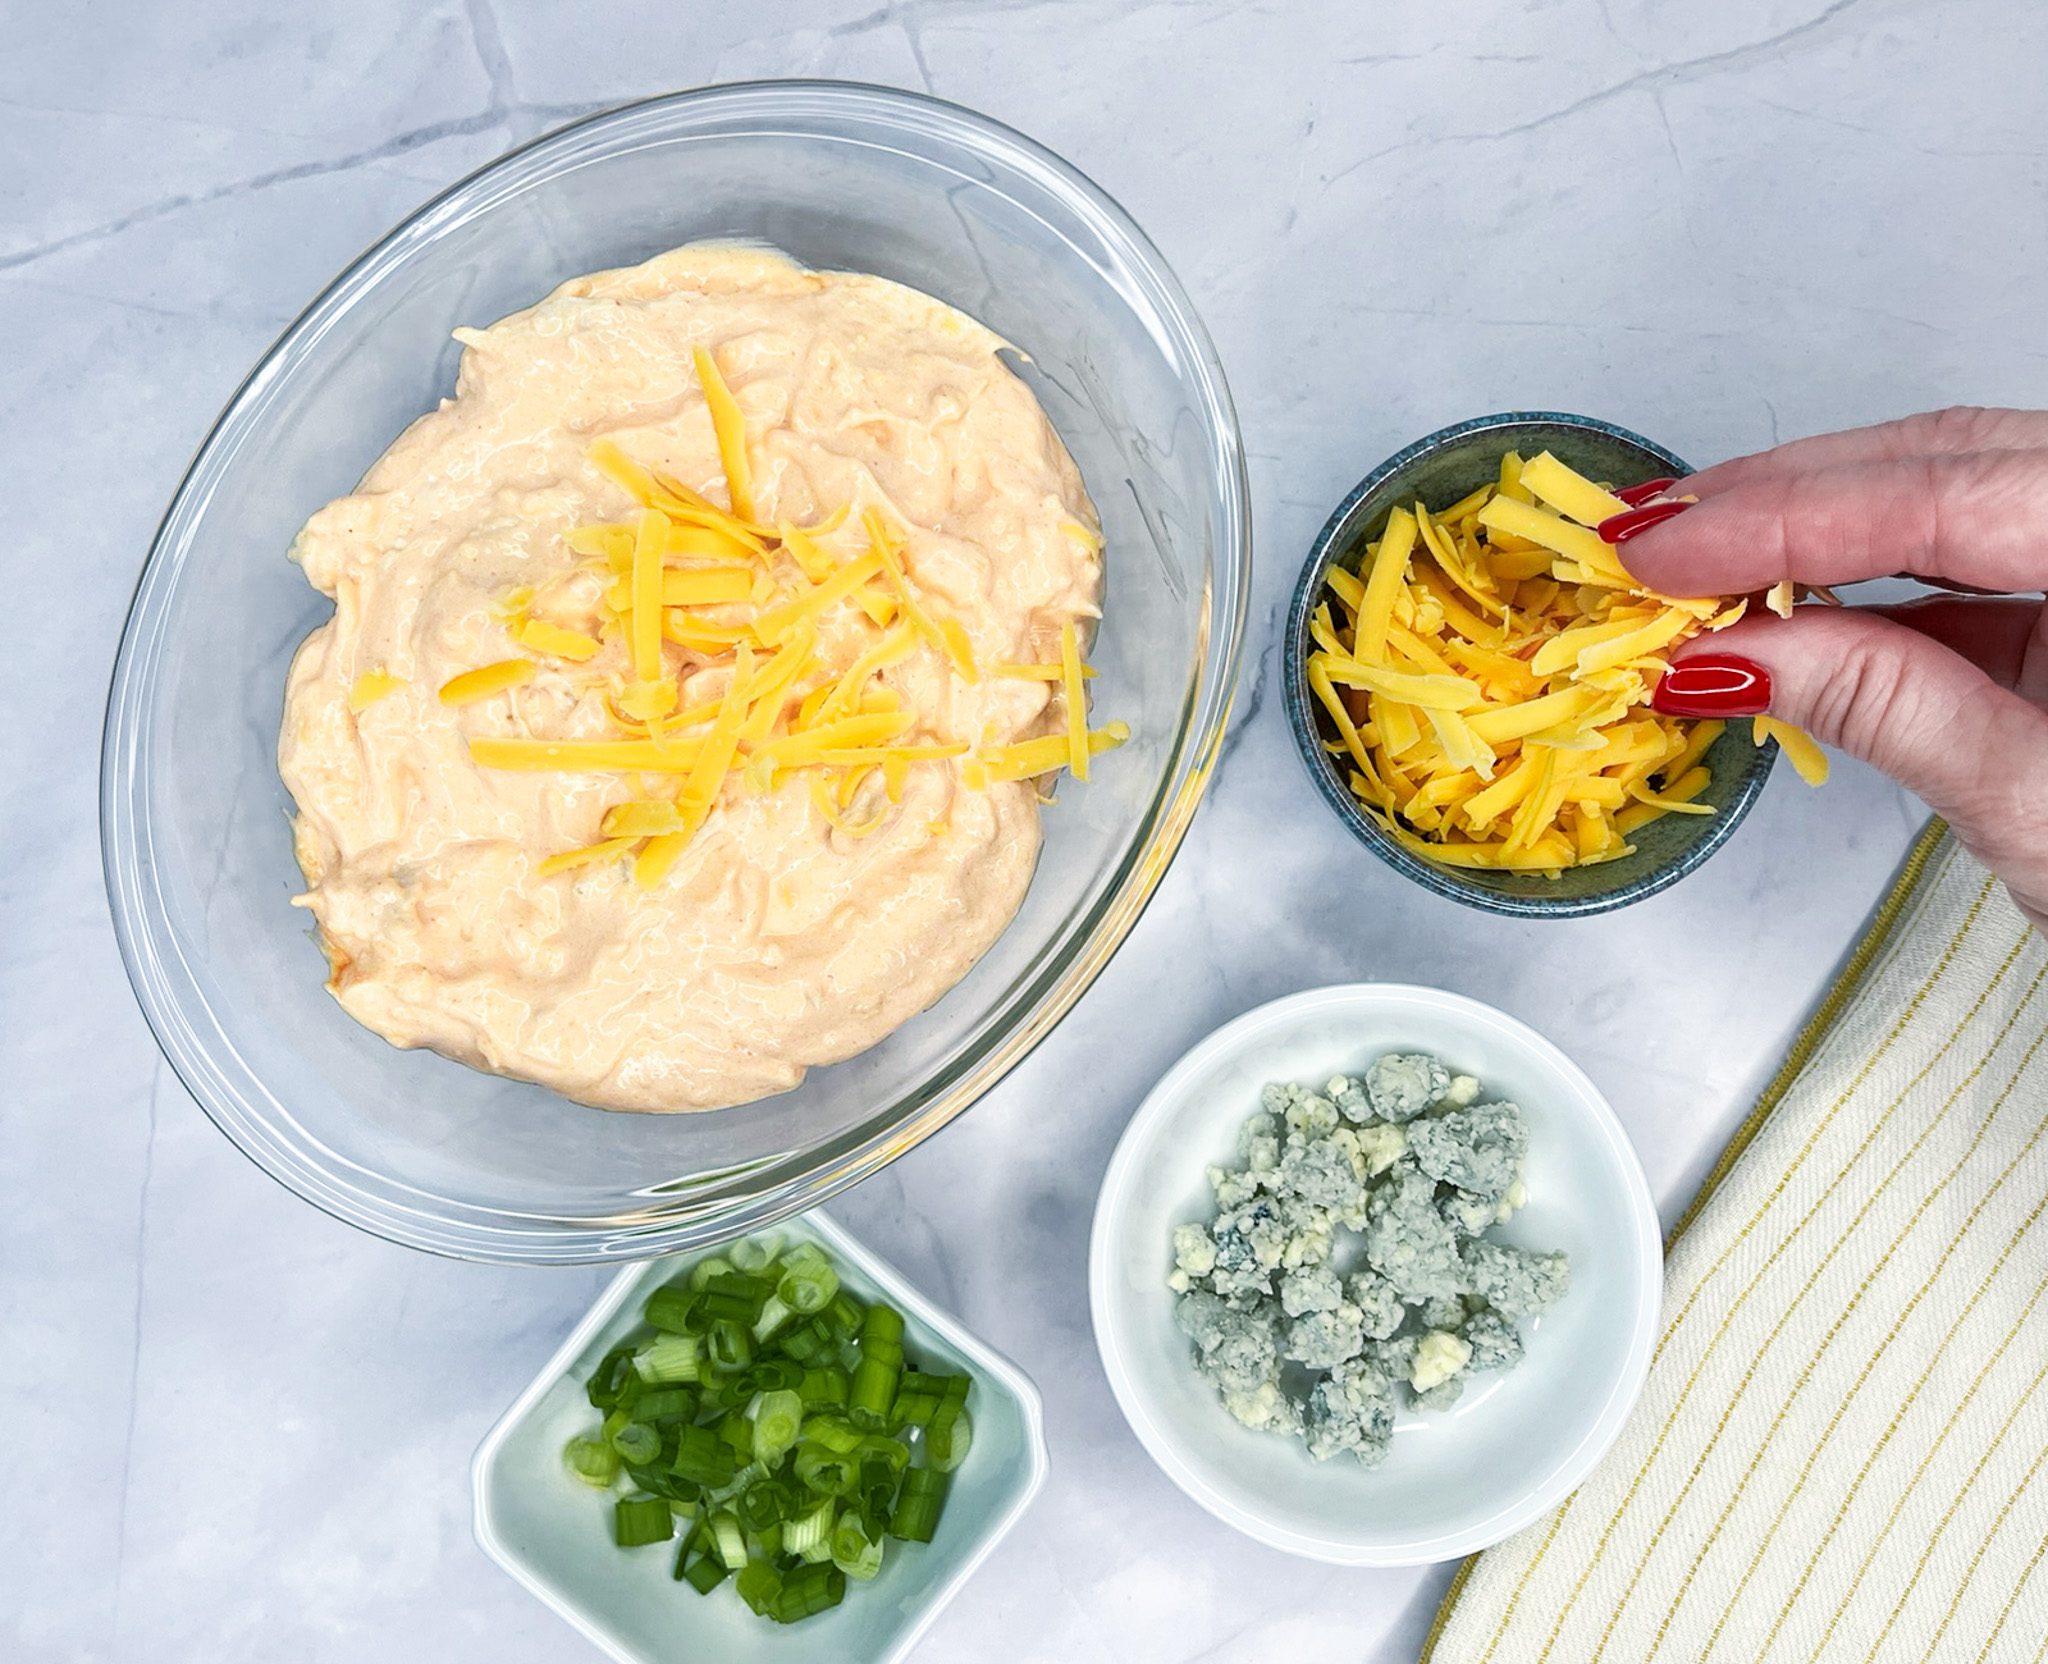
- Fold in the chicken and buffalo sauce. Pour into a small baking dish. Top with the remaining cheddar cheese.
- Bake for 18-20 minutes or until hot and bubbly.
- Top with blue cheese and green onion. Serve with your favorite dippers.
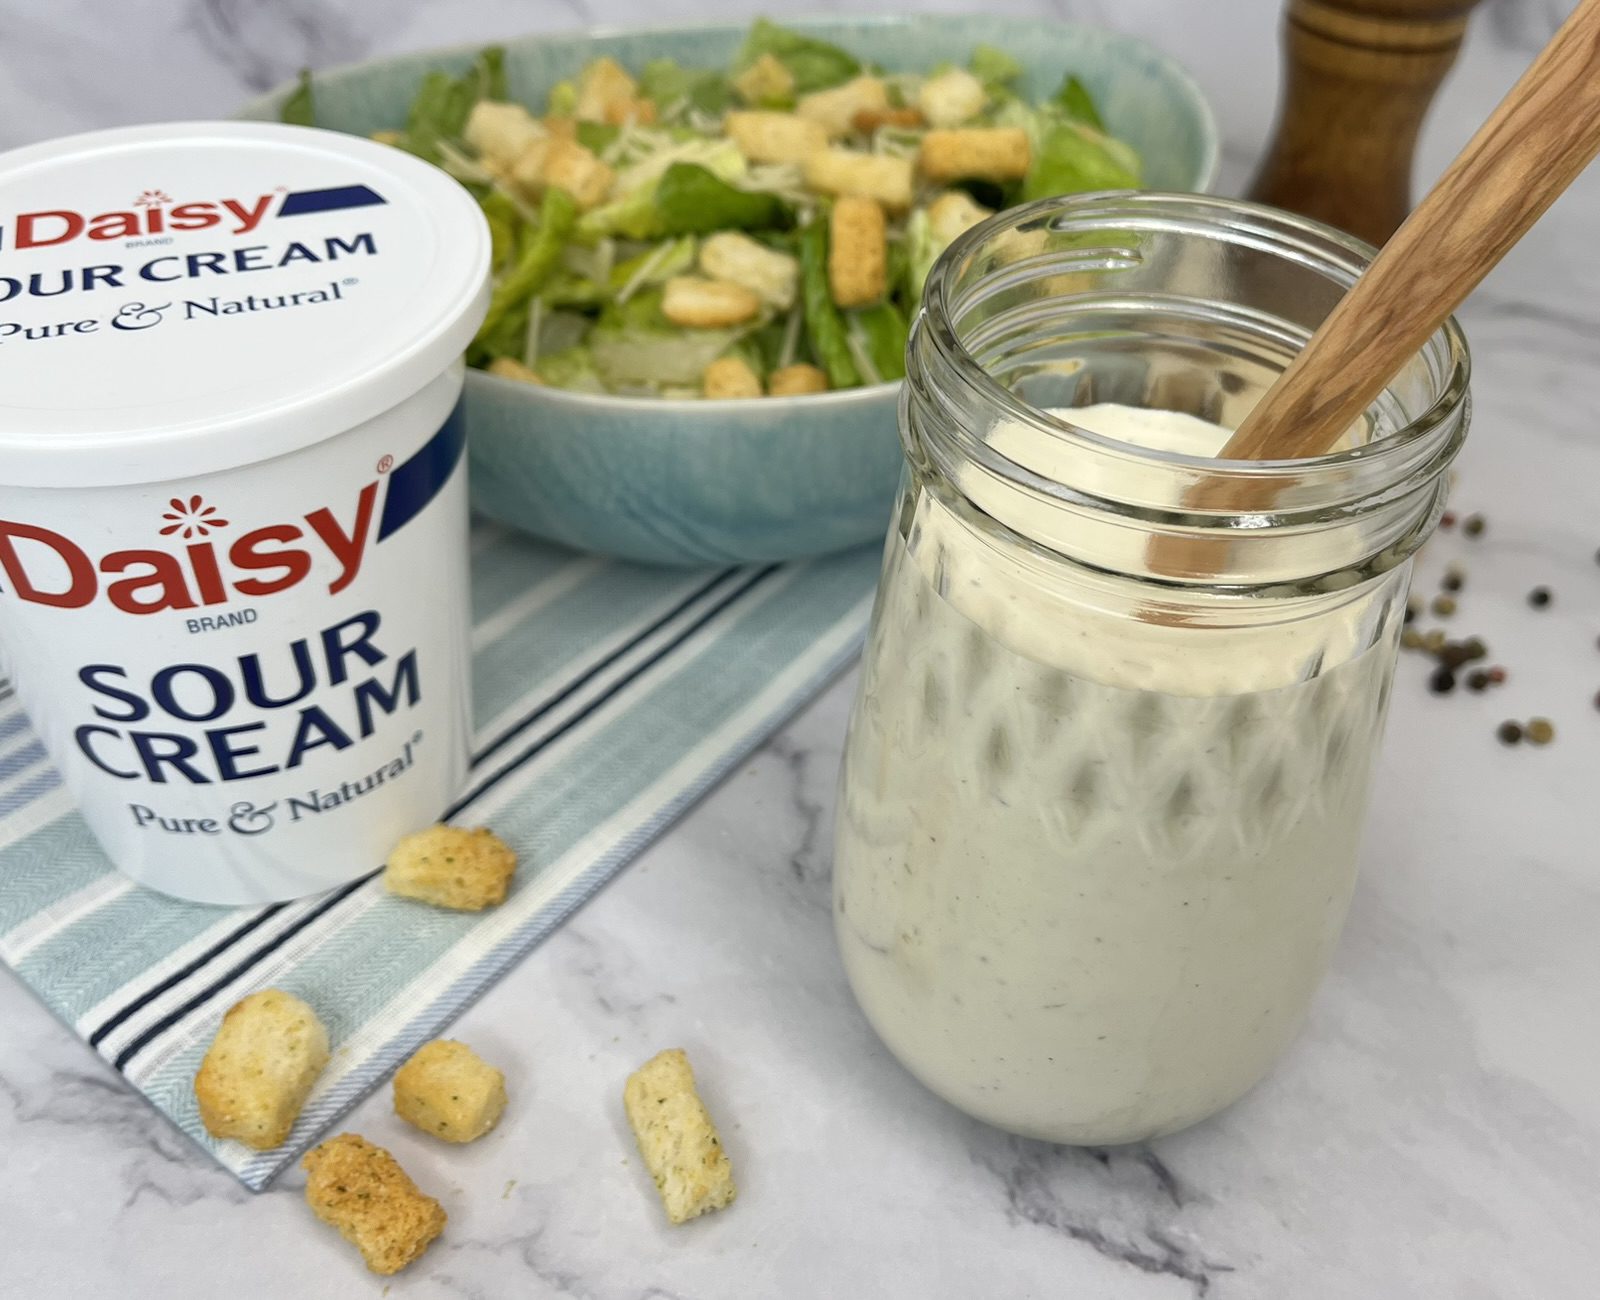
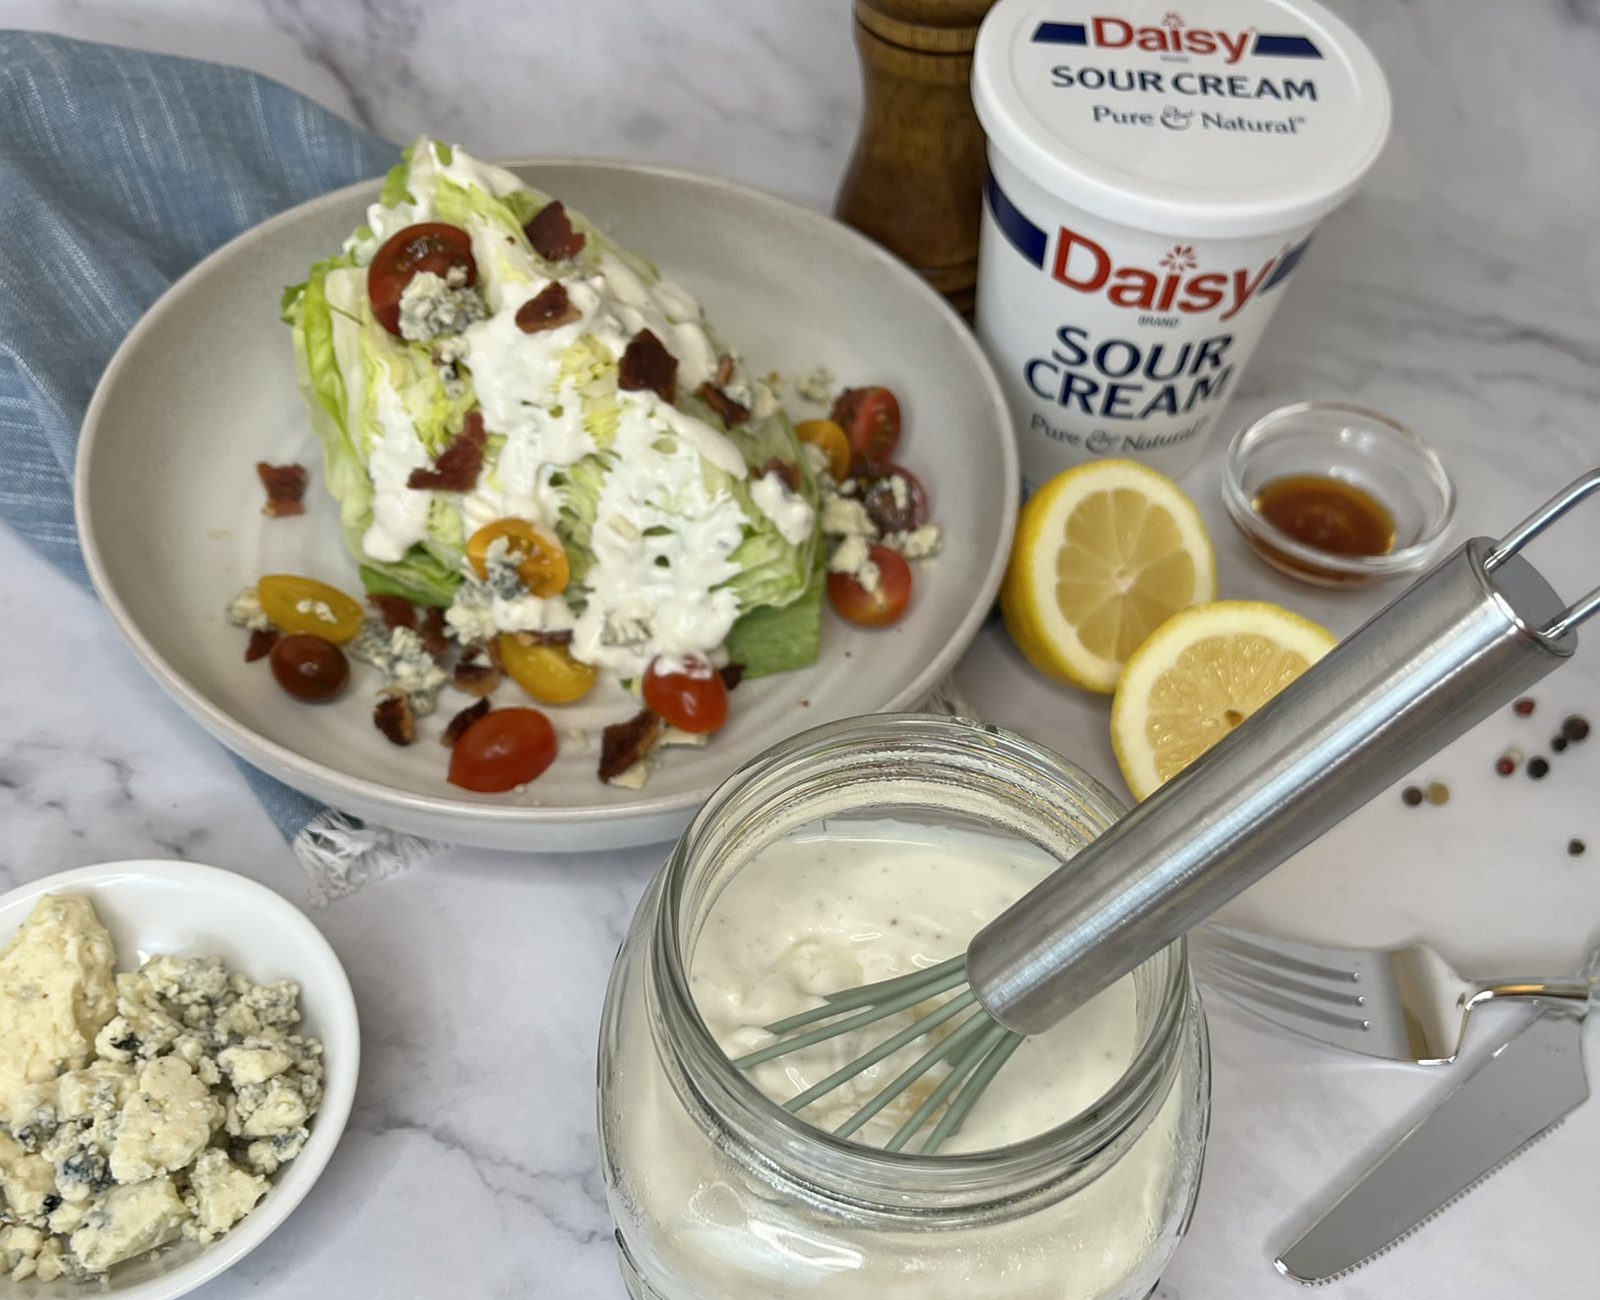
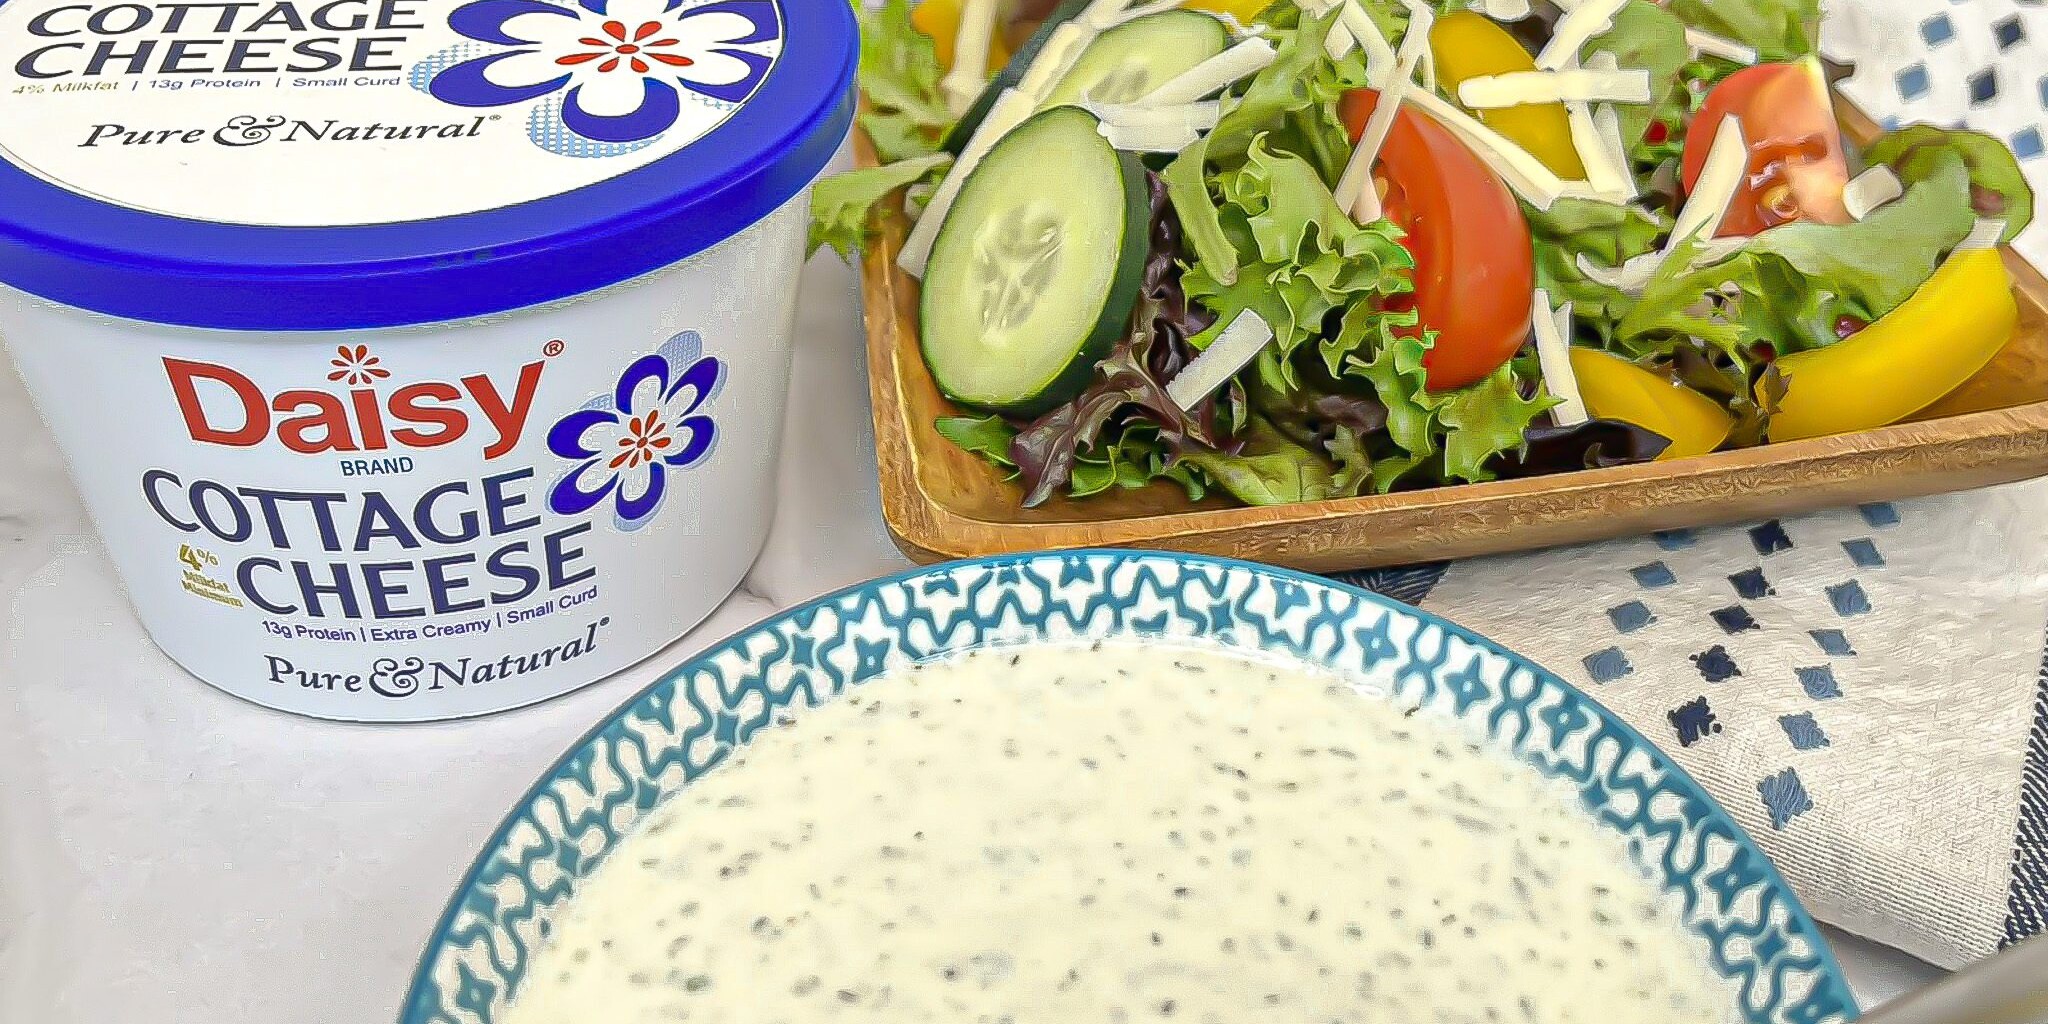
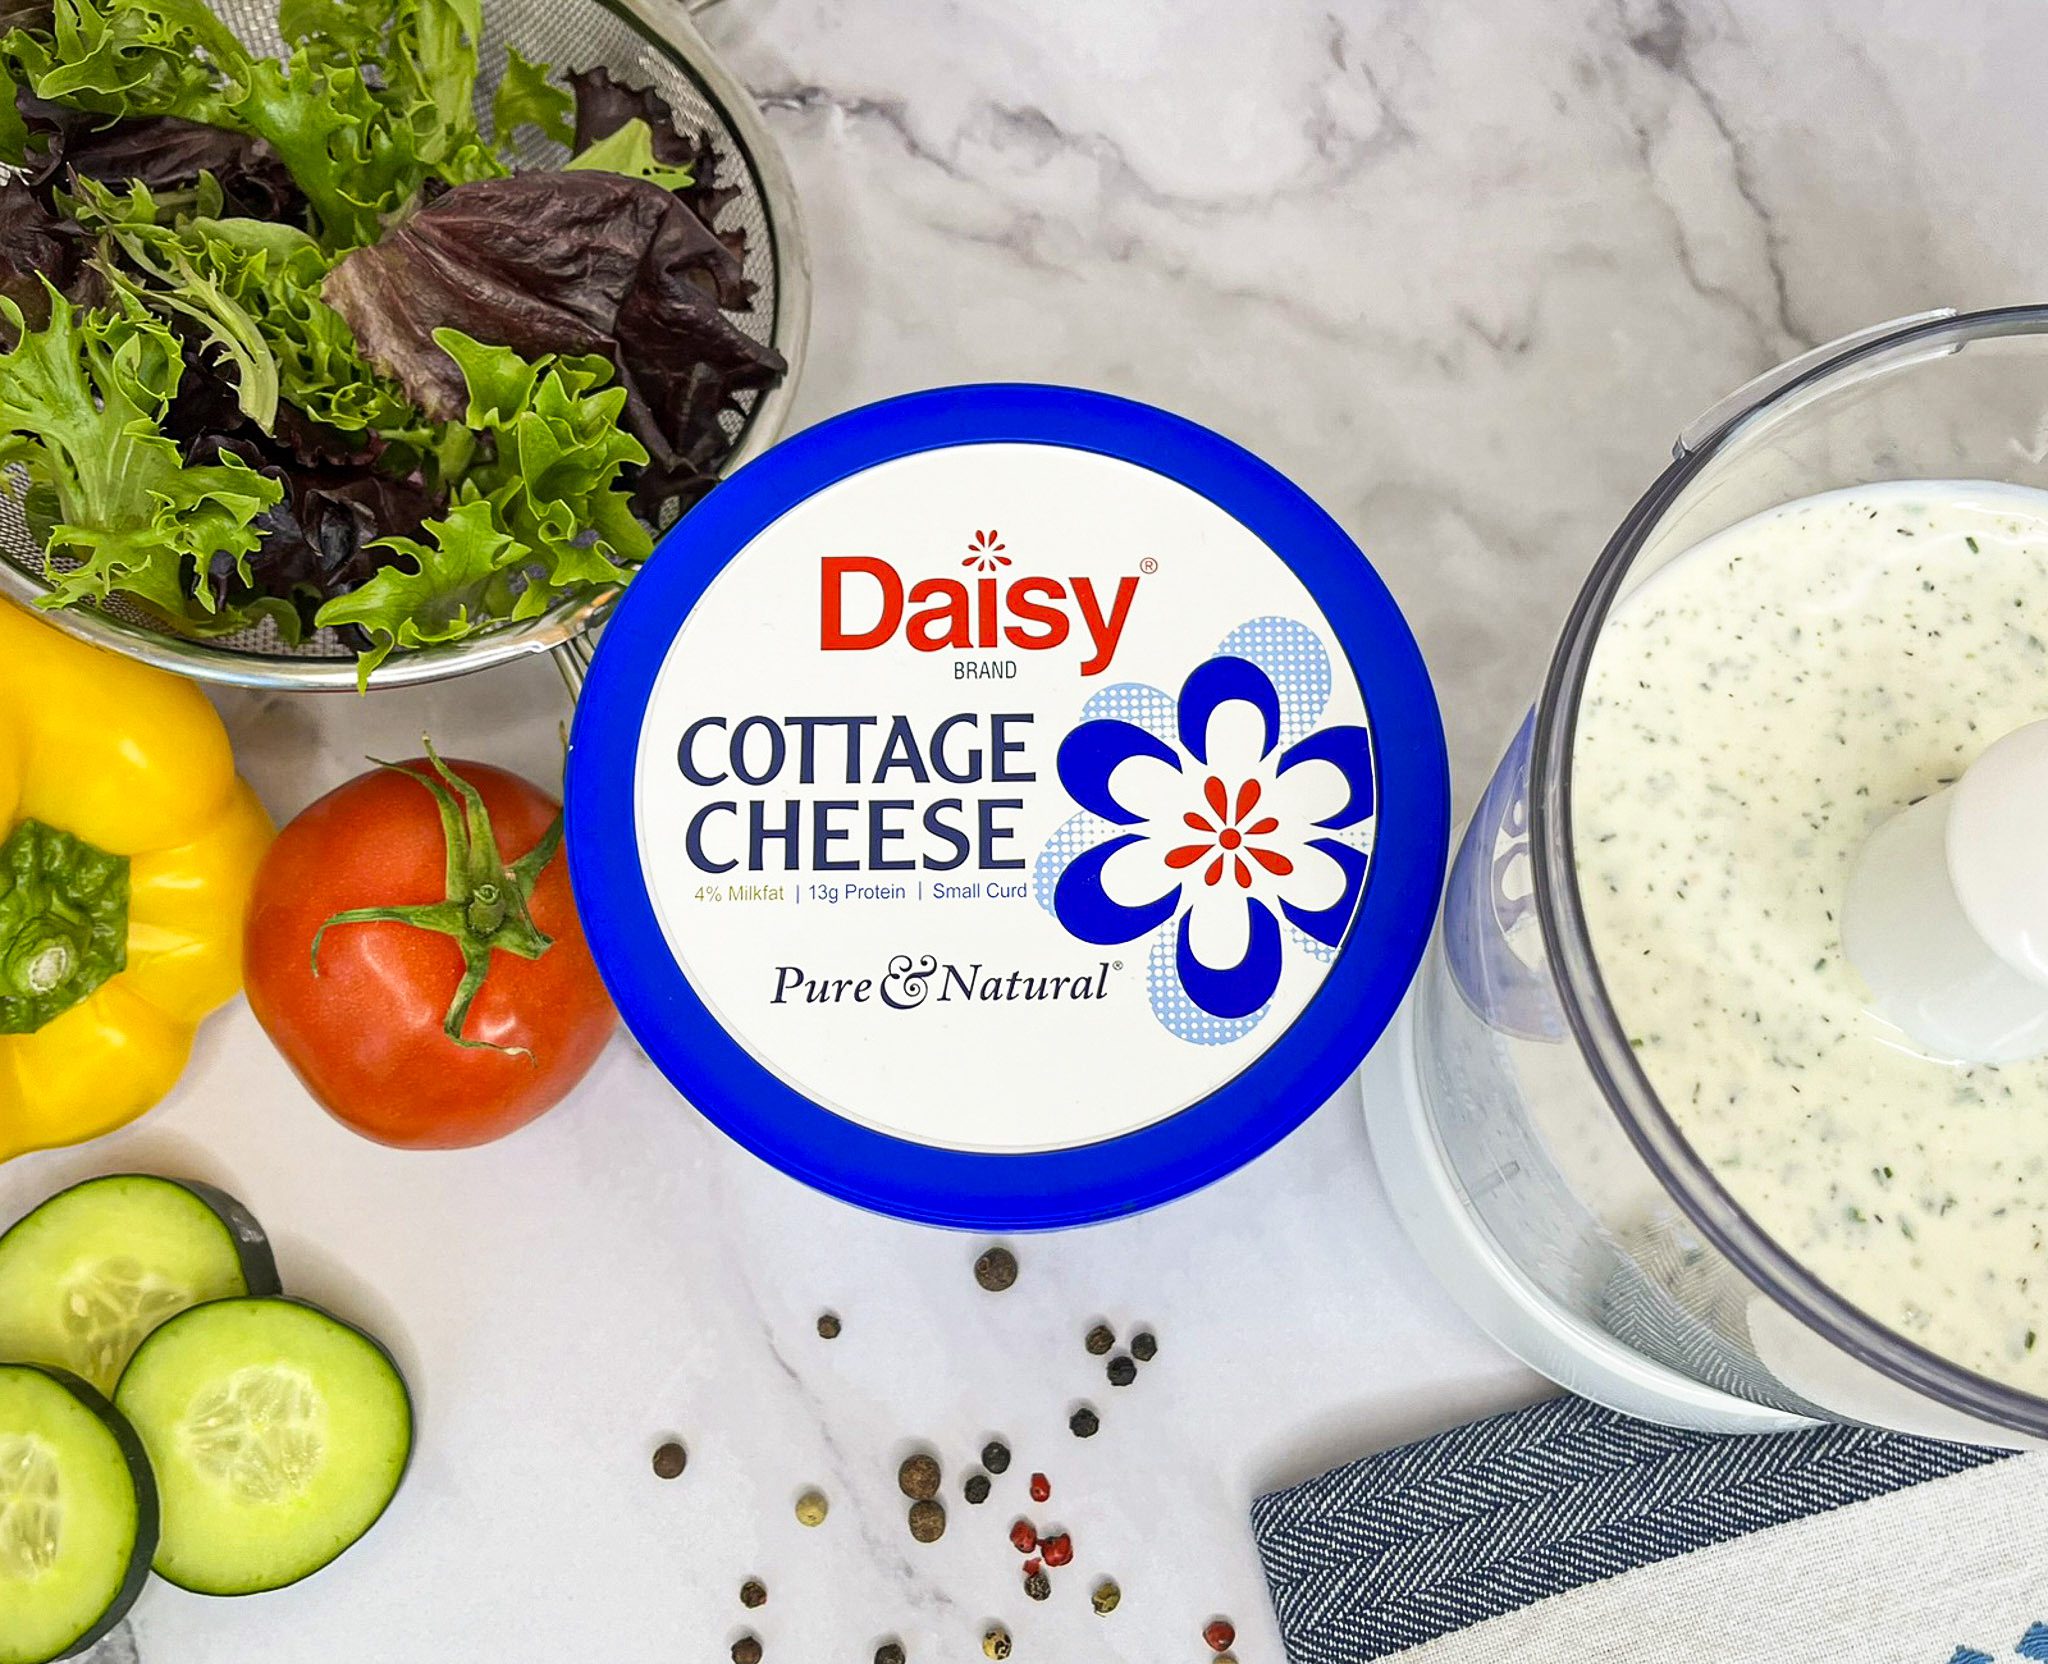
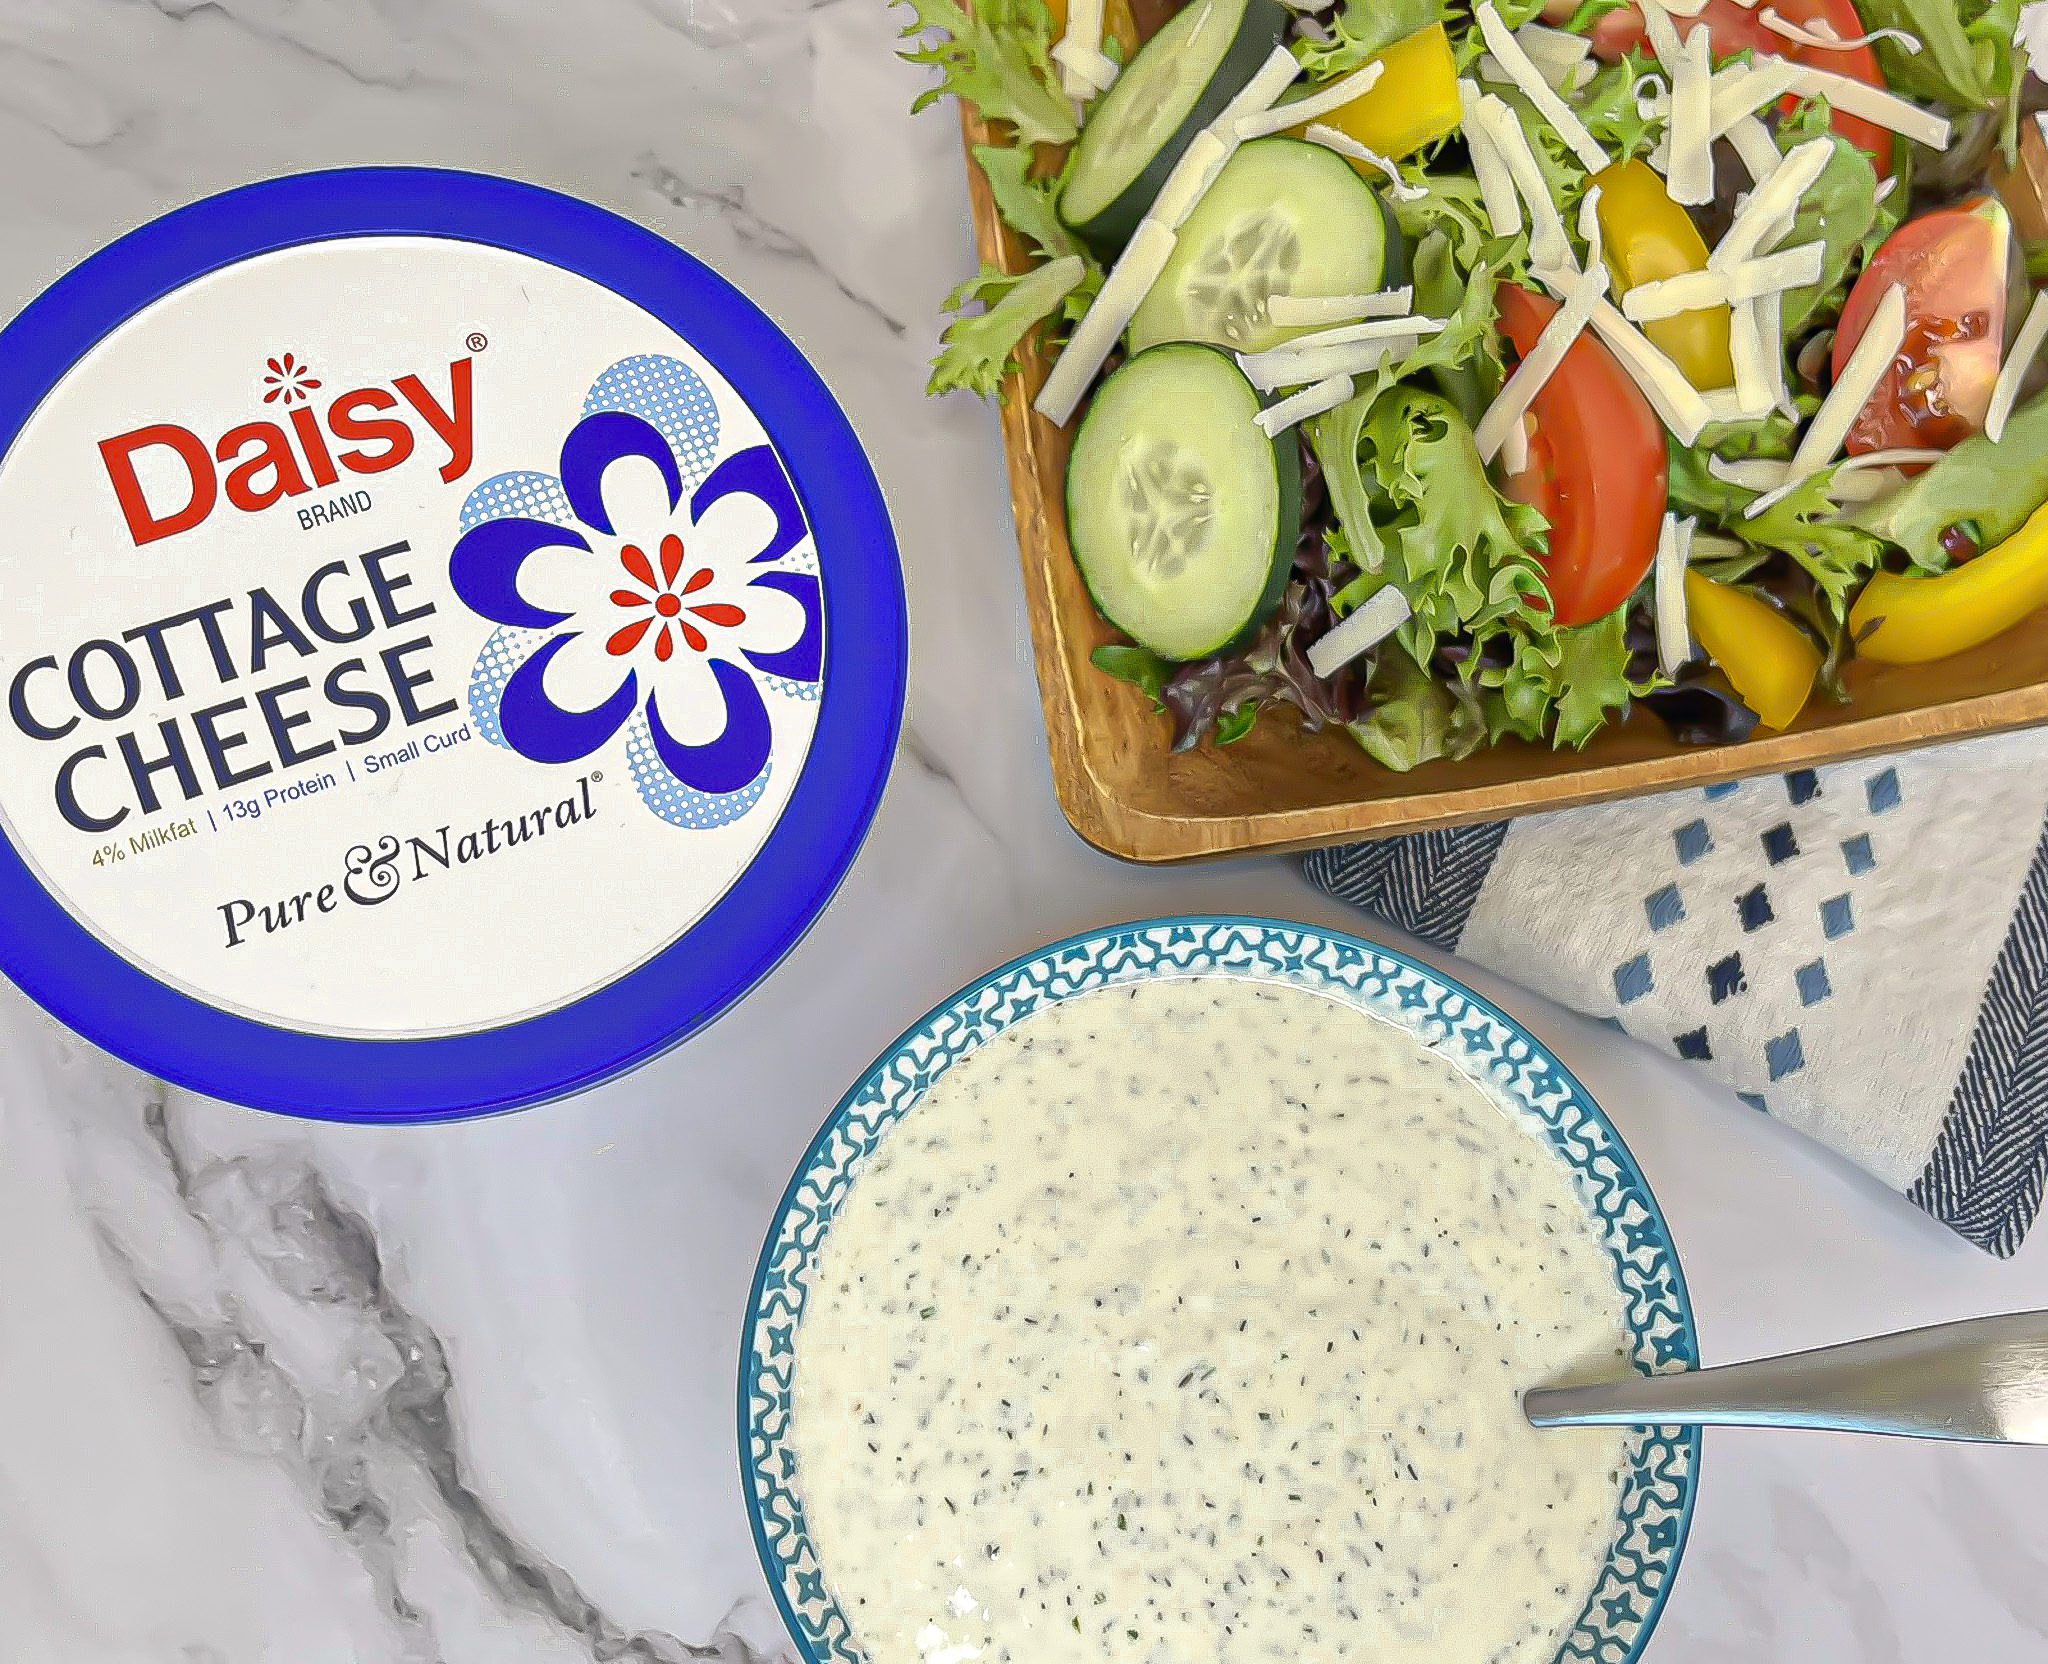
Cheesy Ranch Dressing
Cheesy Ranch Dressing
This easy Cheesy Ranch Dressing comes together in minutes and tastes so much better than anything from a bottle. It’s creamy, flavorful, and packed with protein without the preservatives or artificial ingredients you’ll often find in store-bought dressings. Simple, wholesome, and seriously delicious.
This delicious, flavor-packed dressing starts with Daisy Cottage Cheese as the base. It blends up smooth and creamy, adding a boost of protein and a rich texture that makes every bite extra satisfying. It’s a simple swap that delivers big on both flavor and nutrition.
Cheesy Ranch Dressing Ingredients
- Daisy Cottage Cheese (1 cup): Provides the dressing with its creamy texture and adds a subtle tangy taste with a boost of protein.
- Buttermilk (1/2 cup): Tangy in taste, it adds a touch of acid to the dressing and thins it out.
- Mayonnaise (1/4 cup): Adds a creamy richness to the dressing.
- Fresh Chives (2 tablespoons, chopped): Small, thin, and wispy onions, perfect for adding a touch of mild onion flavor with a taste similar to leeks.
- Parmesan (2 tablespoons, grated): Best when freshly grated, it adds a nutty saltiness to the dressing.
- Garlic (1 clove): Fresh garlic gives a pungent, sharp flavor that compliments the herbs.
- Onion Powder (1/4 teaspoon): Adds a concentrated, punchy onion taste without adding texture of fresh onions.
- Kosher Salt (1/4 teaspoon): A large-grain salt that is less refined than table salt and contains no additives. It helps enhance the other flavors of the dressing.
- Cracked Black Pepper (1/4 teaspoon): Adds a round and deep flavor than ground pepper. Highly fragrant and earthy in taste with citrus and slight floral notes.
- Dried Dill (1 teaspoon): One of the traditional flavors of ranch dressing, this concentrated dried herb packs a bright, sweet, citrusy, earthy punch.
Substitutions, Variations, and Tips
- ½ teaspoon jarred minced garlic may be used in place of the garlic clove.
- A small, diced jalapeno or serrano chile may be added for if you like spicier salad dressings.
- Similarly, you can add 1/8 teaspoon of cayenne pepper to boost the heat of the dressing.
- Don’t want to invest in a whole jug of buttermilk? You can make your own version with regular milk and vinegar or lemon juice. Just mix 1 tablespoon of white vinegar or lemon juice into 1 cup of milk. Let stand for 10 minutes and then use.
- Green onions or leeks may be used in place of chives.
- 1 tablespoon chopped fresh dill may be used in place of dried dill.

How to Make Cheesy Ranch Dressing
- Combine all ingredients, except the dill, in a food processor and pulse until smooth.
- Stir dill into dressing.
- Use immediately or refrigerate before serving.
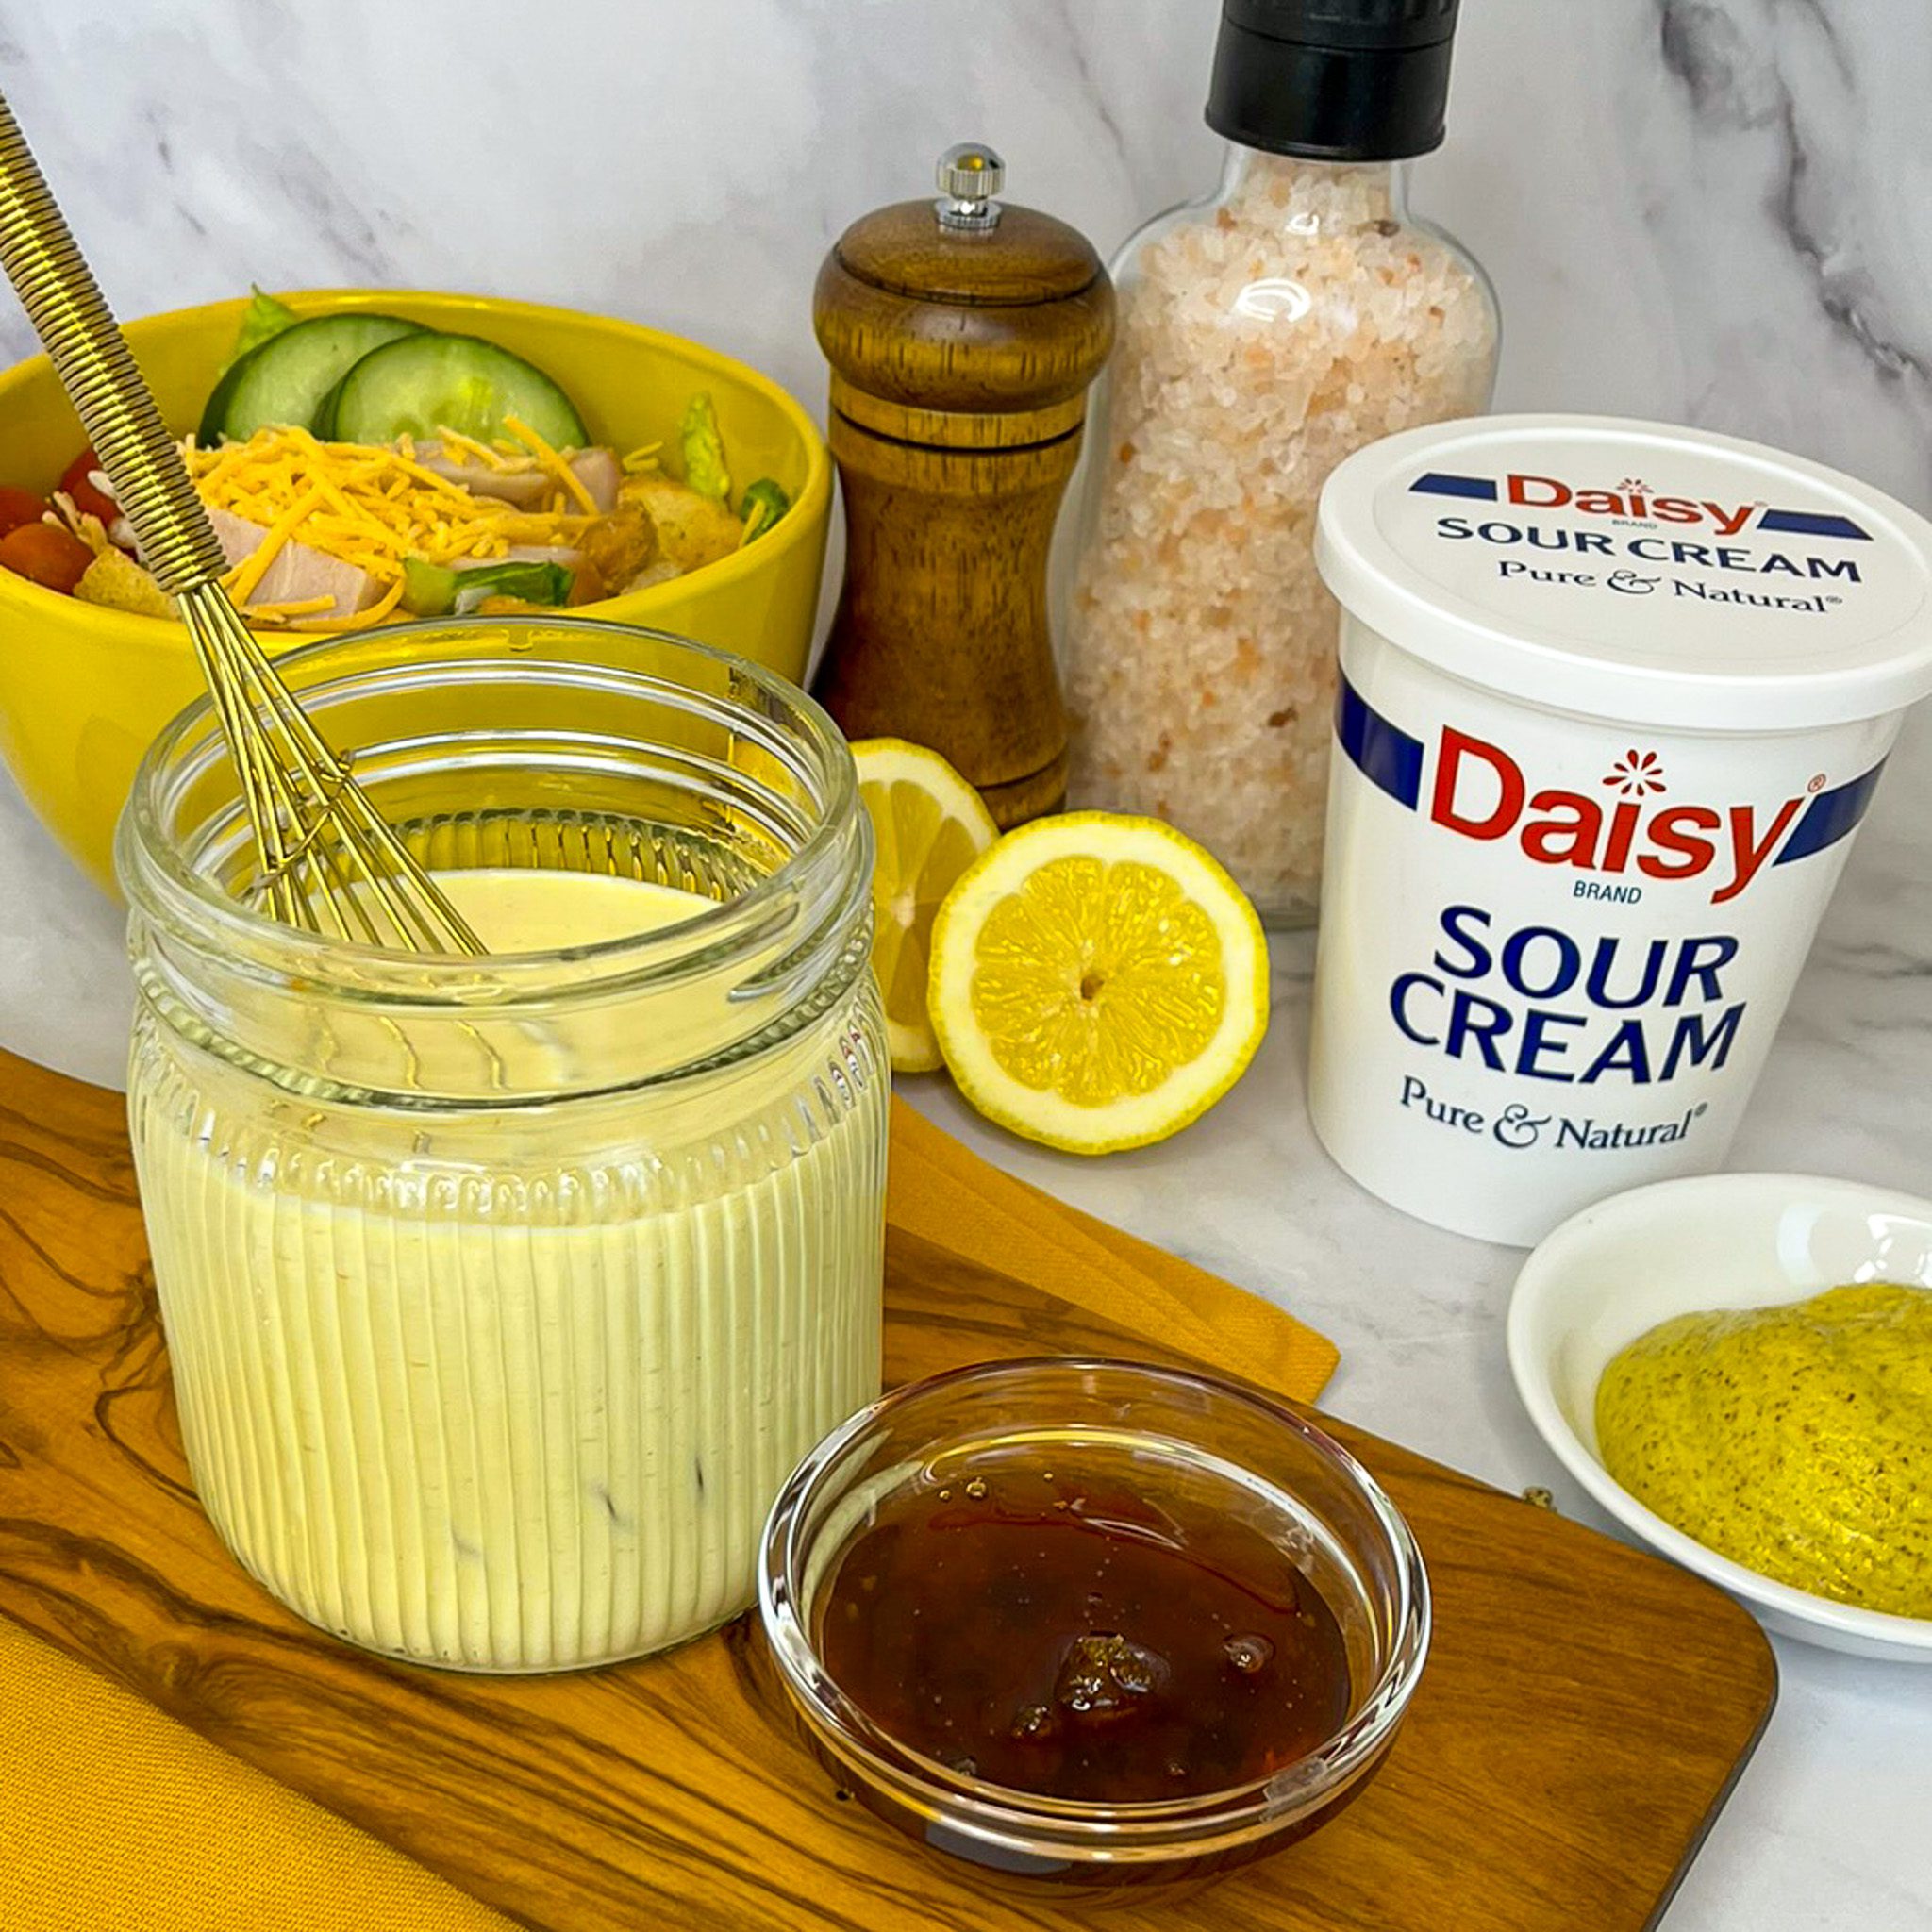
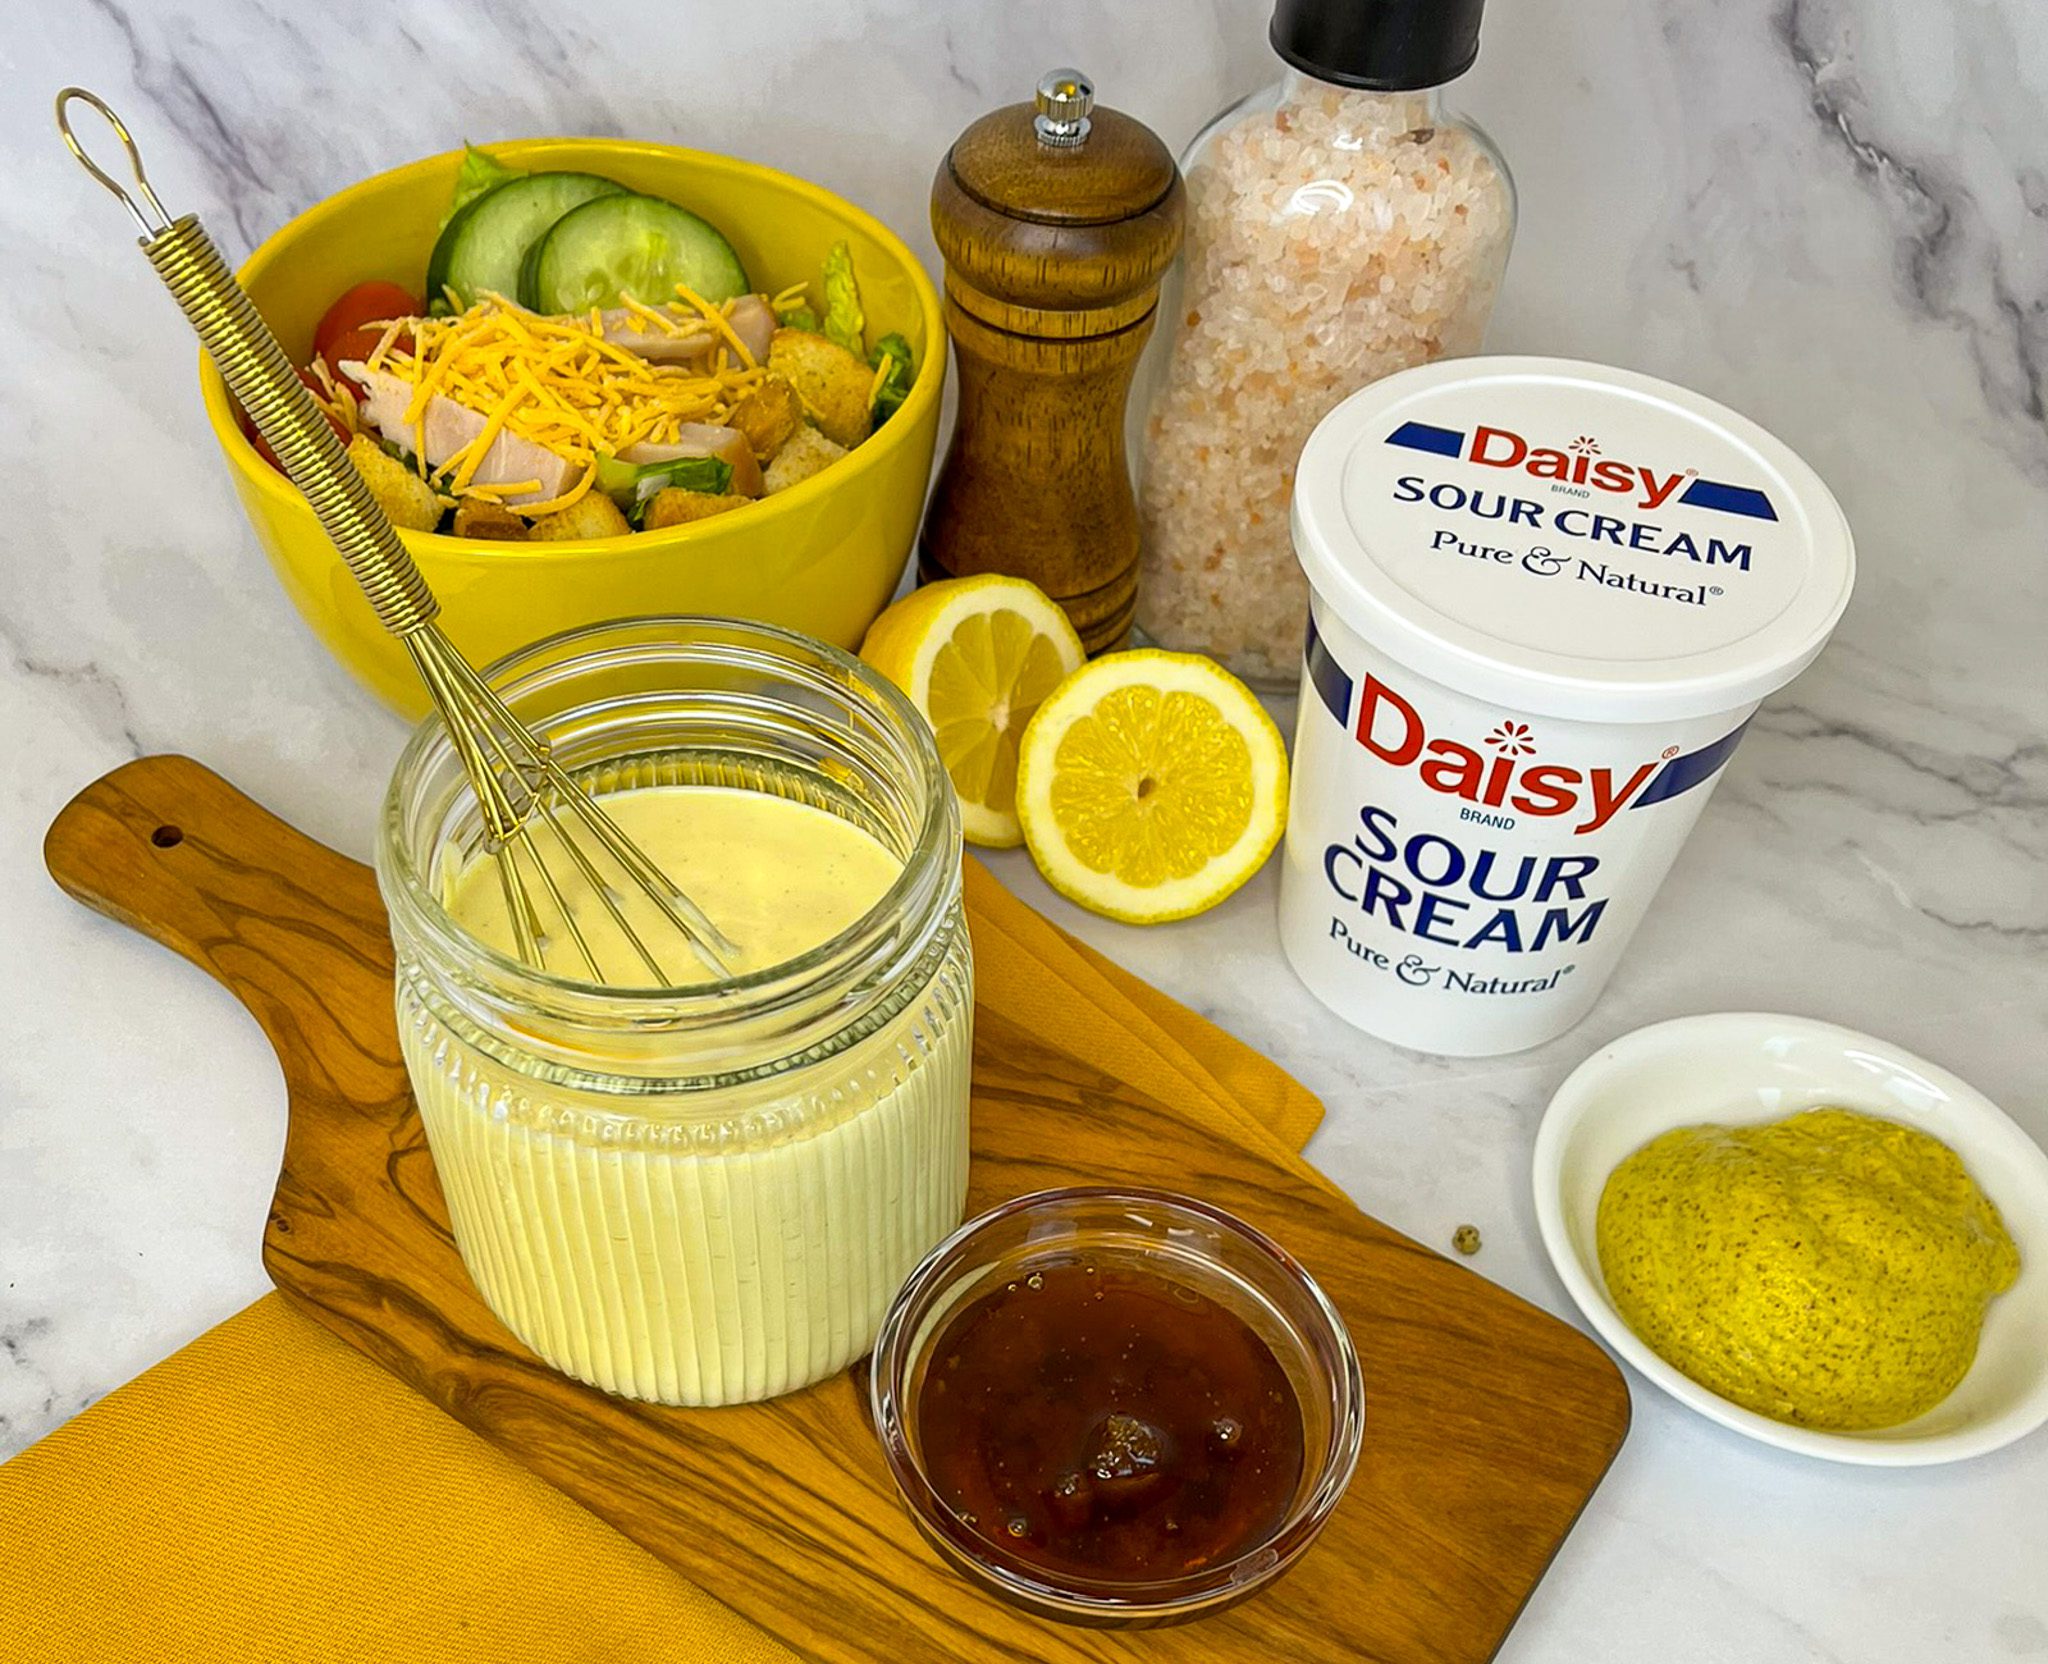
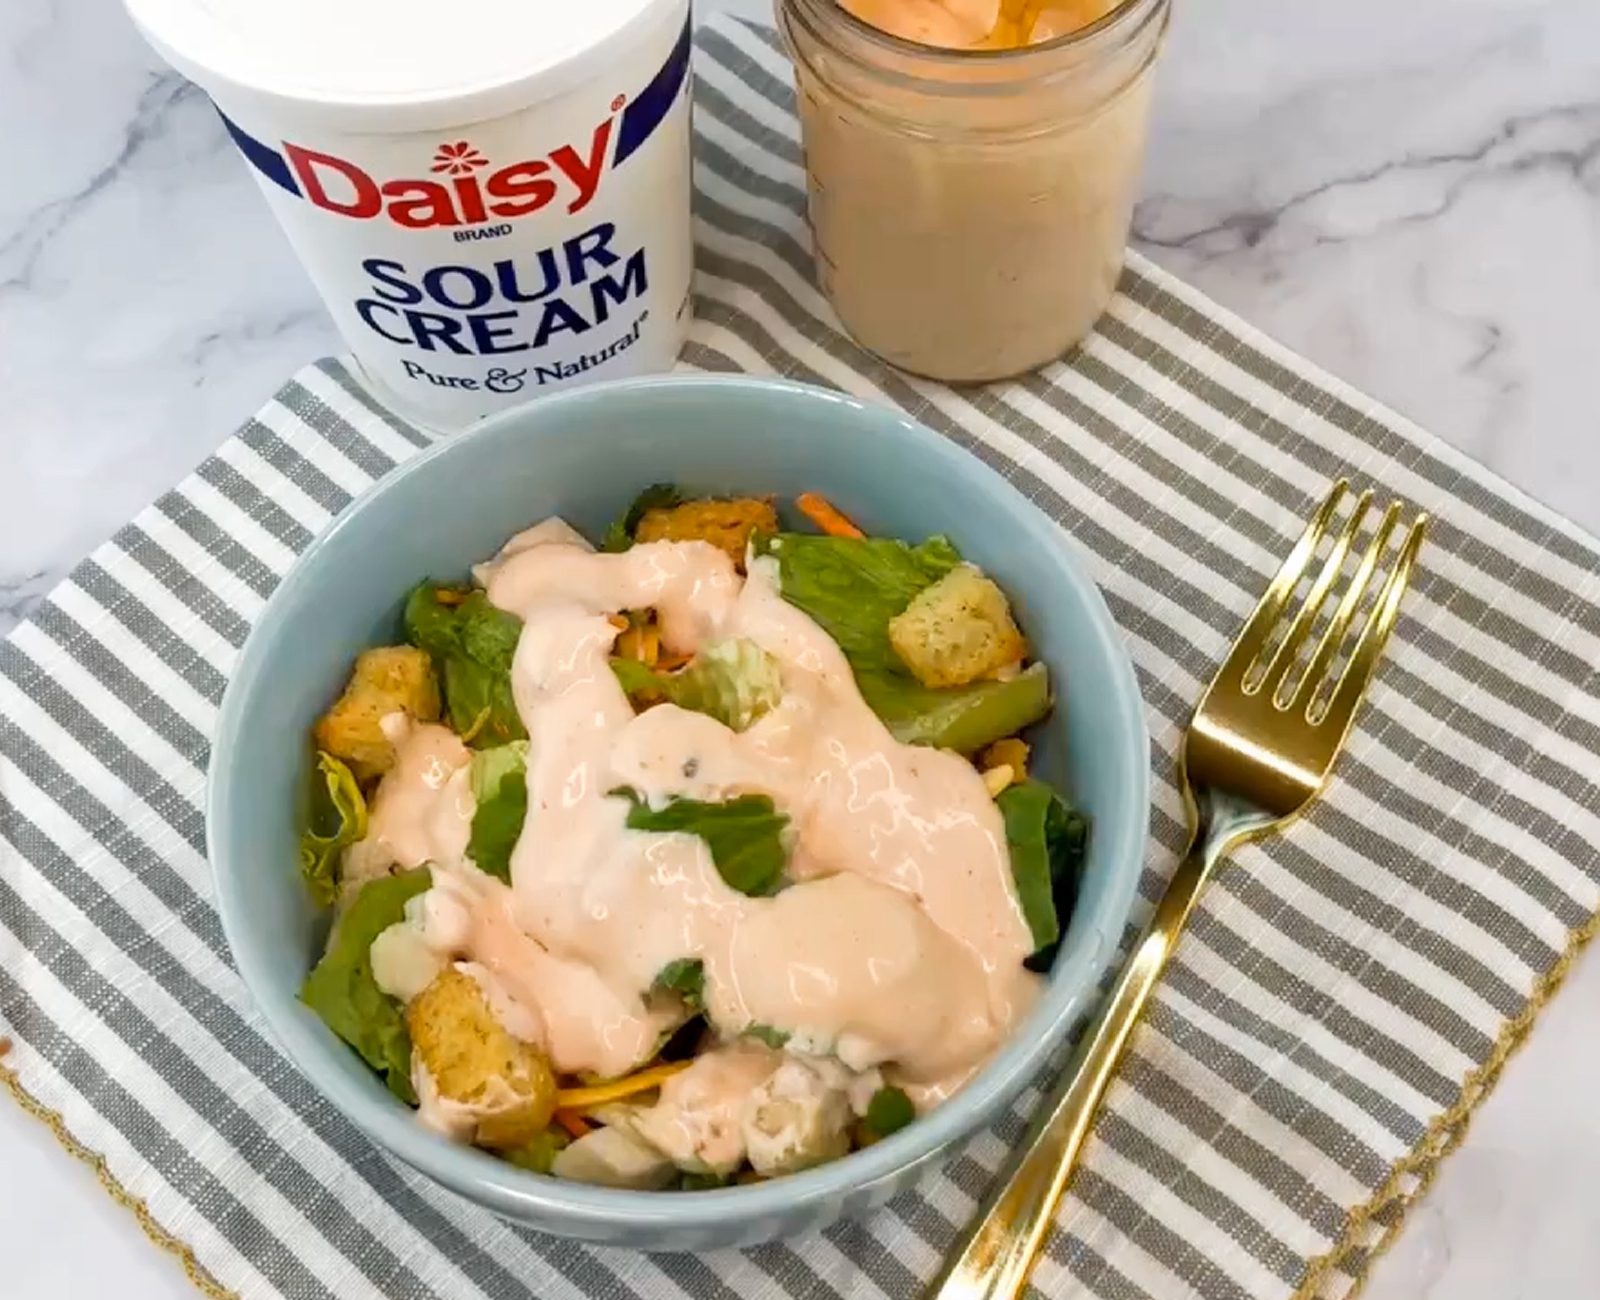
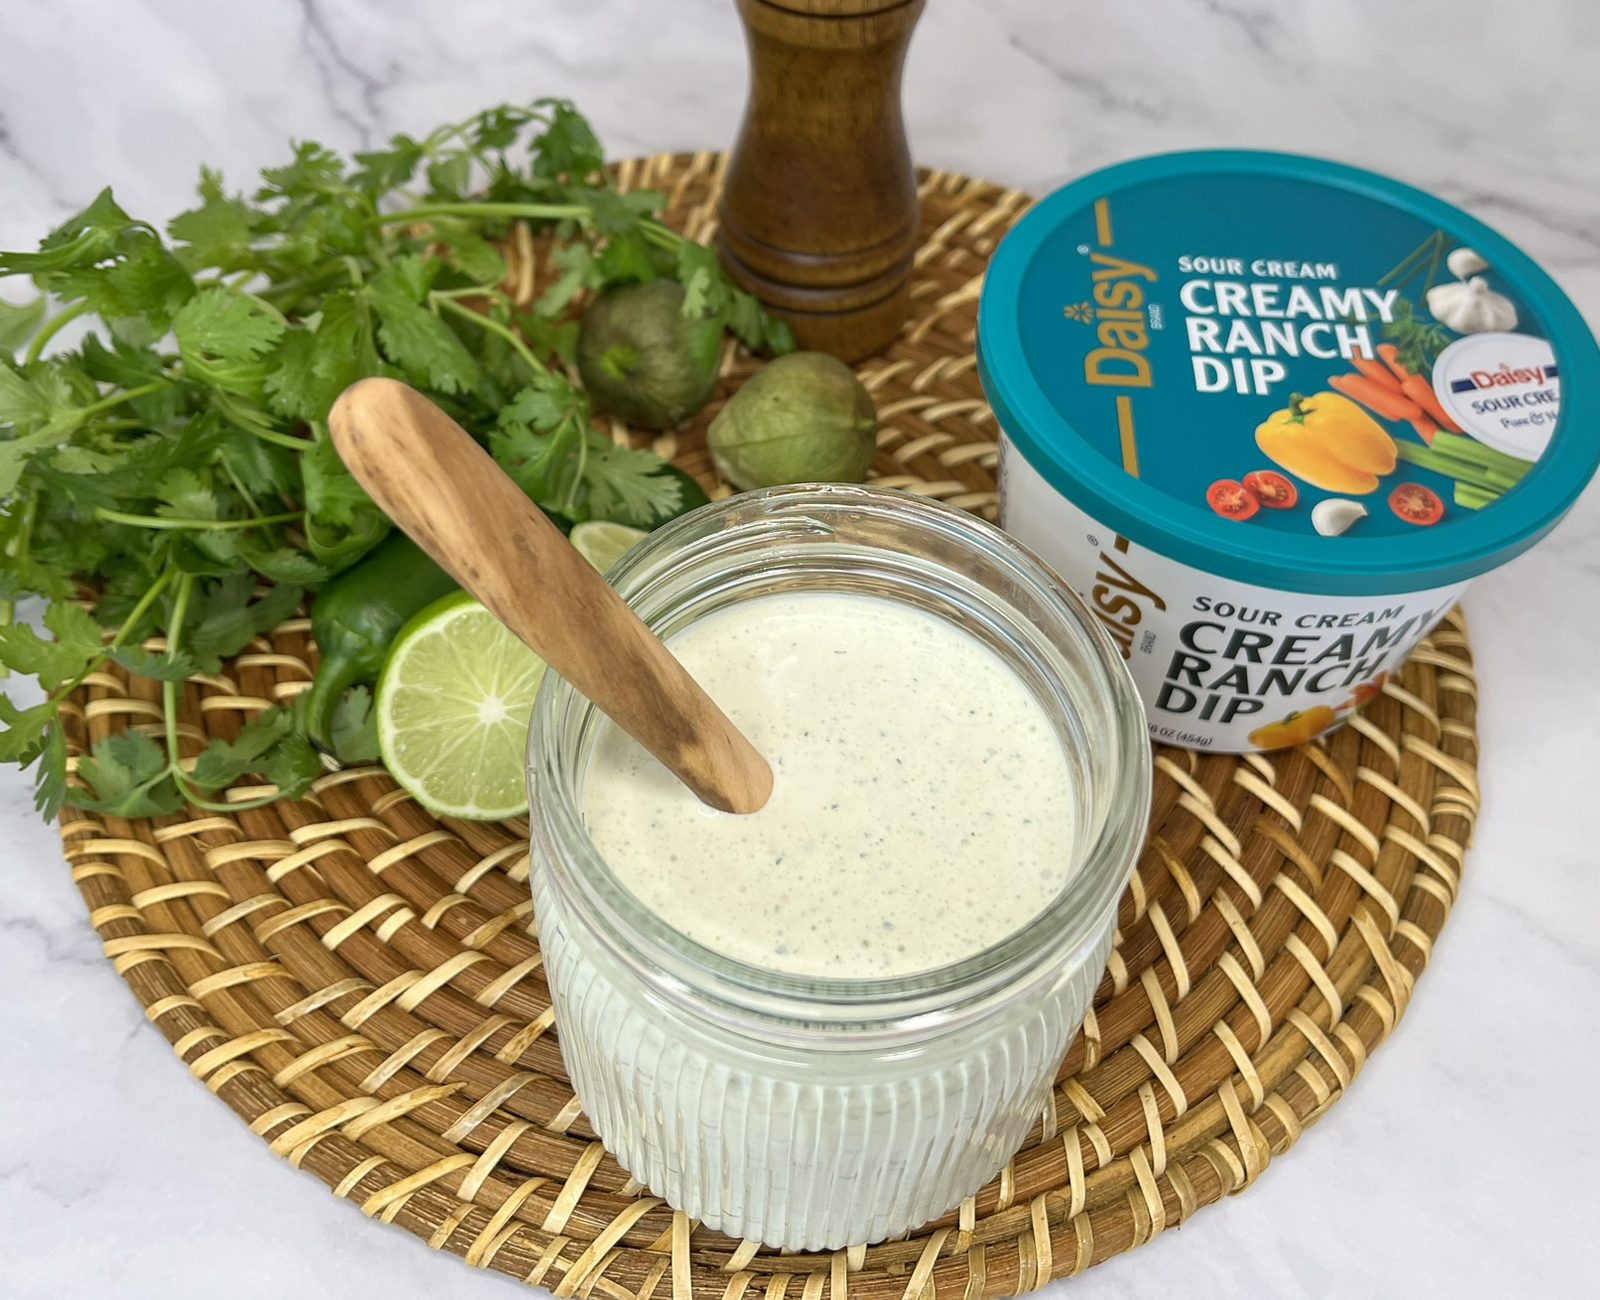
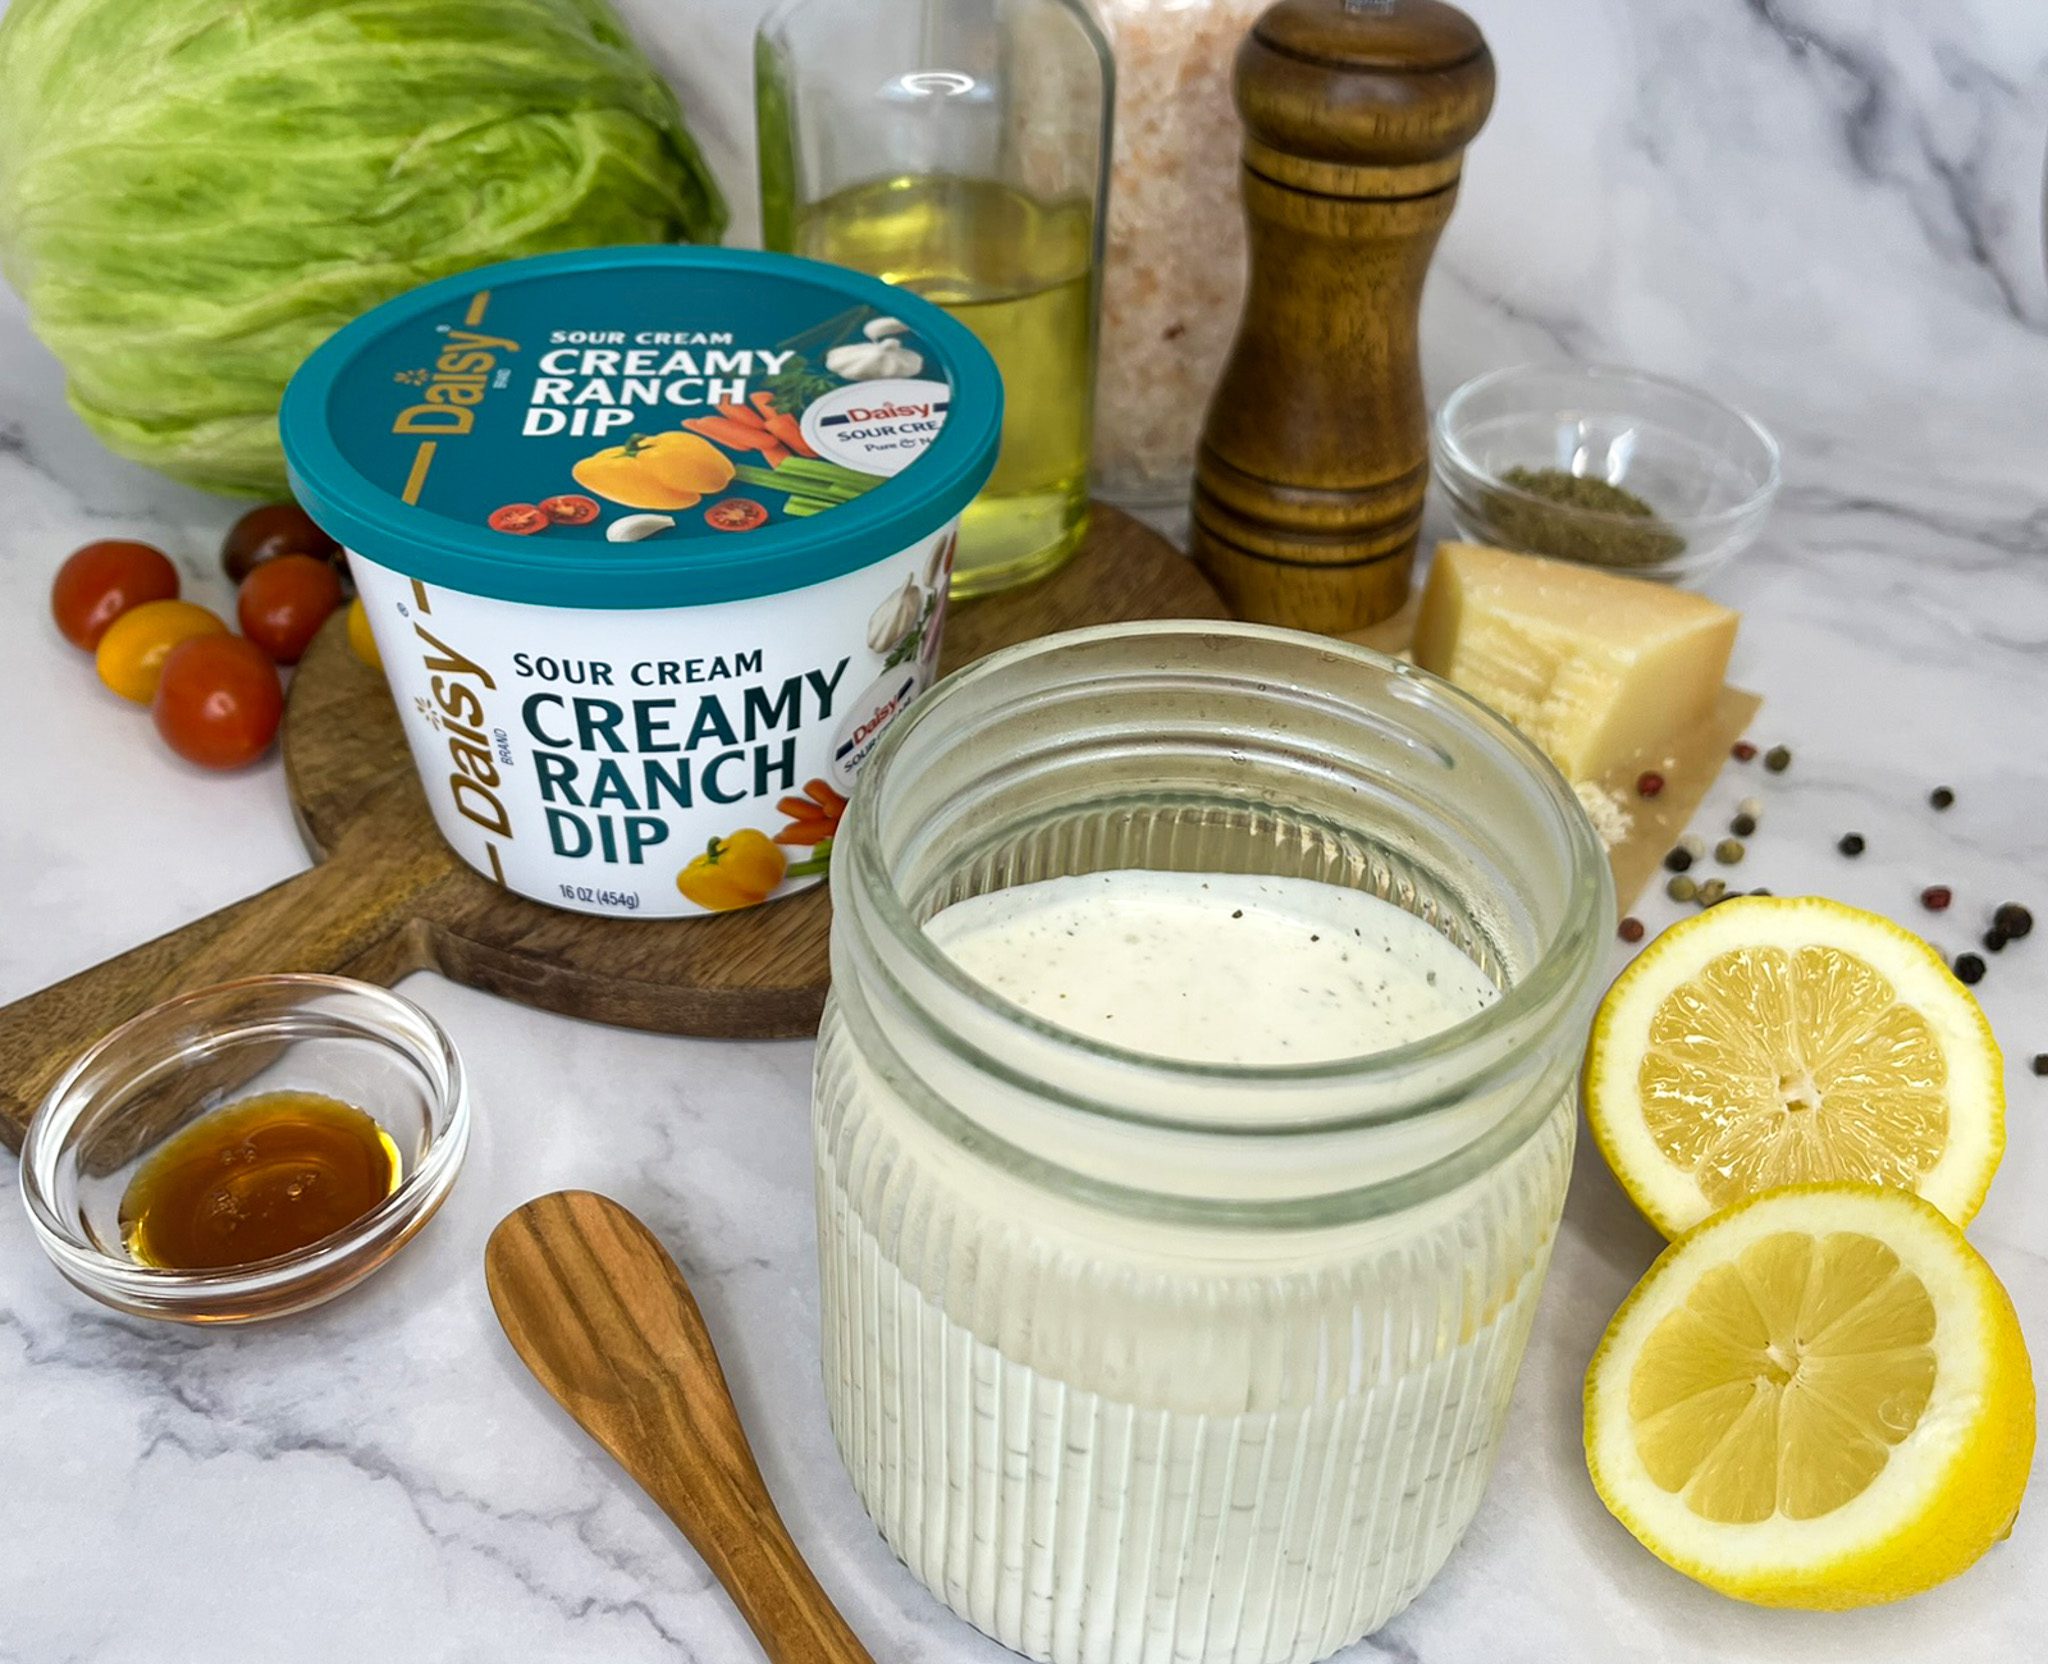
Easy Homemade Salad Dressings
Fresh, Flavorful, & Customizable – Easy Homemade Salad Dressing Ideas
Ditch the store-bought bottles and have a little fun in the kitchen! Homemade salad dressing is surprisingly quick, easy, and budget-friendly and the flavor payoff is so worth it.
Whether you prefer something tangy and zippy or smooth and slightly sweet, starting with Daisy Sour Cream or Daisy Ranch Dip makes it simple. Just whisk your base with a few pantry staples, think olive oil, vinegar or citrus juice, herbs, and seasonings, and you’ll have a fresh, flavorful dressing in minutes. It’s a delicious way to customize your salads and save money at the same time.
One of the best parts about making your own dressing? You’re in total control. You know exactly what’s going into it. No unnecessary additives, preservatives, or artificial flavors. Just simple, real ingredients you already have on hand.
A splash of oil, a drizzle of vinegar or citrus, and a spoonful of your favorite pantry condiments can come together to create something truly delicious. Mix and match herbs, spices, and seasonings to create endless flavor combinations that suit your taste perfectly.
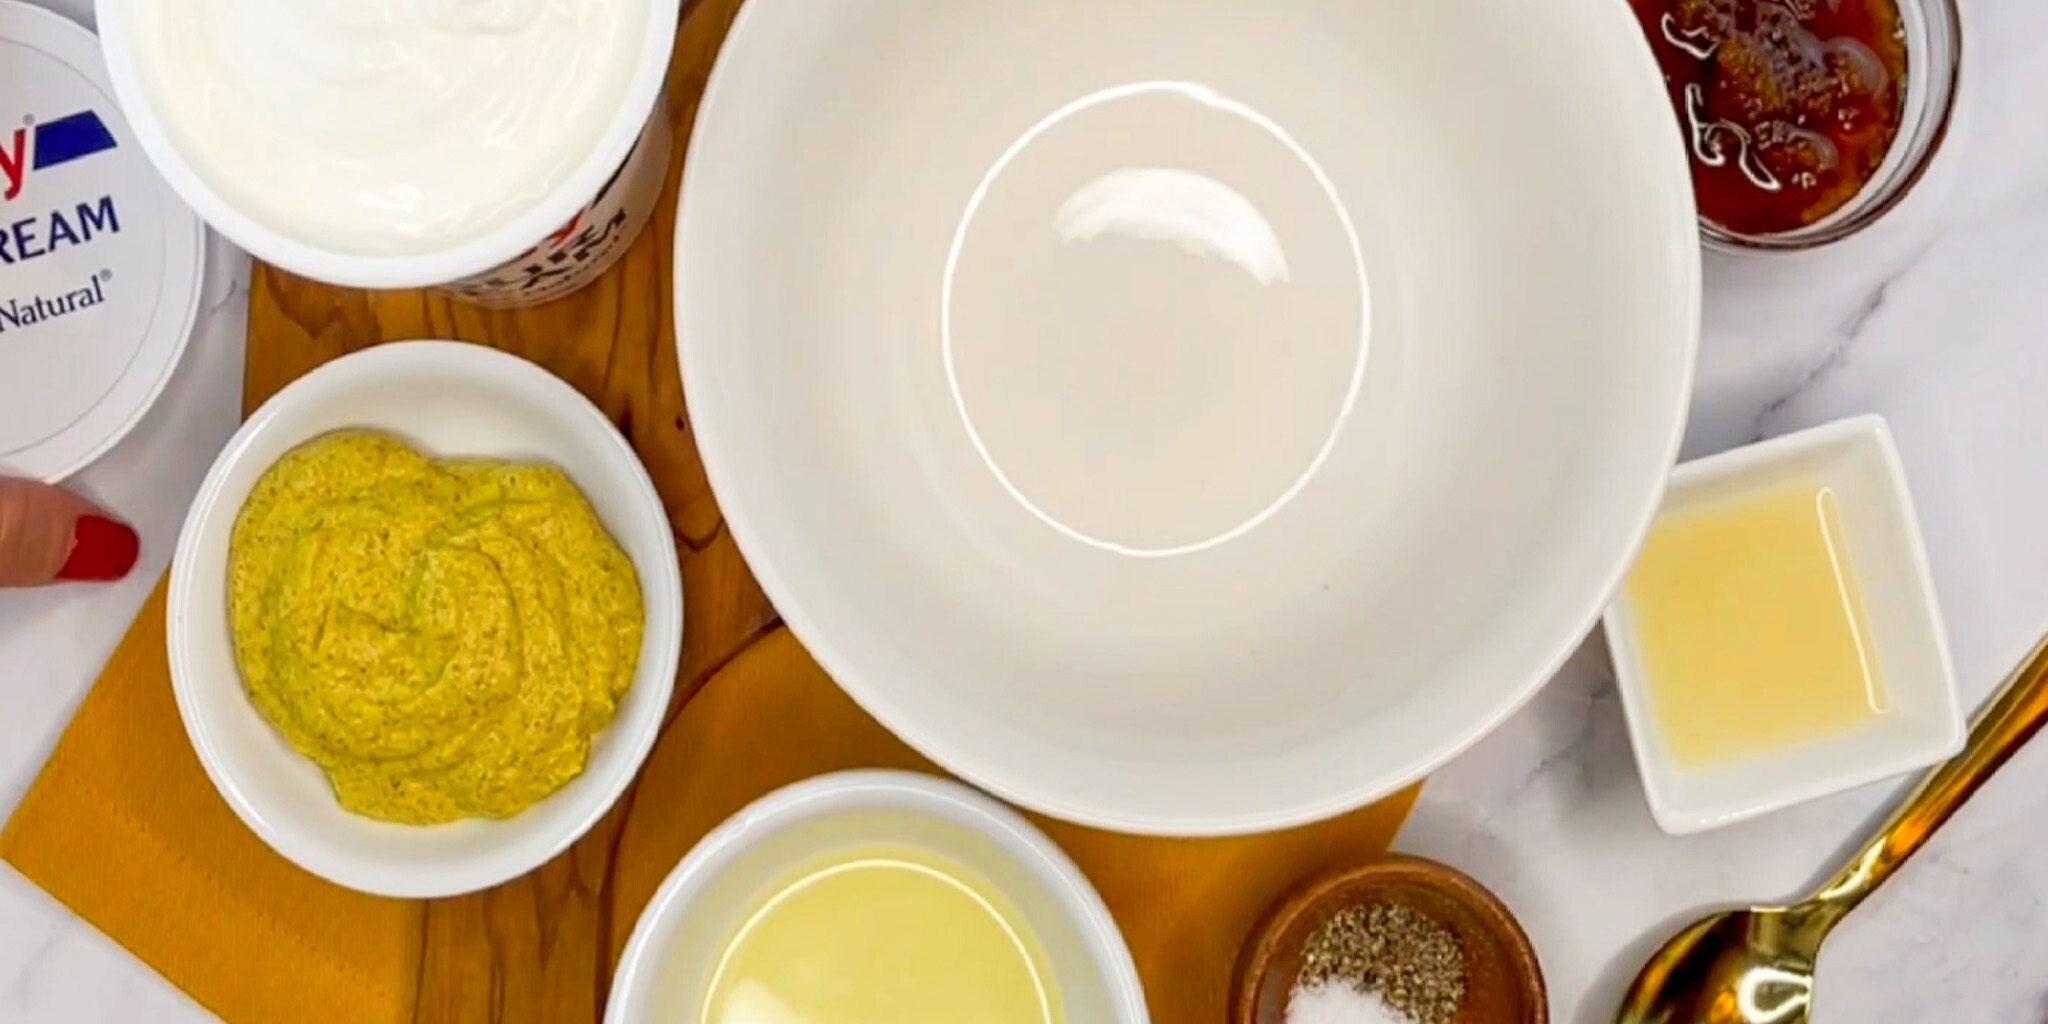
Ingredient Options
- Daisy Sour Cream: The classic rich flavor and creamy texture that creates the most delicious dressing base.
- Daisy Creamy Ranch Dip: Made with classic Daisy Sour Cream with fresh herbs and spices, it also creates a delicious dressing base.
- Condiments: The possibilities are endless – ketchup, mayonnaise, mustard (any type), honey, sriracha, sambal, hot sauce, pickle relish (sweet or dill), Worcestershire, salsa, chili sauce, horseradish, pesto, and barbeque sauces are great options to try. Try mixing and matching to find your favorite flavor combos.
- Vinegar or Citrus Juice: Adds a bright note and bit is tartness to balance out the other flavors. White wine vinegar, balsamic vinegar, apple cider vinegar, lemon juice, and lime juice are great choices. Aim for a ratio of around 1 part acid to 2 parts oil/healthy fat. Try experimenting with your favorites.
- Oil: A classic salad dressing ingredient, it carries other flavors and helps thin the dressings. Olive oil is a classic, but any neutral flavored oil will work well.
- Cheese: Grated or crumbled cheeses add richness and unique flavors. Try adding ¼ to ½ cup per batch of dressing.
- Veggies and Herbs: Adds a touch of freshness and spice. Avocados, minced garlic, fresh or canned jalapeno or green chilies, cilantro, basil, or dill are all great options.
- Spices: Enhances the flavors of dressings and sauces. Experiment with your favorites. Cracked black pepper adds a floral, spicy note while paprika adds color and a smokey flavor. Onion powder, garlic powder, and spice blends are great options to consider. Adding ½ to 1 teaspoon is a good starting point, with adjustments added to taste.

Irresistible Combinations Made with Daisy Sour Cream
Salad dressings made with rich, creamy Daisy Sour Cream bring you that classic tangy flavor you love with an extra velvety twist. Made with real ingredients, they deliver unreal flavor in every bite.
Perfect for drizzling over crisp salads, spooning onto burgers, or serving as a dip for fresh veggies, these homemade classics taste so much better than anything from a bottle. No artificial flavors, just simple, real deliciousness. Bold, creamy, and full of flavor, they’ll instantly elevate your salads and complement all your favorite dishes.
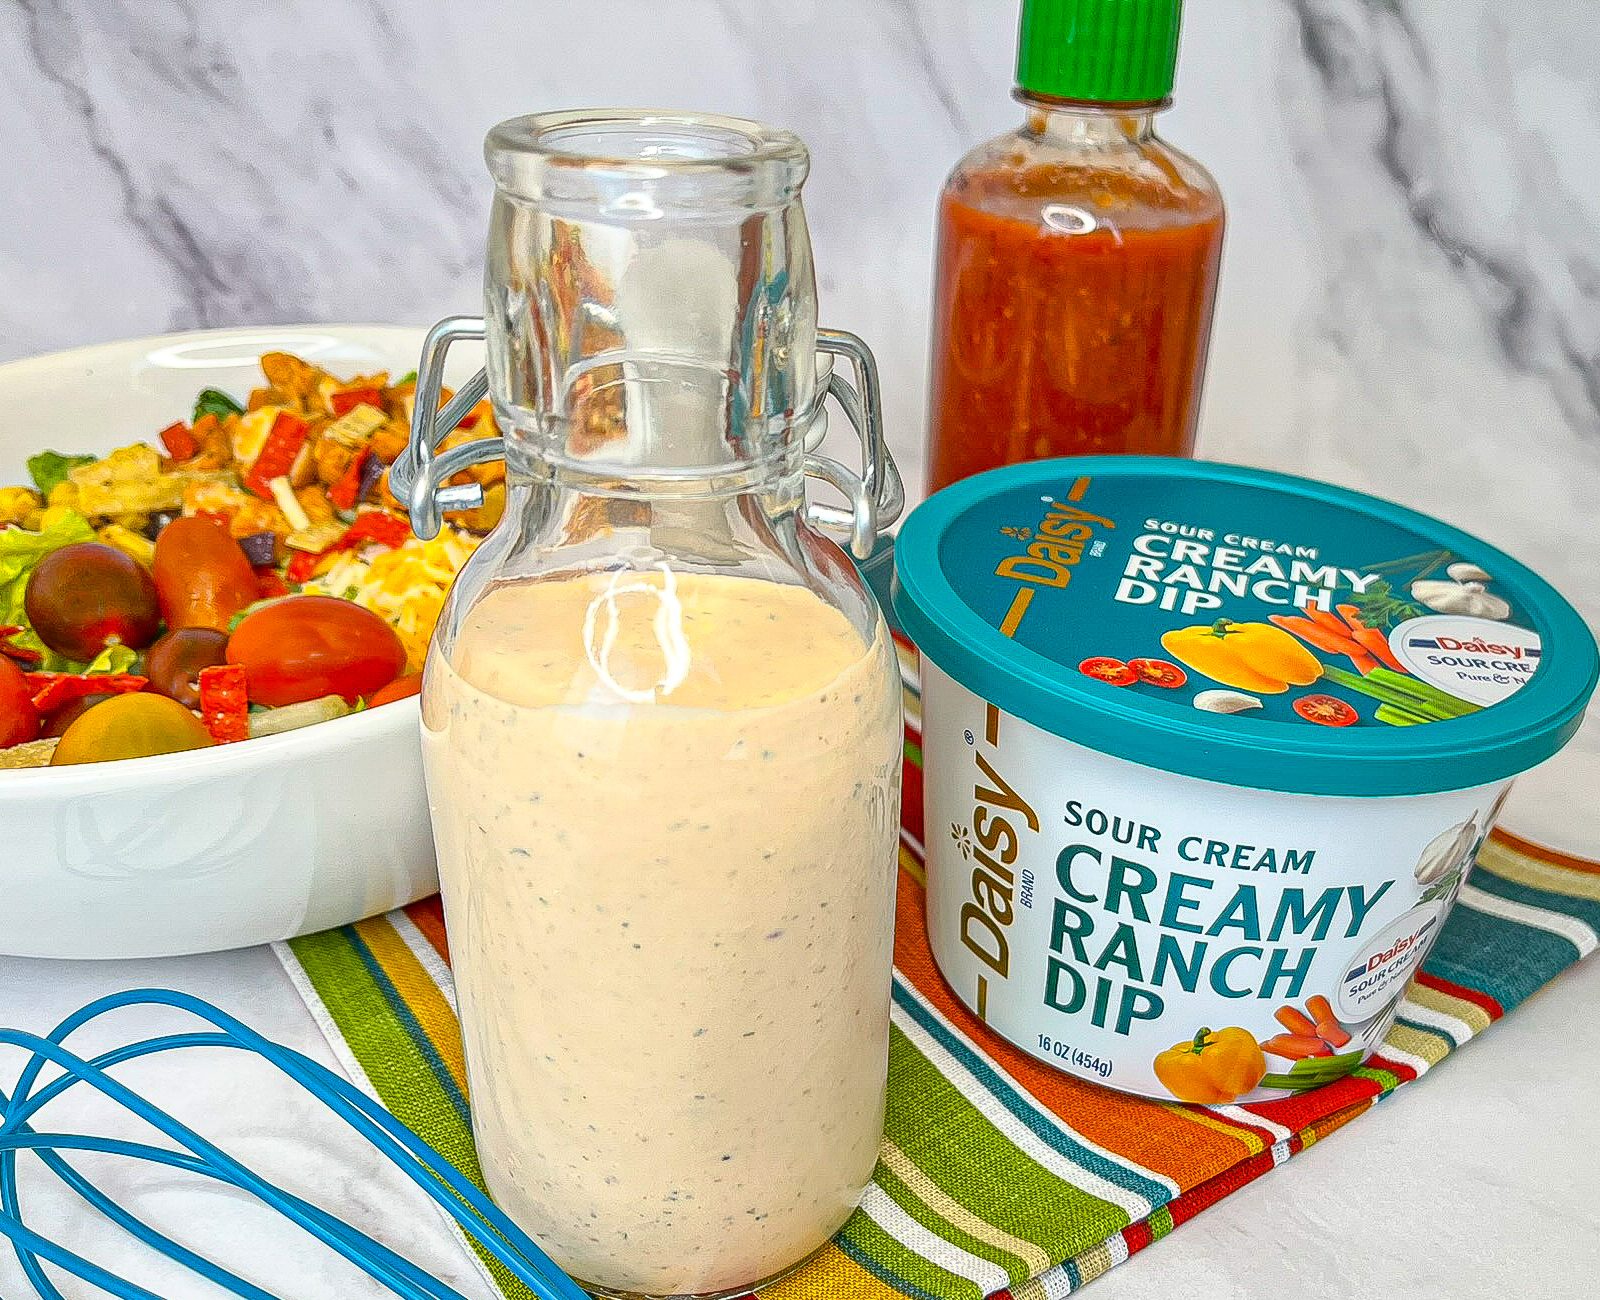
Delicious Discoveries Made with Daisy Creamy Ranch Dip
Give your salads a delicious upgrade by using Daisy Creamy Ranch Dip as the base for your creamy homemade dressings. It adds that rich, tangy ranch flavor you love, while blending beautifully with fresh herbs, citrus, and other real ingredients for a fun, flavorful twist.
The result? Unique, versatile dressings that are perfect for drizzling over salads, dipping crisp veggies, or spooning onto wraps, wings, tacos, and your favorite Mexican-inspired dishes. Anytime you need a little extra flavor boost, this easy ranch-inspired base has you covered.
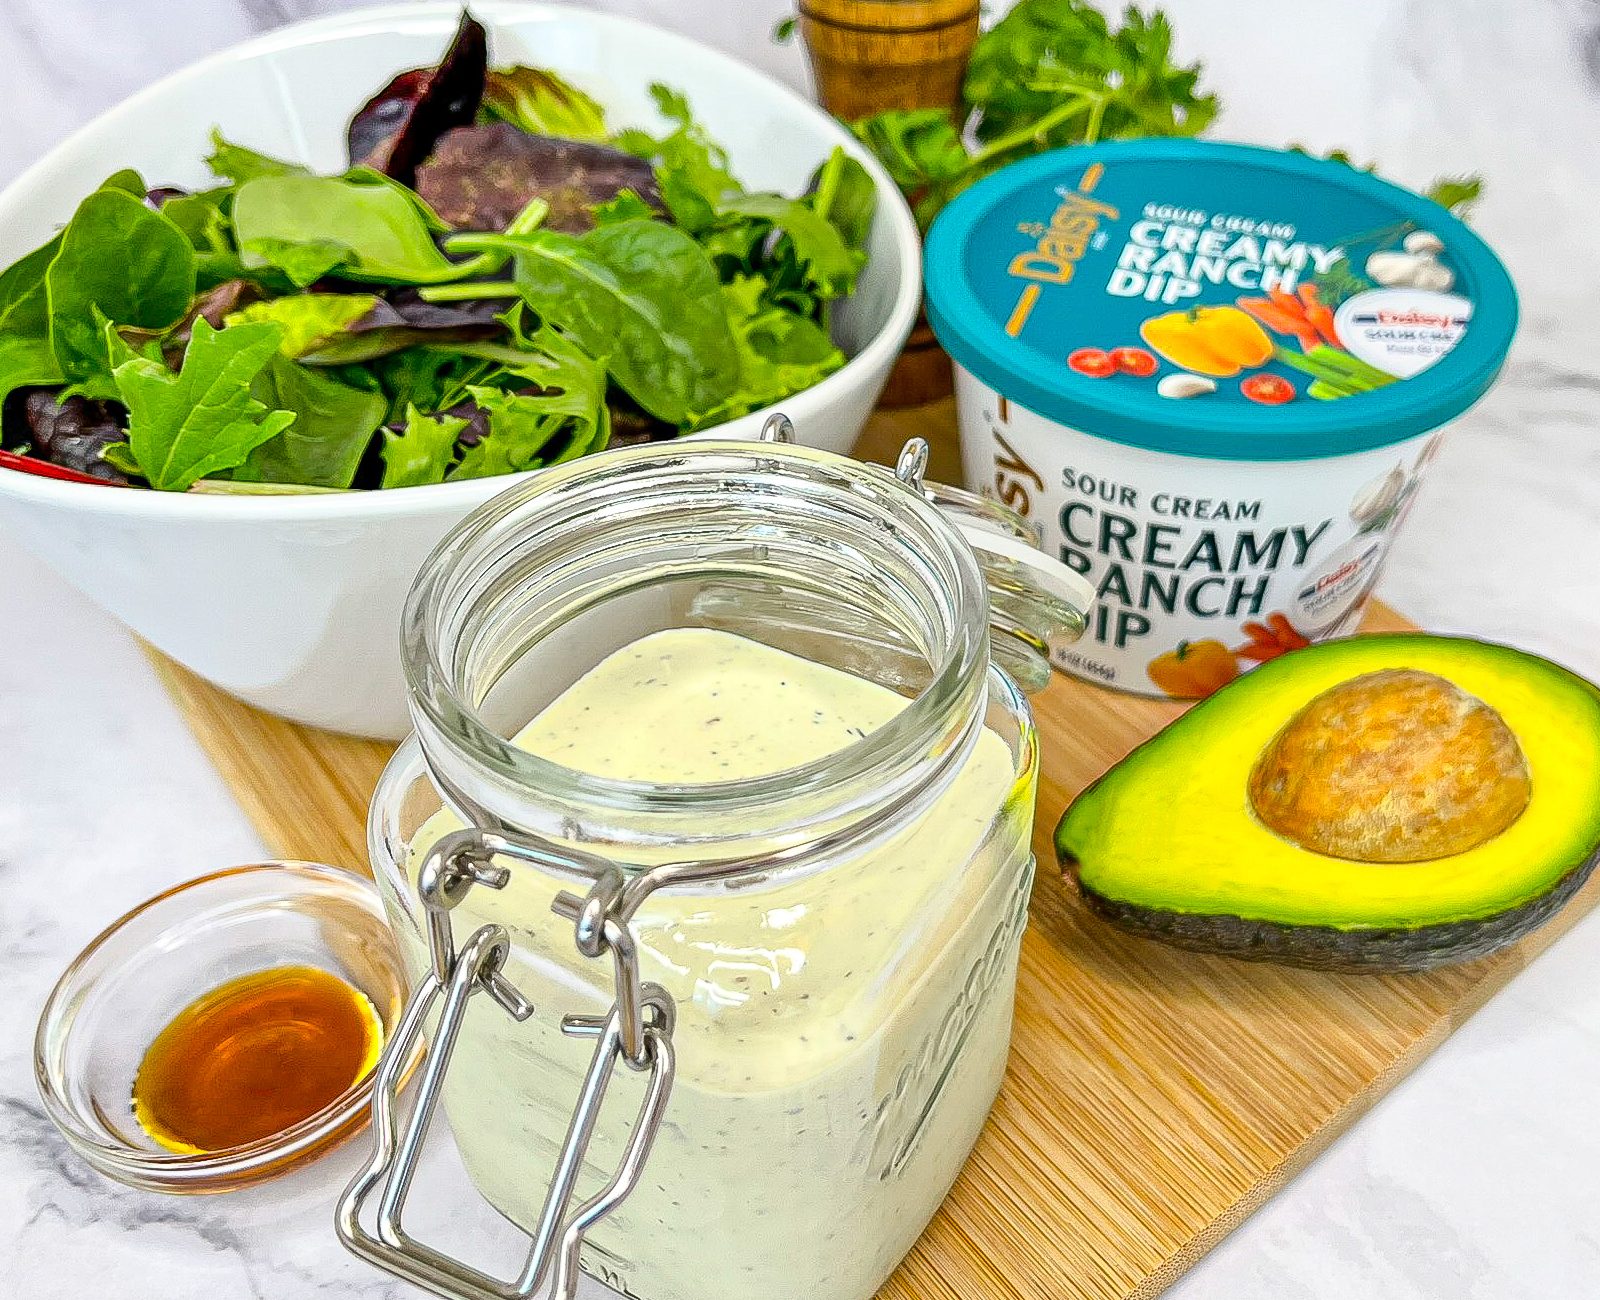
Get ready to have some fun with flavor! Each batch of homemade dressing is a chance to create something new and delicious. Add a swirl of sriracha for a spicy kick, a squeeze of fresh citrus for bright, zesty flavor, or experiment with herbs and spices to make it completely your own.
The possibilities are endless, and every combination brings something exciting to the table. With just a few simple ingredients, you can transform everyday meals into bold, crave-worthy dishes that keep everyone coming back for more.
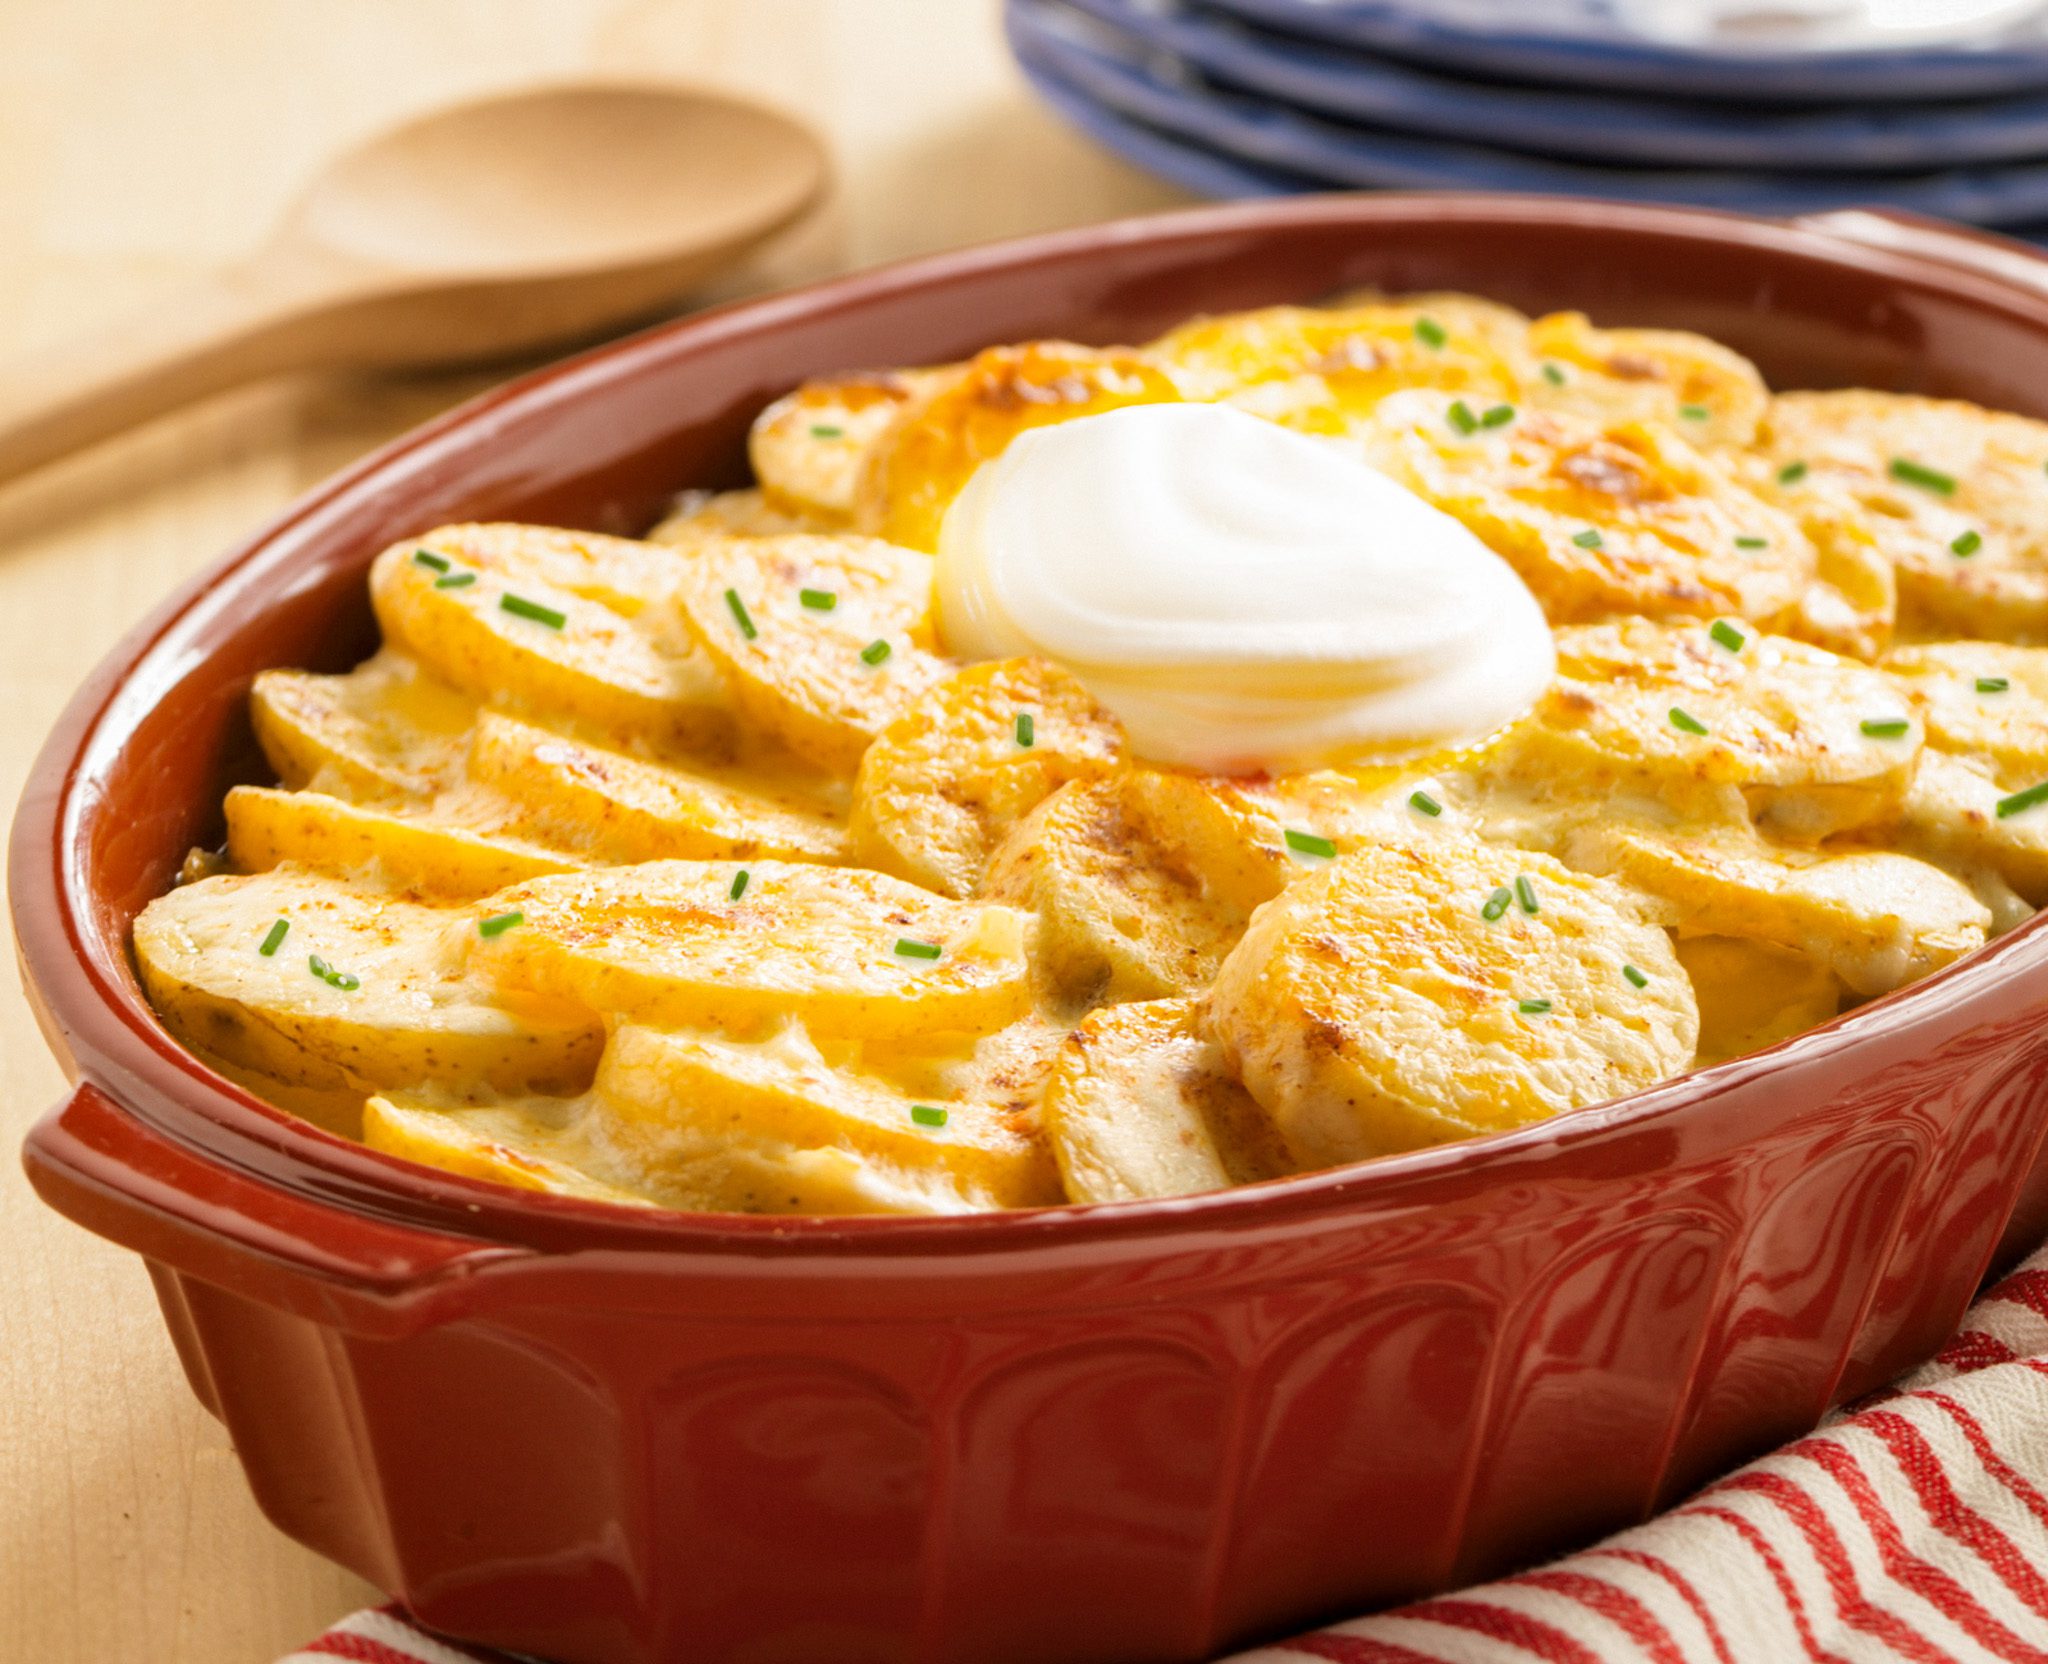
Creamy Scalloped Potatoes
Creamy Scalloped Potatoes
Perfect for chilly winter nights, this crowd-pleasing potato dish is warm, comforting, and satisfying. It effortlessly elevates cozy weeknight dinners while still feeling elegant enough to serve alongside a holiday roast, ham, or turkey. Decadent, creamy, savory, and just slightly tangy thanks to Daisy Sour Cream, these potatoes look luxuriously indulgent yet are surprisingly simple to make with ingredients you likely already have on hand.
Similar to classic potatoes au gratin, these Creamy Scalloped Potatoes feature thinly sliced potatoes layered and baked in a rich, cheesy cream sauce until perfectly tender. The result is irresistibly soft, velvety potatoes coated in a luscious, indulgent sauce that makes every bite comforting and crave-worthy. Incredibly simple to prepare, this recipe is straightforward and requires little culinary skill. They are so irresistible that they’ll become favorite savory side.
Creamy Scalloped Potato Ingredients
- Yukon Gold Potatoes (2 ½ pounds, about 5 medium): With creamy interior texture and buttery flavor, they are perfect for scalloped potatoes. They are firm enough to hold their shape, while delicate enough to become tender and velvety in the sauce.
- Butter (1/4 cup): Adds richness to the sauce and aids in the sauteing of the onions.
- Chopped Onion (1/4 cup): Sharp, earthy, and slightly pungent, they add a savory flavor that complements the cheesy sauce. They add a depth of flavor to the dish. Yellow or white onions work best in this recipe.
- All-Purpose Flour (2 tablespoons): Used to thicken and stabilize the sauce.
- Salt (1 teaspoon): Table salt works great for this recipe and enhances the other flavors in the dish.
- Milk (1 ½ cups): Thins the sauce and carries the other flavors into the potatoes.
- Daisy Sour Cream (1 cup): Creamy and delicious, it adds a richness and slight tang to the sauce and makes the sauce velvety.
- Asiago Cheese (1 ½ cup, freshly shredded): This salty, cheese is rich, nutty, and yeasty. It has a similar flavor profile to Parmesan but is nuttier and melts better due to its creamier nature.
- Paprika (1/8 teaspoon): Adds a pop of color with a mild, slightly floral, and slightly sweet note.
Substitutions, Variations, and Tips
- Yukon Gold potatoes are ideal, but Russet potatoes work just as well. Russets have a mild, earthy flavor with a slightly grainier texture.
- Skip red potatoes for this recipe. They’re too waxy and can result in a gluey texture.
- Olive oil can be used in place of butter if preferred.
- Any onion will work, but sweet yellow or white onions offer the best balance of flavor.
- For a milder onion taste, try substituting chopped leeks or green onions.
- If gluten is a concern, cornstarch can be used instead of flour to thicken the sauce. Add the milk first, then whisk in the cornstarch until smooth.
- Half-and-half is a great substitute for milk and creates an even richer, creamier sauce.
- Asiago cheese can be swapped for other favorites like Gruyère, cheddar, Manchego, or Parmesan. Use what you have on hand.
- Fresh garlic and herbs add wonderful depth of flavor. Try about 1 teaspoon of minced garlic or a sprinkle of fresh thyme or rosemary.
- Feel free to finish the dish with extra cheese or a light topping of breadcrumbs for added texture.
- For evenly sliced potatoes, a mandoline slicer or food processor makes prep quick and easy.
- This dish is perfect for making ahead. Prepare it up to one day in advance, wrap tightly, and refrigerate until ready to bake.
- To reheat, preheat the oven to 350°F, cover with foil, and bake for 15–30 minutes until warmed through. Individual portions can also be reheated in the microwave at ½ power in 15–30 second intervals.
- Cooked potatoes can be frozen. To reheat, bake covered at 325°F for about 75 minutes, or thaw to room temperature and bake at 350°F for 15–30 minutes until hot.
How to Make Creamy Scalloped Potatoes
- Spray 2-quart baking dish with nonstick spray. Preheat oven to 350°
- Peel and slice potatoes into 1/8-inch-thick circles. Place in a large saucepan and cover with water. Cook until tender, drain, and cool slightly.
- In saucepan, melt butter over medium heat. Add onion and cook 1 minute. Stir in flour and salt. Cook until bubbles form. Gradually stir in milk and cook until mixture boils. Reduce to lowest heat. Stir in sour cream and cheese. Cook until cheese melts, stirring constantly.
- Layer half potatoes in baking dish and cover with half the sauce. Repeat. Sprinkle with paprika.
- Bake 30-35 minutes until top starts to brown. Let stand a few minutes before serving.

Lemon Tea Cookies
Lemon Tea Cookies
These soft, citrusy Lemon Tea Cookies are bursting with bright lemon flavor and have a melt-in-your-mouth texture, thanks to the creamy richness of Daisy Cottage Cheese. Each bite is a delightful mix of tangy, sweet, and tender crumb — finished with a zesty lemon glaze that adds the perfect punch of flavor. And the best part? They come together in just 15 minutes!

These to-die-for cookies are perfect for summer snacking, after-school treats, or year-round tea time. Pair them with a warm cup of tea or a cold glass of milk for a little moment of joy any time of day.
Lemon Tea Cookie Ingredients
- All-Purpose Flour (1 ¼ cups): The gluten in all-purpose flour gives the cookies structure.
- Baking Powder (3/4 teaspoon): A main ingredient for leavening, it adds volume and lightness to the batter and adds height to the cookies.
- Unsalted Butter (4 tablespoons, softened): Lends flavor and richness to the cookies.
- Sugar (1 cup): Adds sweetness to the cookies.
- Egg (1 large): Acts as glue to hold the other ingredients together and adds a bit of height to the cookies.
- Daisy Cottage Cheese (1 cup, blended): The star ingredient that gives the cookies their name. It provides moistness and richness to the cookies, plus a bit of protein.
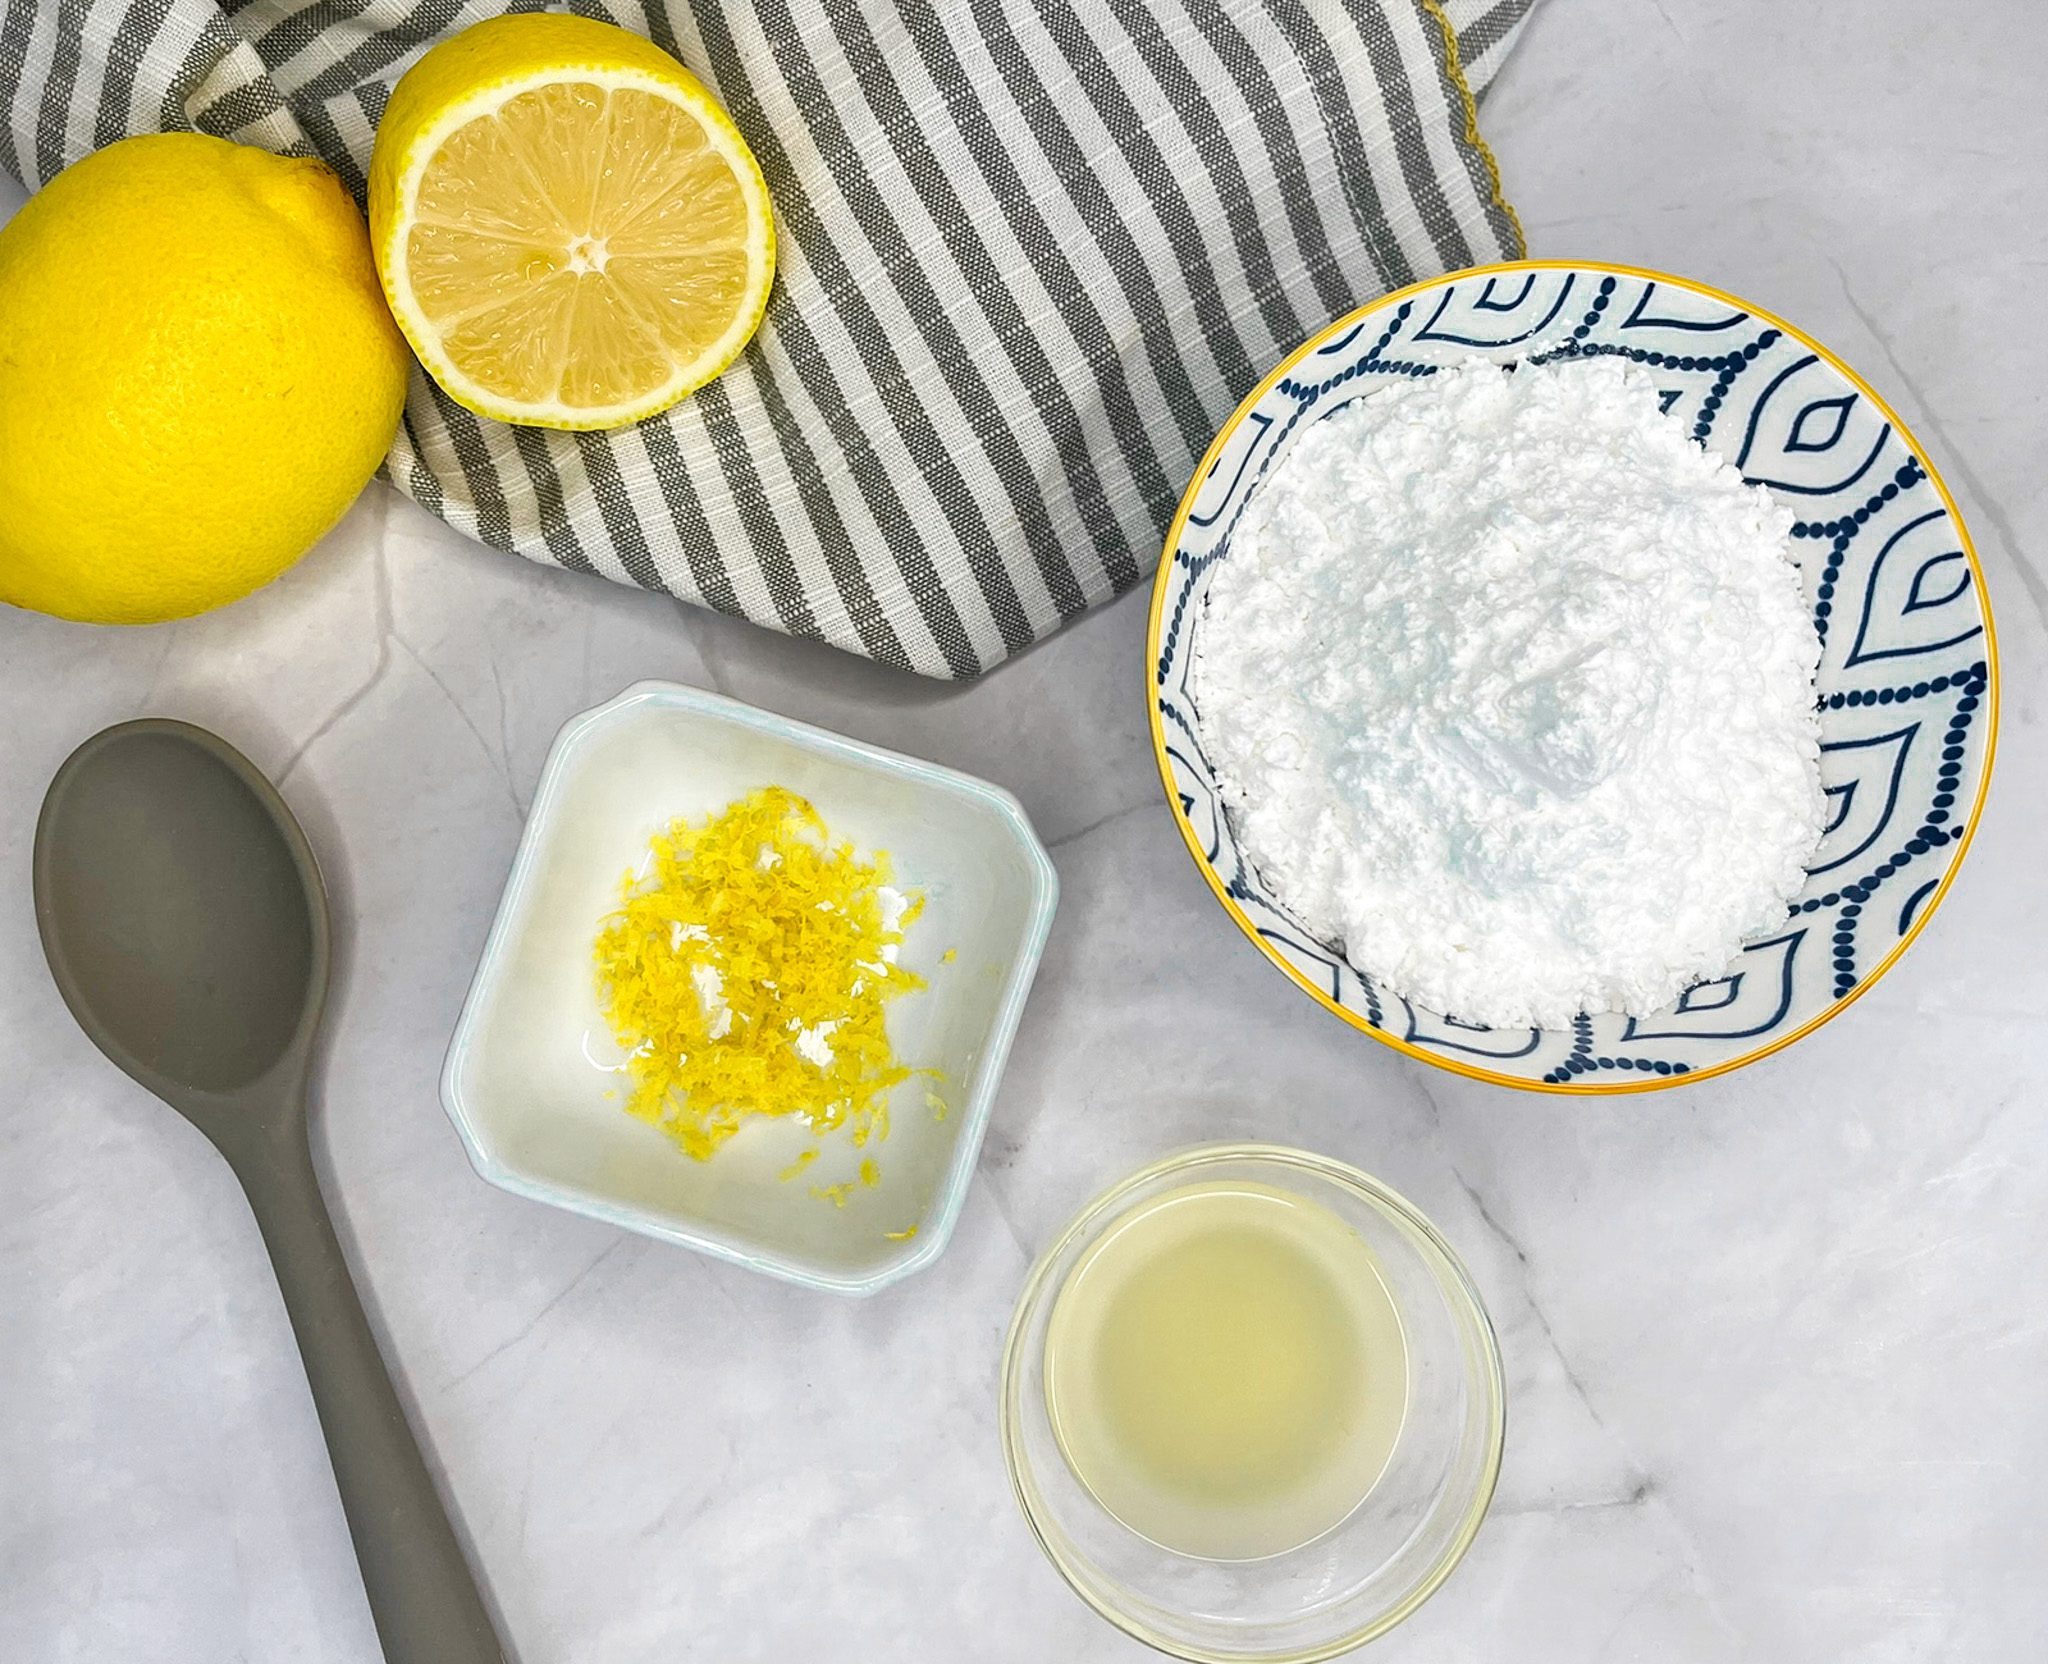
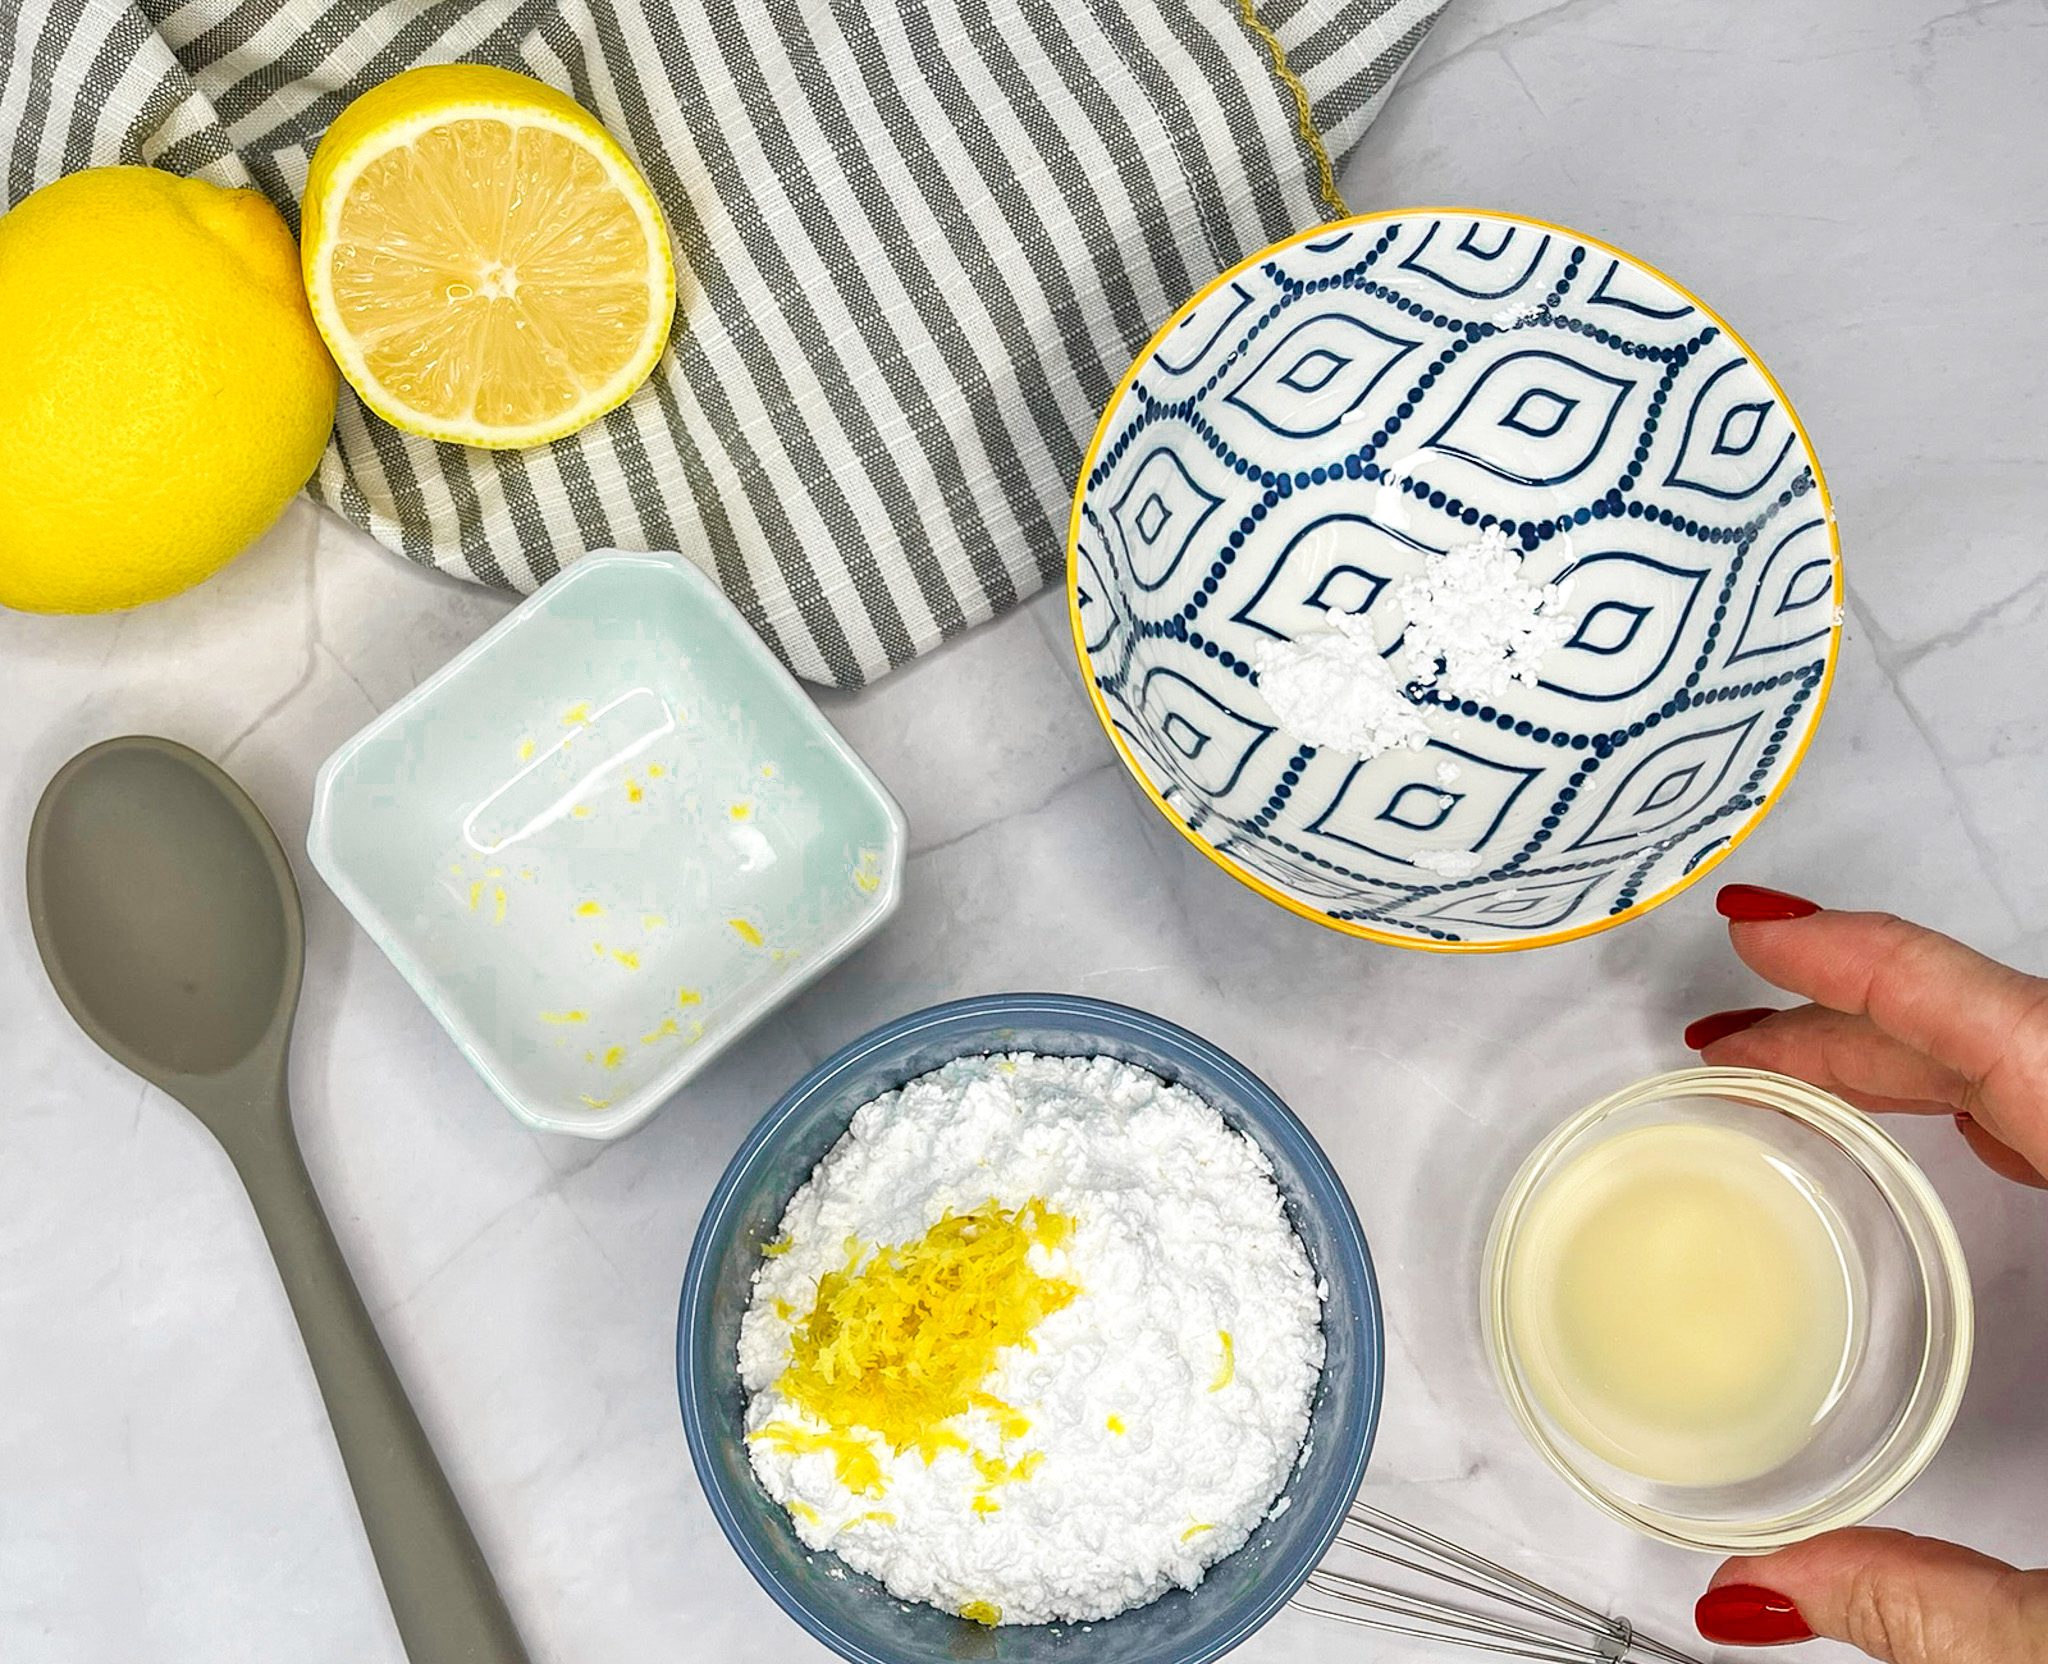
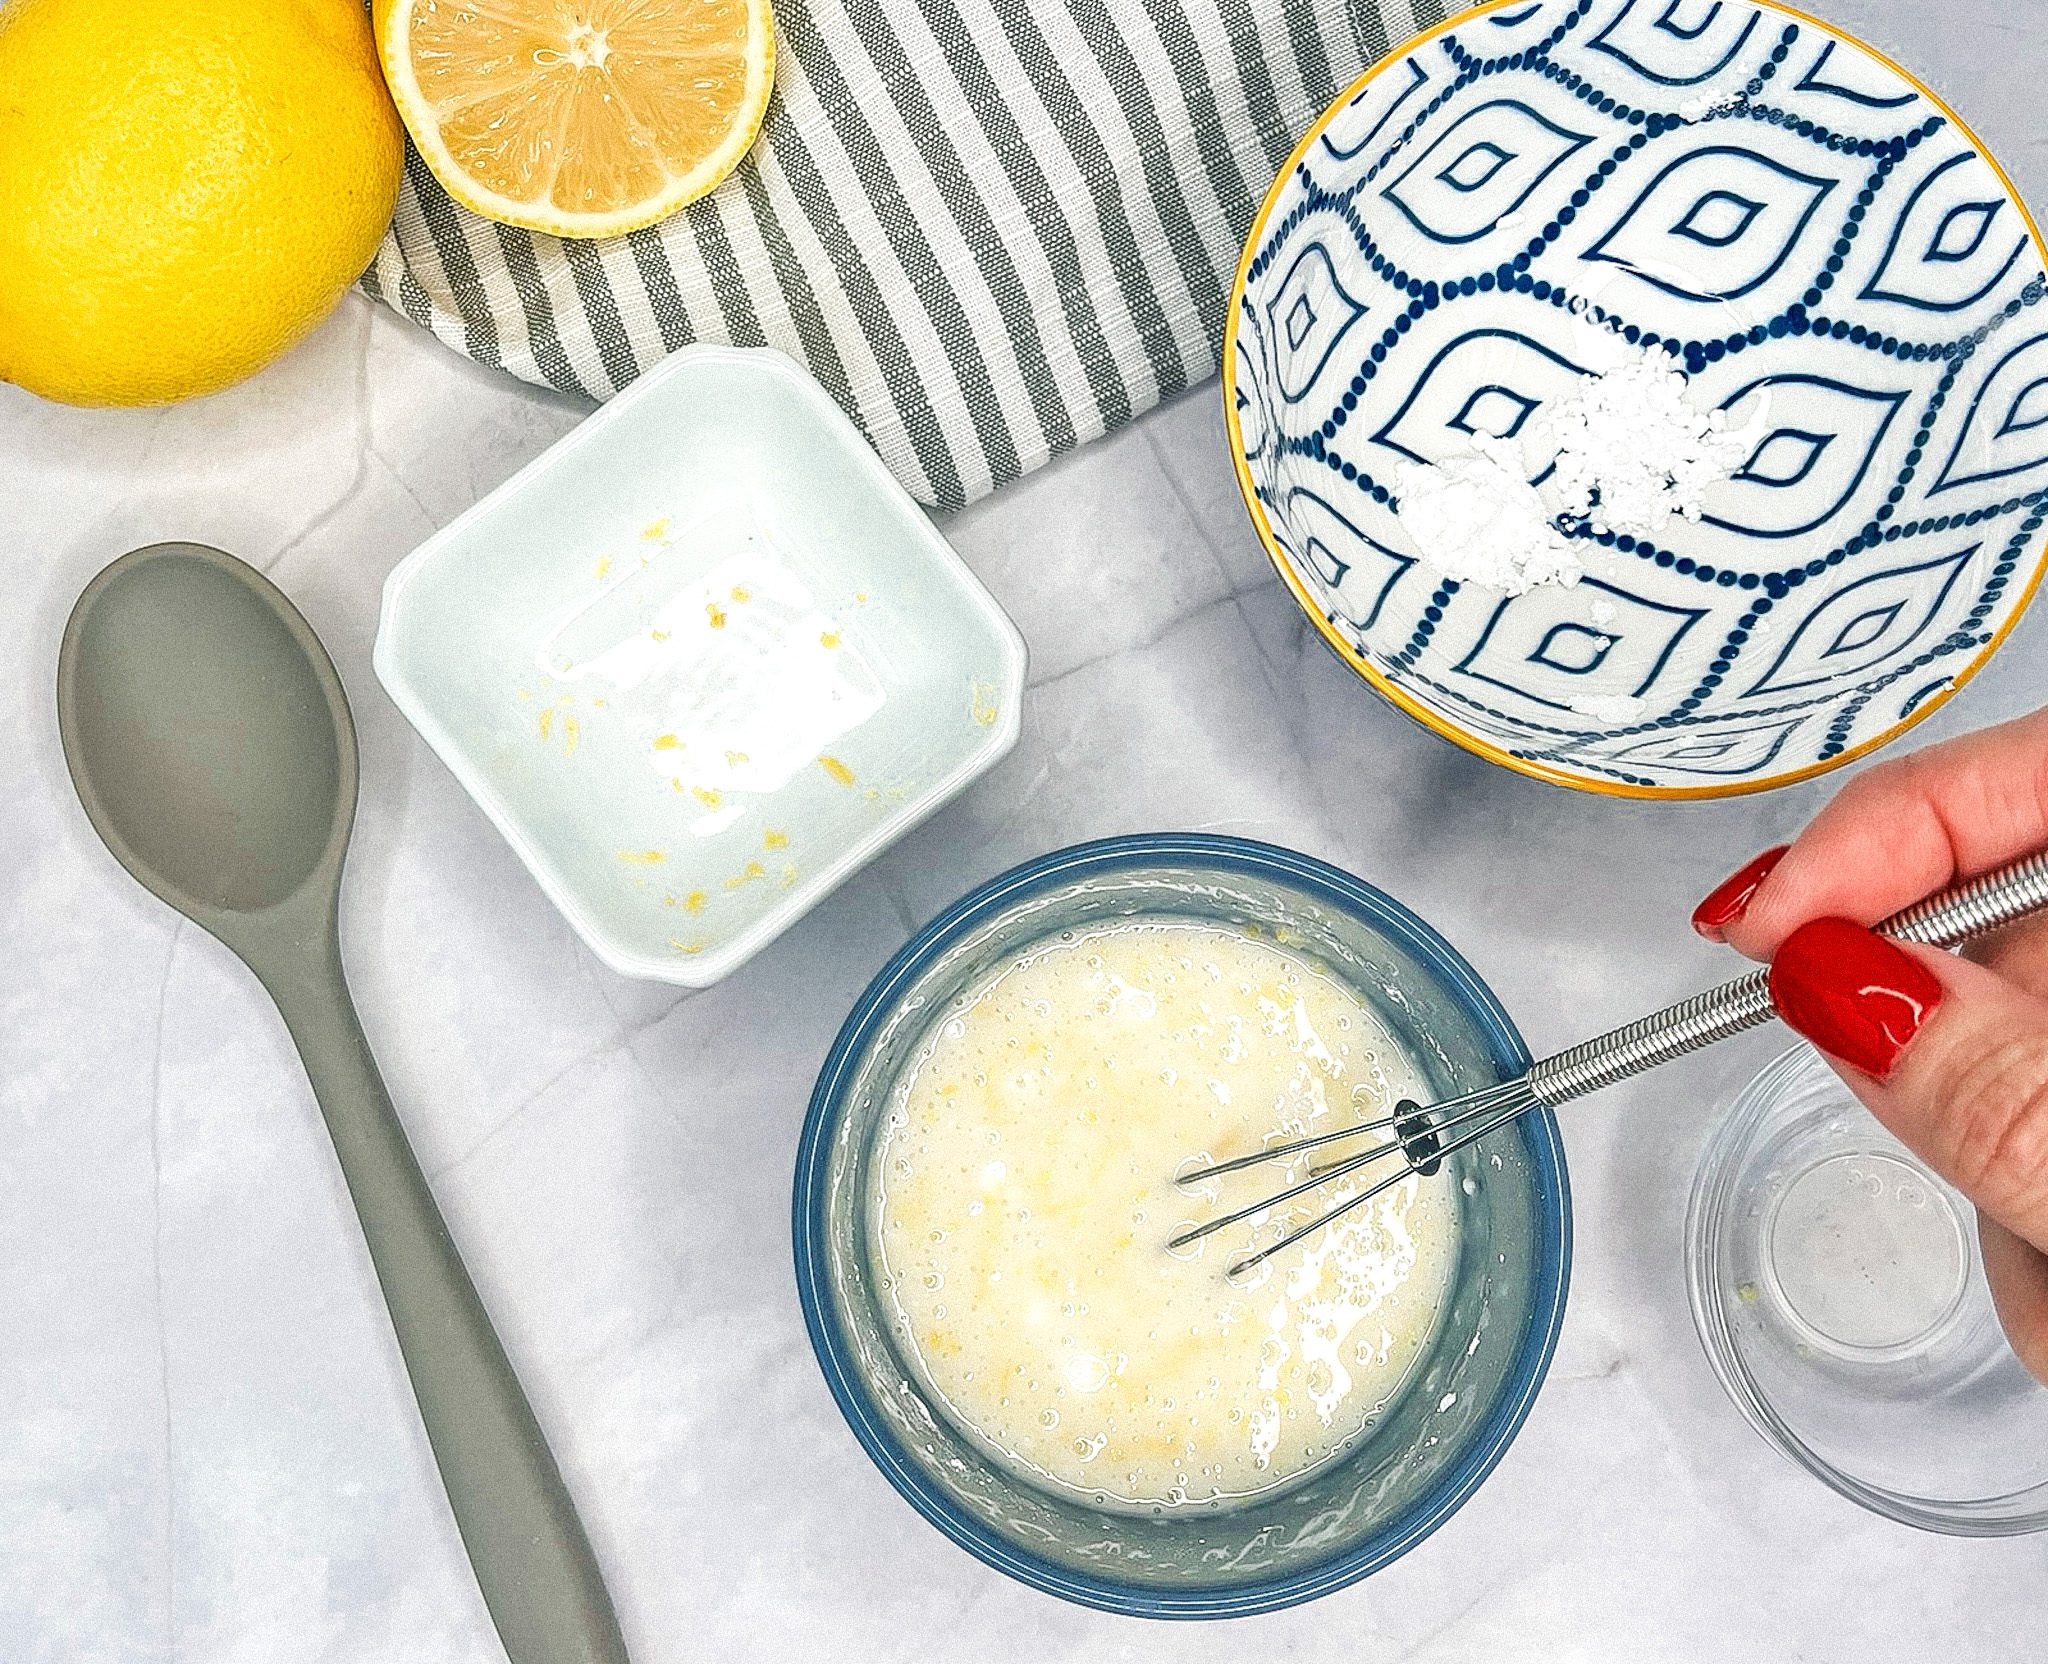
- Lemon (1 large, zested and juiced): Delivers the fresh, concentrated, tart, zesty citrus flavor to the cookies and the glaze.
- Vanilla Extract (1 teaspoon): An essential ingredient in many desserts, it enhances the flavor of the cookies.
- Powdered Sugar (3/4 cups): Finely ground sugar with no hint of graininess, it is the perfect sugar for making the glaze for the cookies.
Substitutions, Variations, and Tips
- Bring all ingredients to room temperature for best results.
- Swap lemon for lime or orange zest and juice for a fun twist.
- When measuring flour, spoon it into the cup and level it off — avoid scooping directly from the bag, which can pack the flour and lead to dry cookies.
- Don’t overmix the dough — too much mixing develops gluten, making cookies dense.
- Want a thicker glaze? Wait until cookies are fully cooled. Add extra powdered sugar for more thickness, or thin with ½ teaspoon water at a time.
- Store cookies in an airtight container to keep them fresh.
How to Make Lemon Tea Cookies
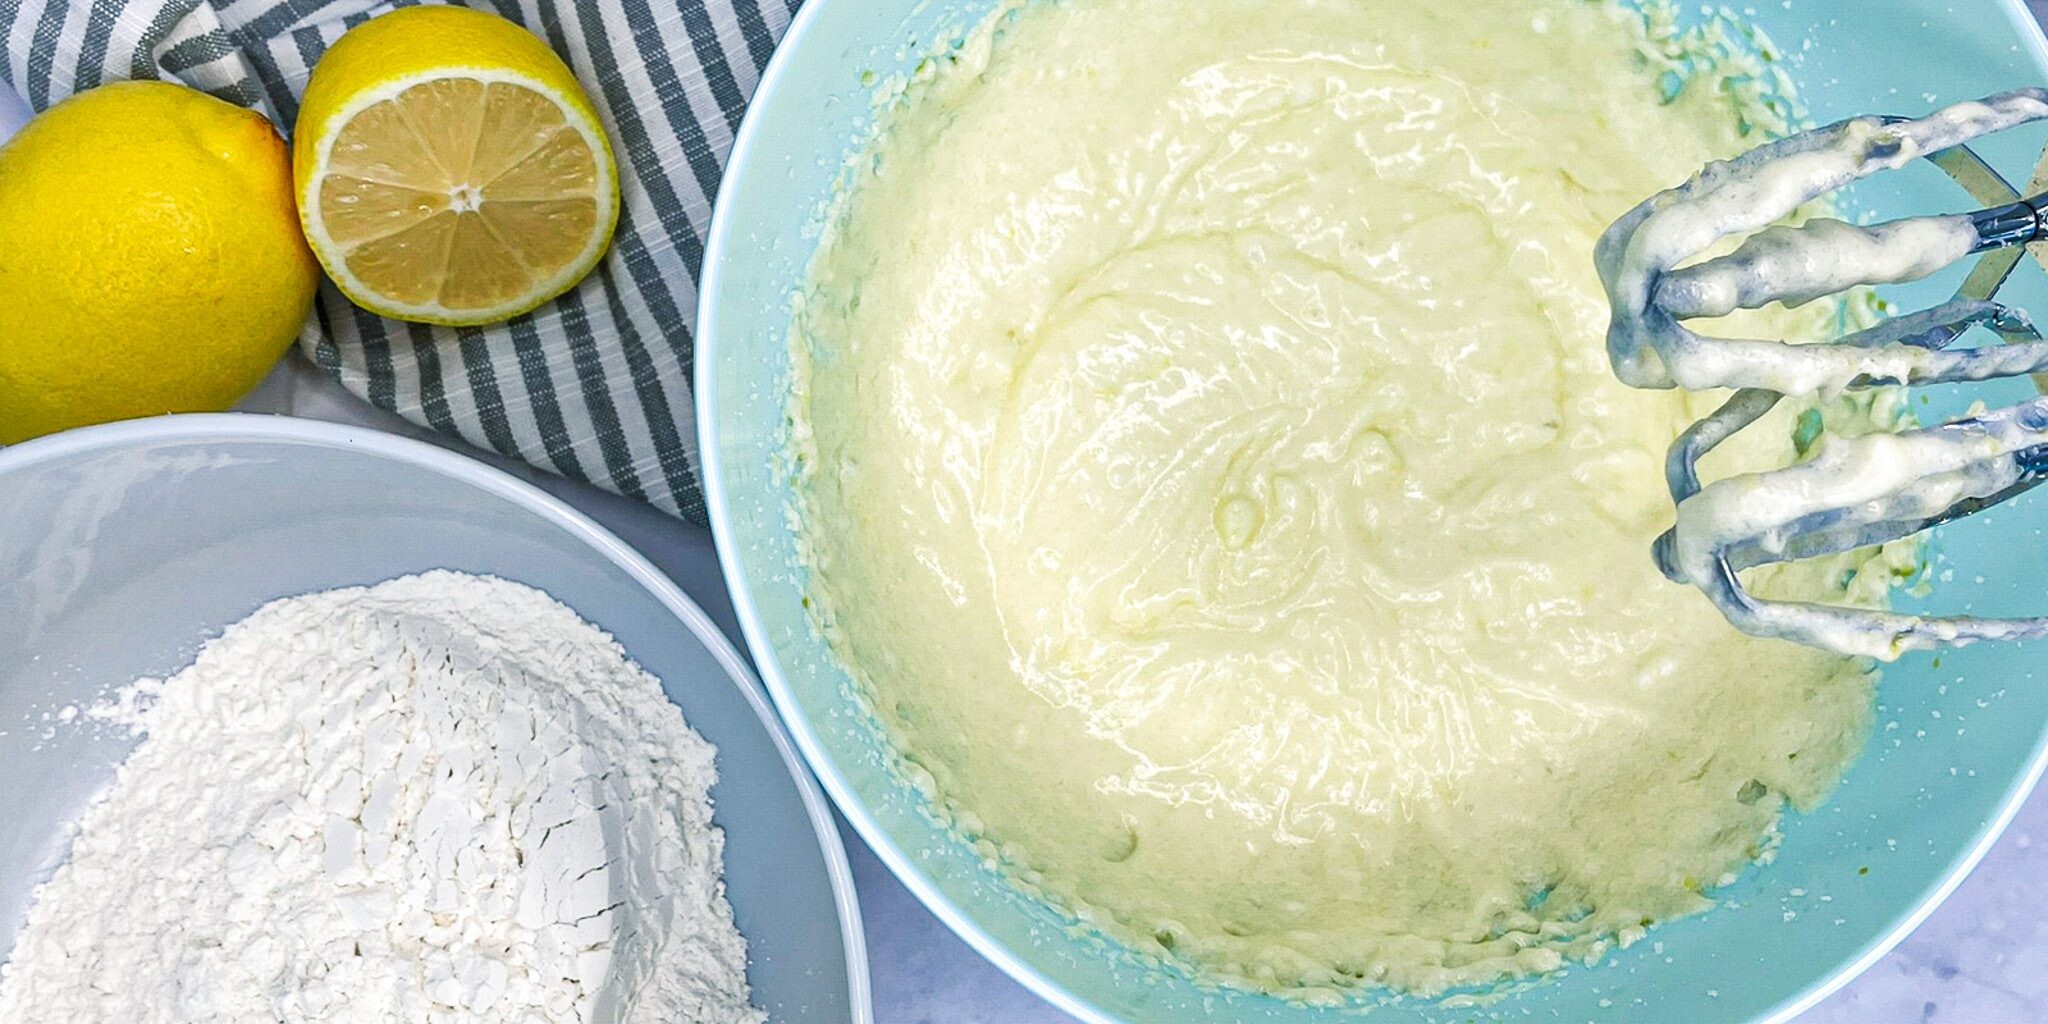
- Preheat oven to 375°F. Line baking sheets with parchment paper.
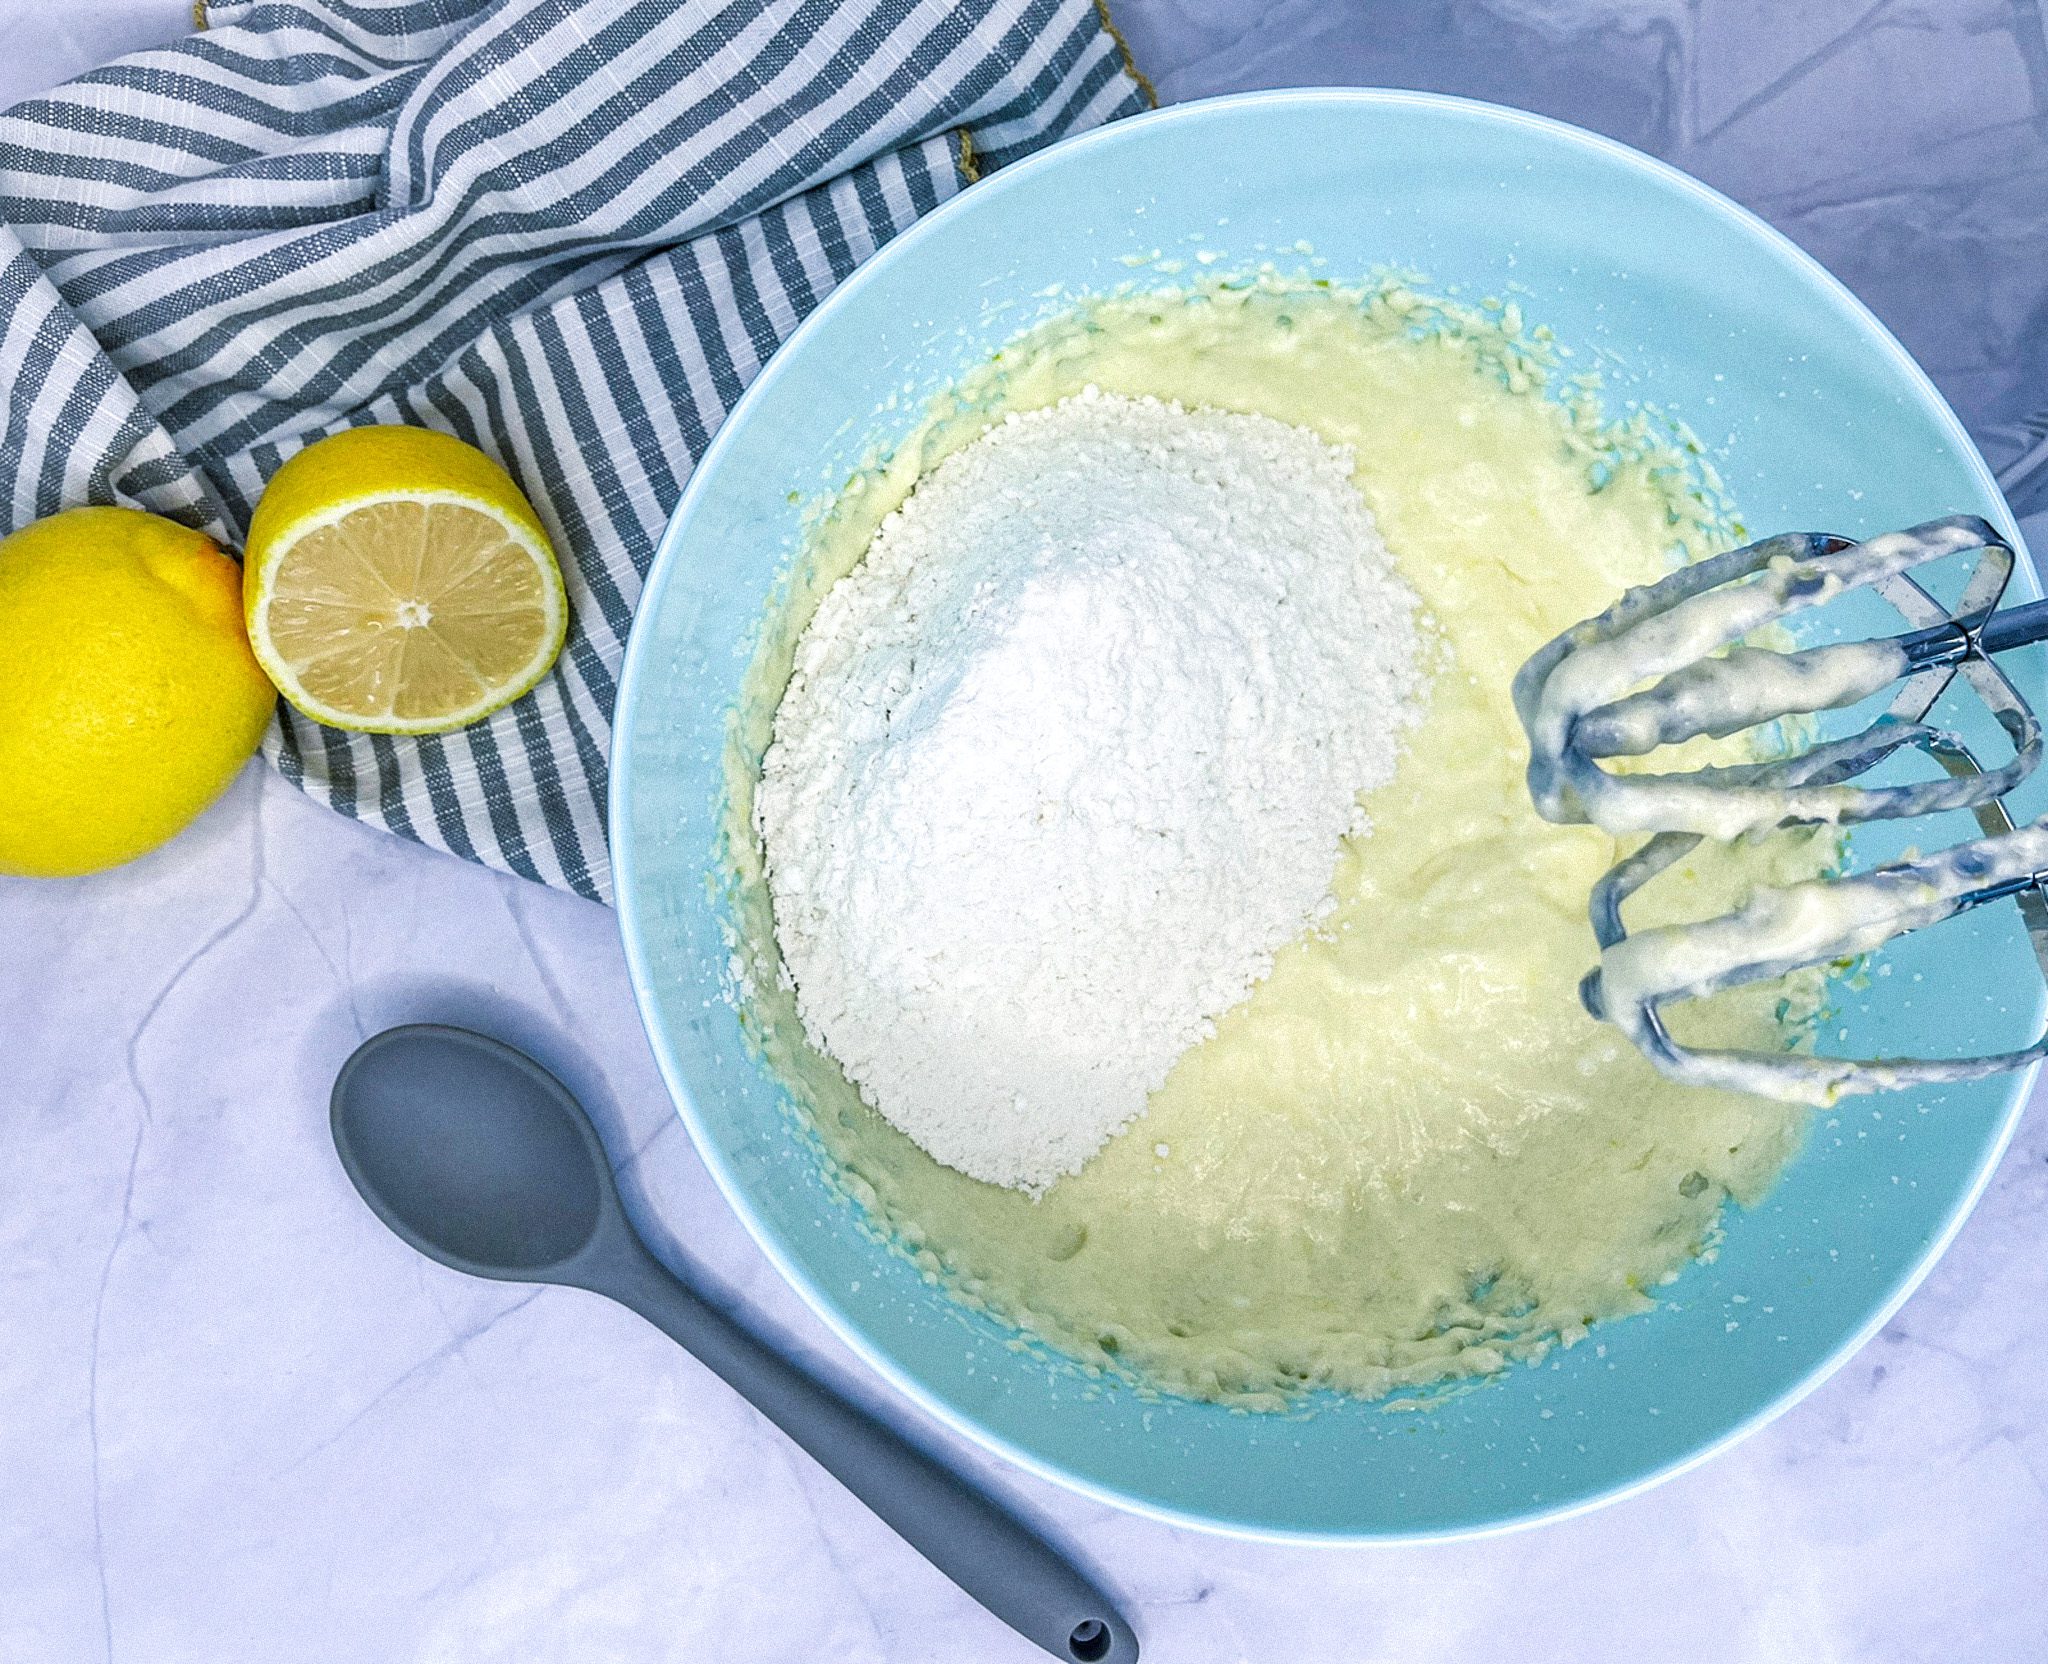
- In a bowl, mix the flour and baking powder. Set aside.
- Using an electric mixer, beat butter and sugar until light and fluffy (about 3 minutes). Add egg and mix until fully incorporated.
- Add blended Daisy Cottage Cheese, half the lemon zest, half the lemon juice, and vanilla extract. Mix well.
- Stir in dry ingredients until just combined.
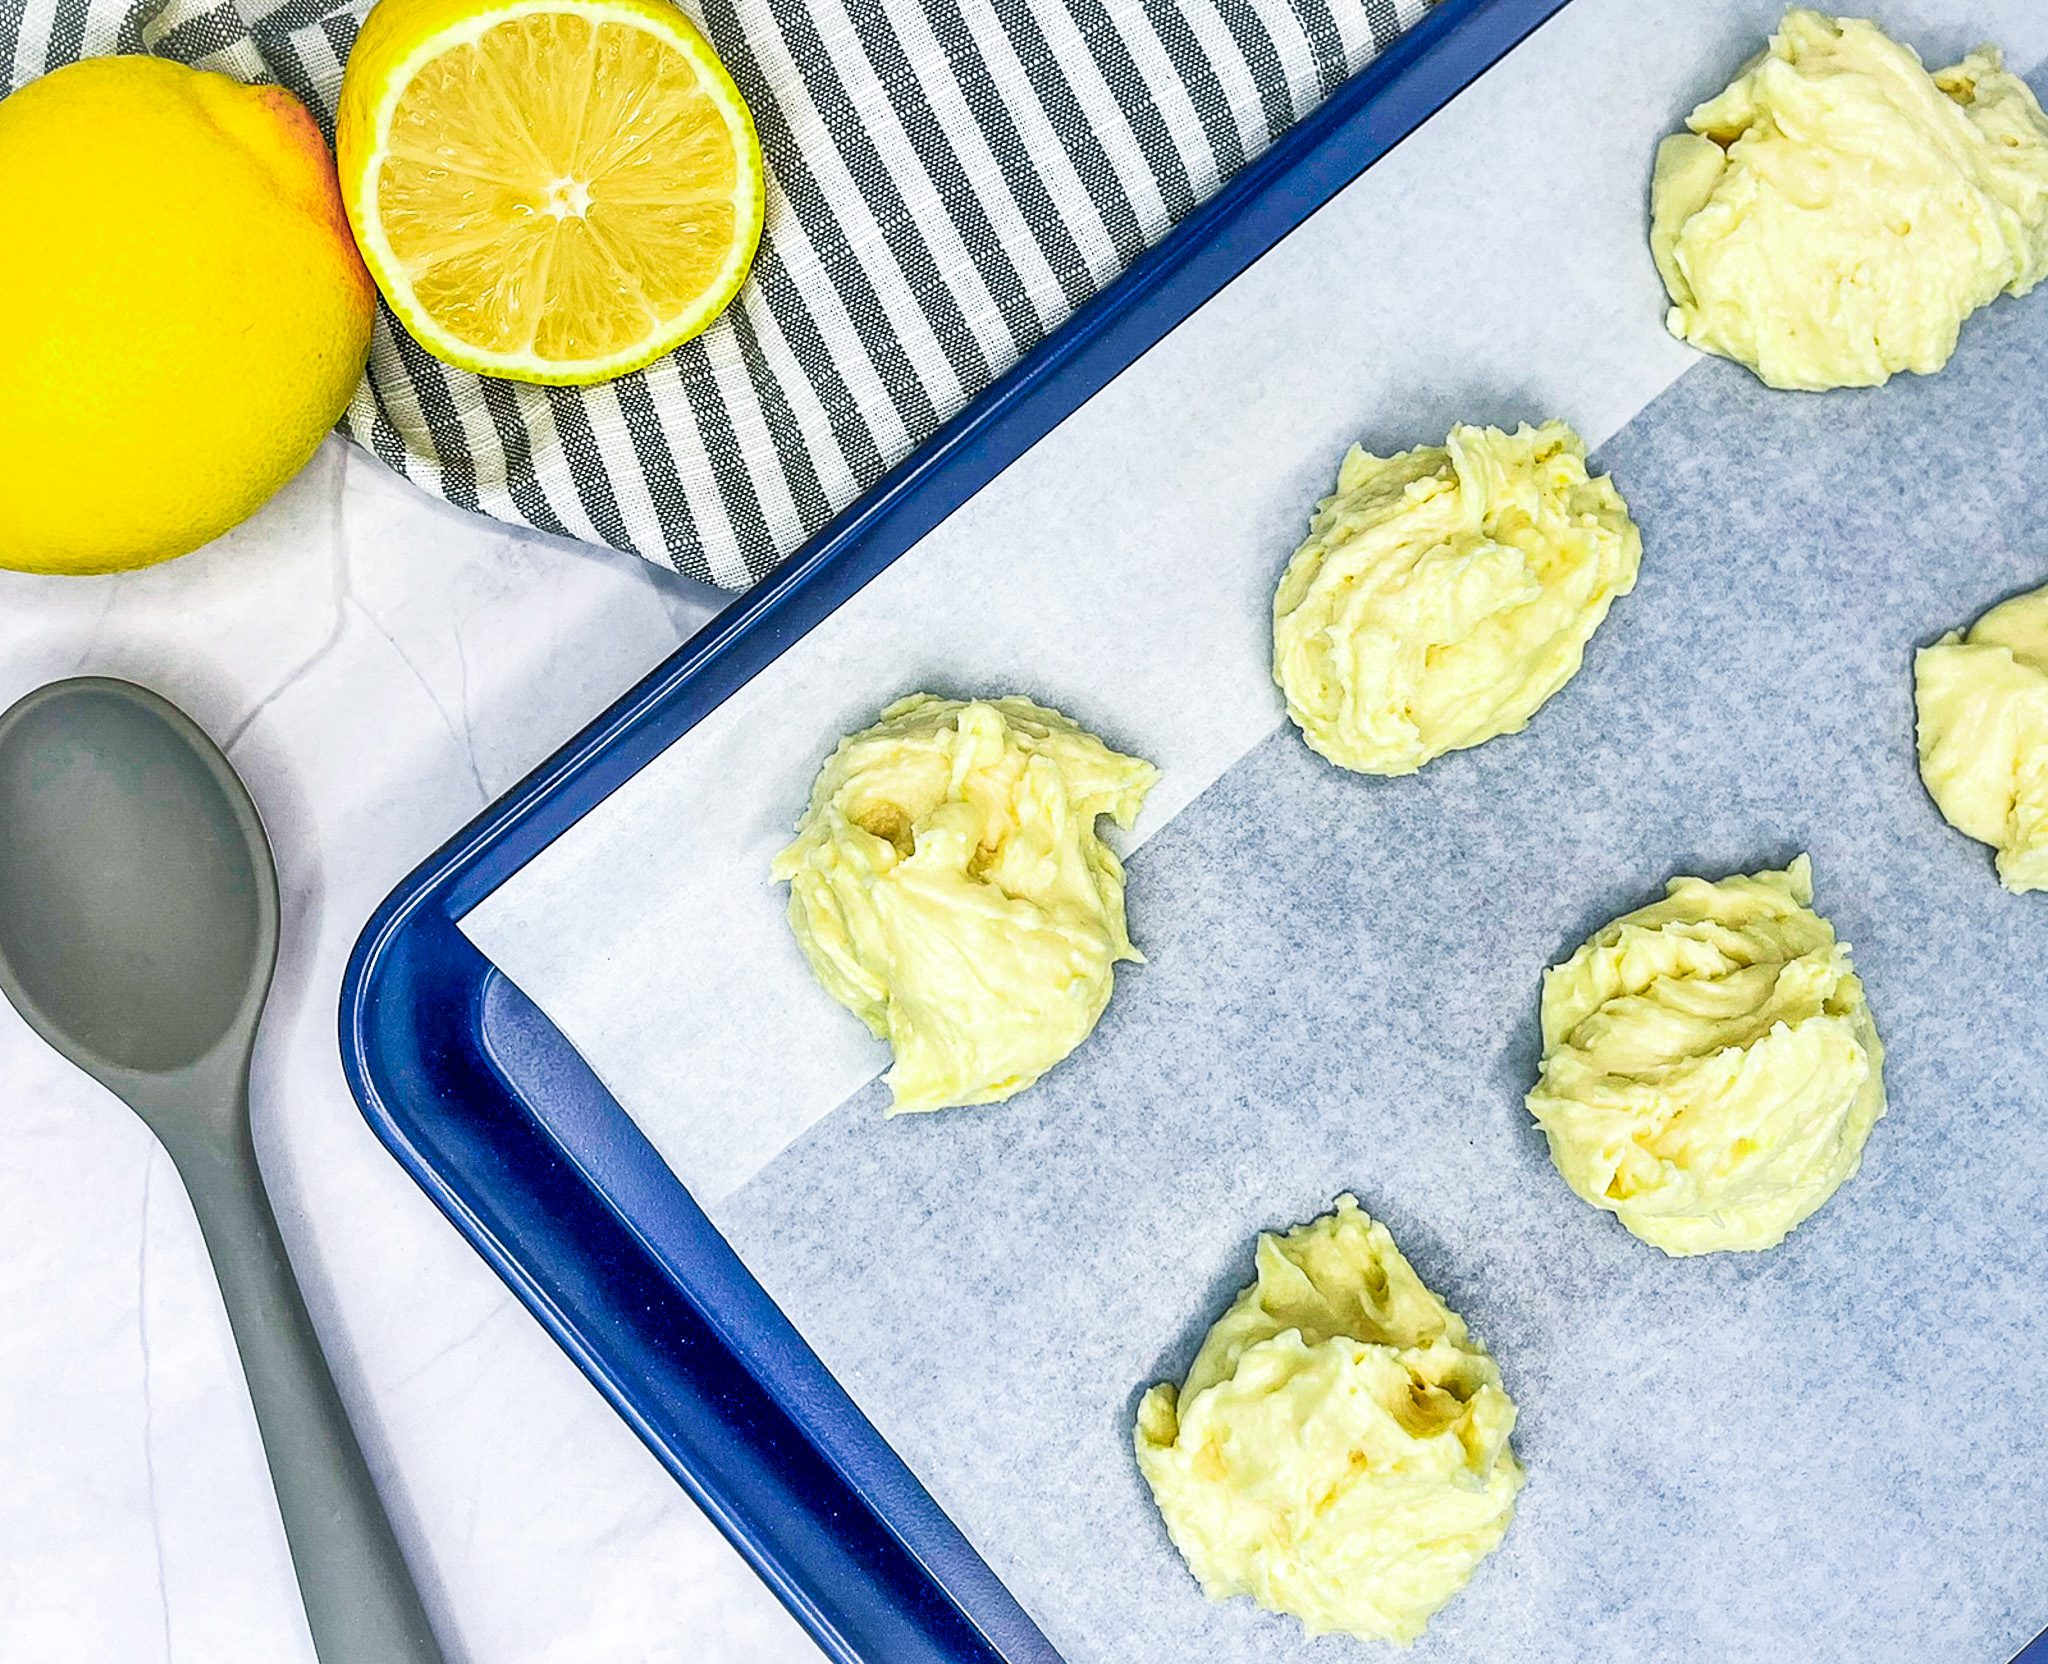
- Scoop about 2 tablespoons of dough for each cookie onto prepared baking sheets. Bake for 15 minutes, until edges are slightly golden. Let cookies rest on the baking sheet for 20 minutes.
- Meanwhile, make the glaze: mix powdered sugar with remaining lemon zest and juice. Stir until smooth. Spoon about ½ teaspoon of glaze onto each cookie and gently spread to the edges.
- Let glaze set for about 2 hours before serving.

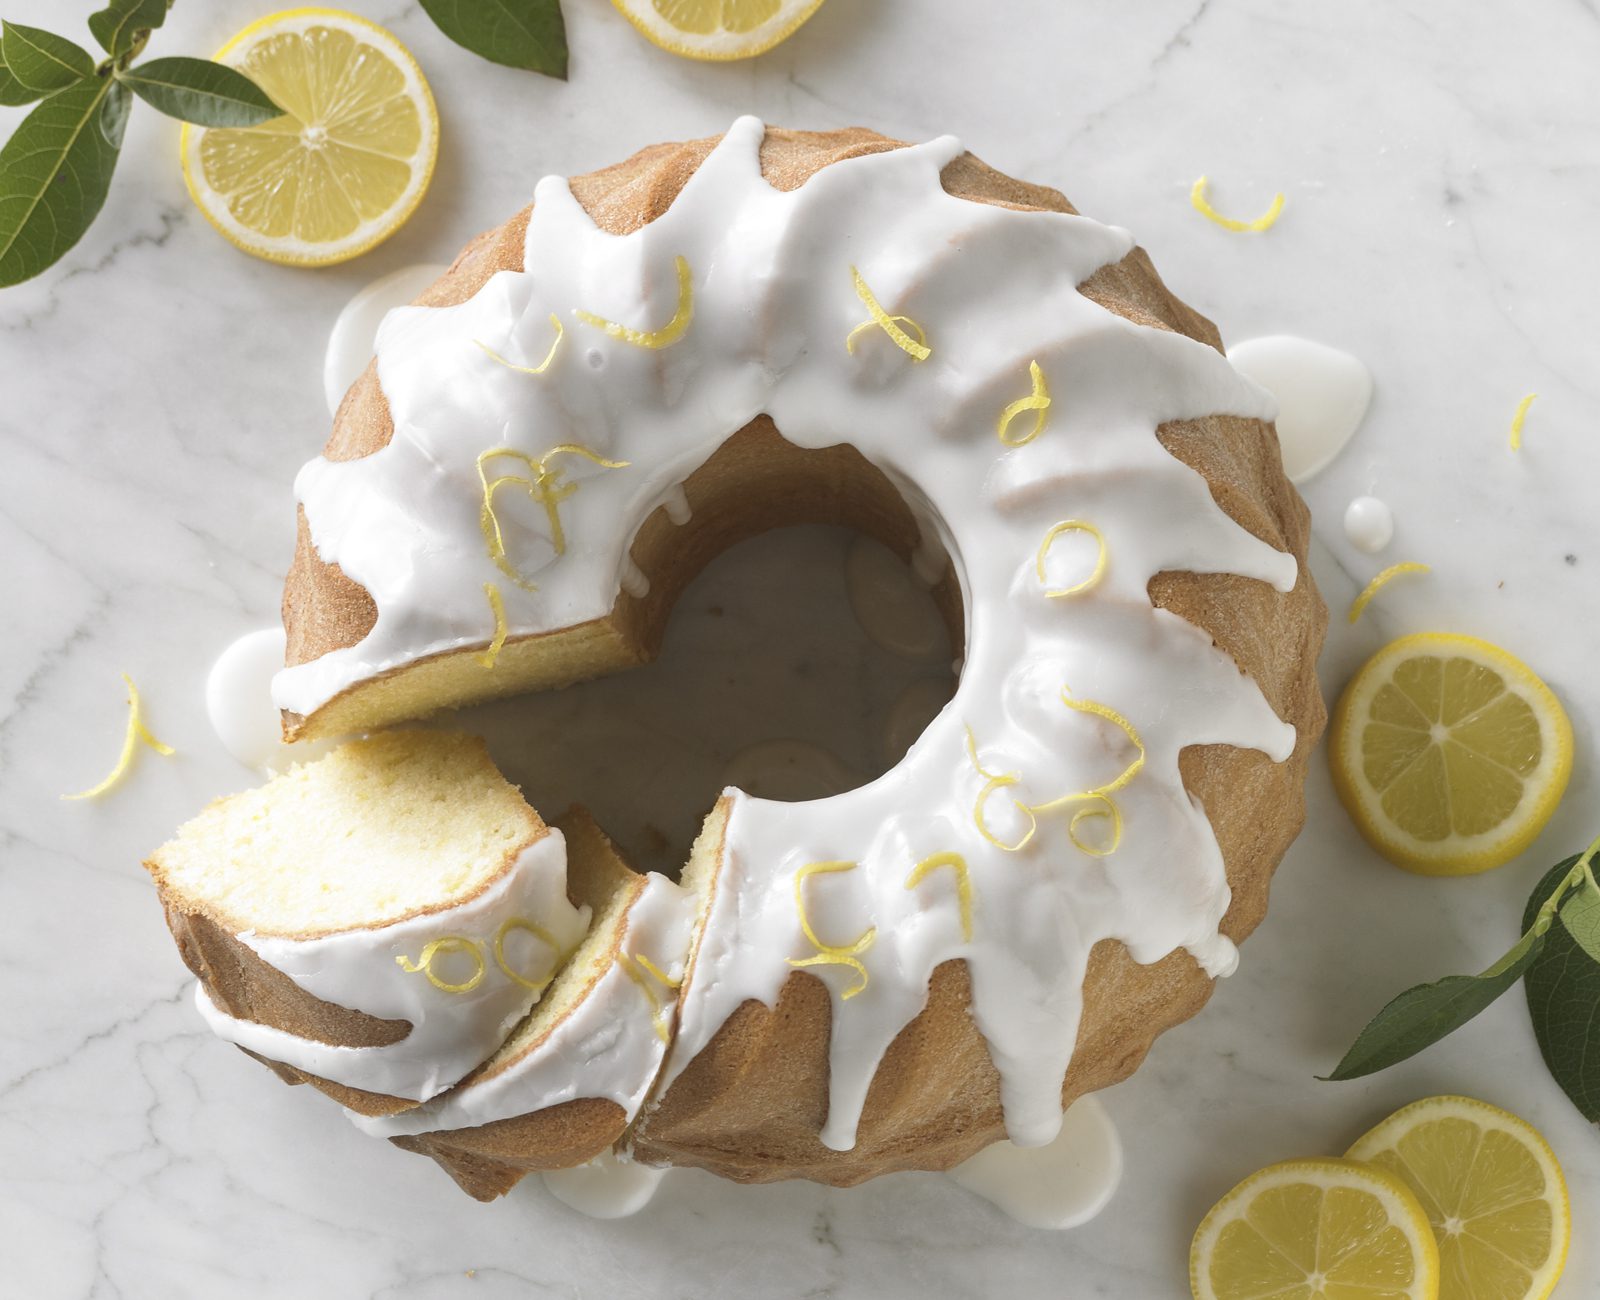
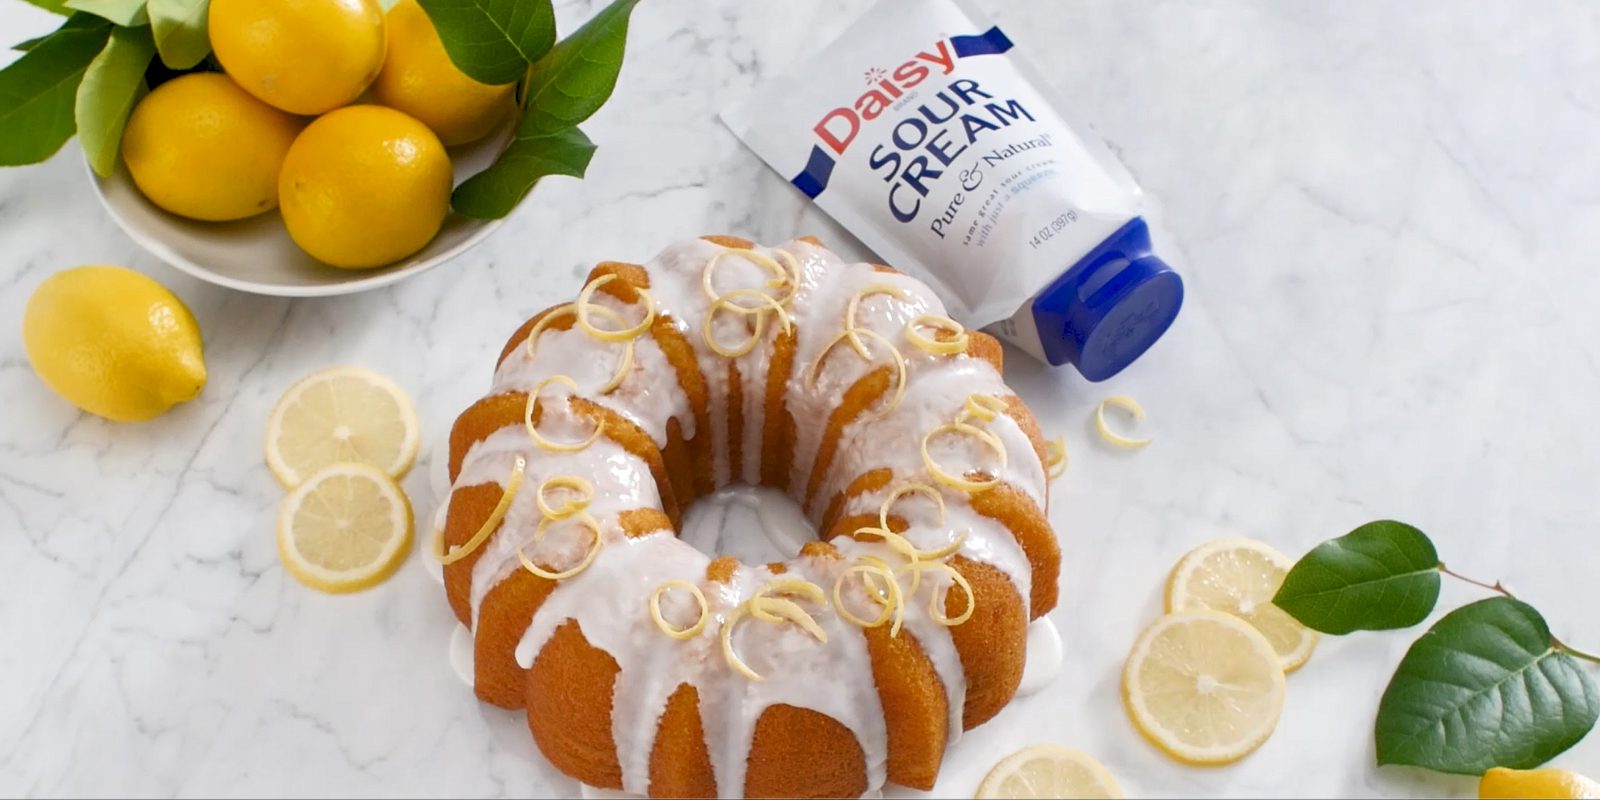
Lemon Sour Cream Pound Cake
Lemon Sour Cream Pound Cake
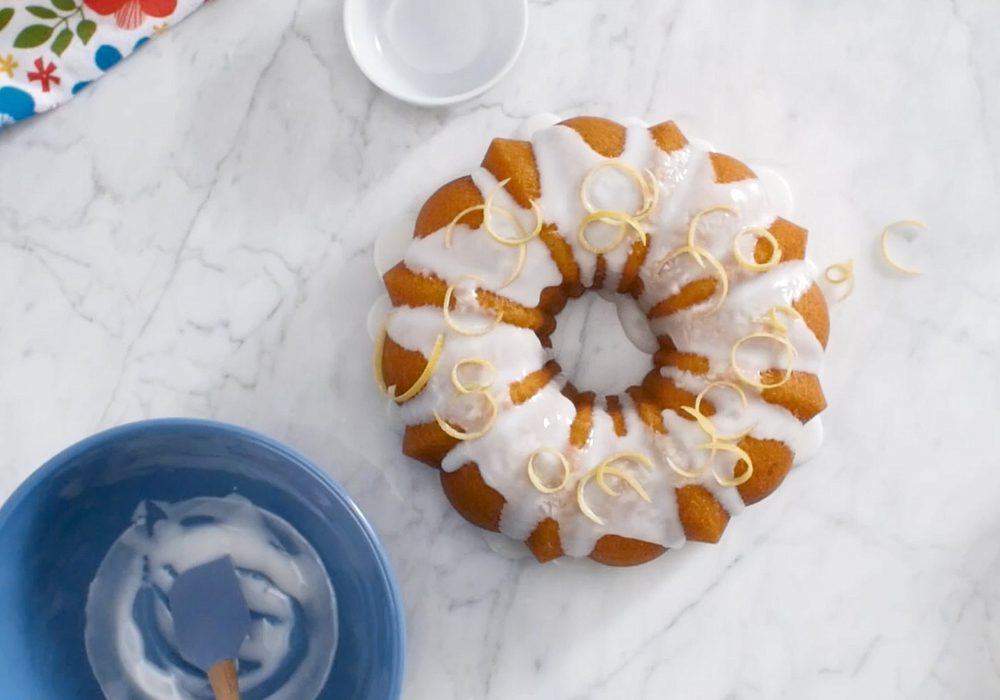
Loved for its perfect balance of bright, citrusy lemon and rich, creamy, tangy sour cream, this indulgent, bakery-quality cake is refreshing, light, moist, tender, and delightfully lemony. As it bakes, an irresistible aroma fills your kitchen, and you’ll find yourself counting the minutes until you can enjoy the first slice.
The combination of sour cream and zesty lemons brings out the best in both ingredients without ever being overwhelming, creating a complex, crave-worthy flavor. Fresh lemon zest and juice add a burst of citrusy brightness, perfectly paired with sour cream to create the ultimate pound cake. The sour cream adds richness, moisture, and depth, ensuring a soft, tender crumb that stays delicious for days. Its subtle tang complements the lemon’s tartness, balances the sweetness, and delivers a rich cake that’s satisfying without feeling heavy.
This is the perfect cake for anyone looking for something that’s both light and indulgent. Ideal for any season, it feels refreshing in the spring and summer, yet rich enough to enjoy in the fall and winter. Luscious and timeless, this lemon cake is made for sharing.
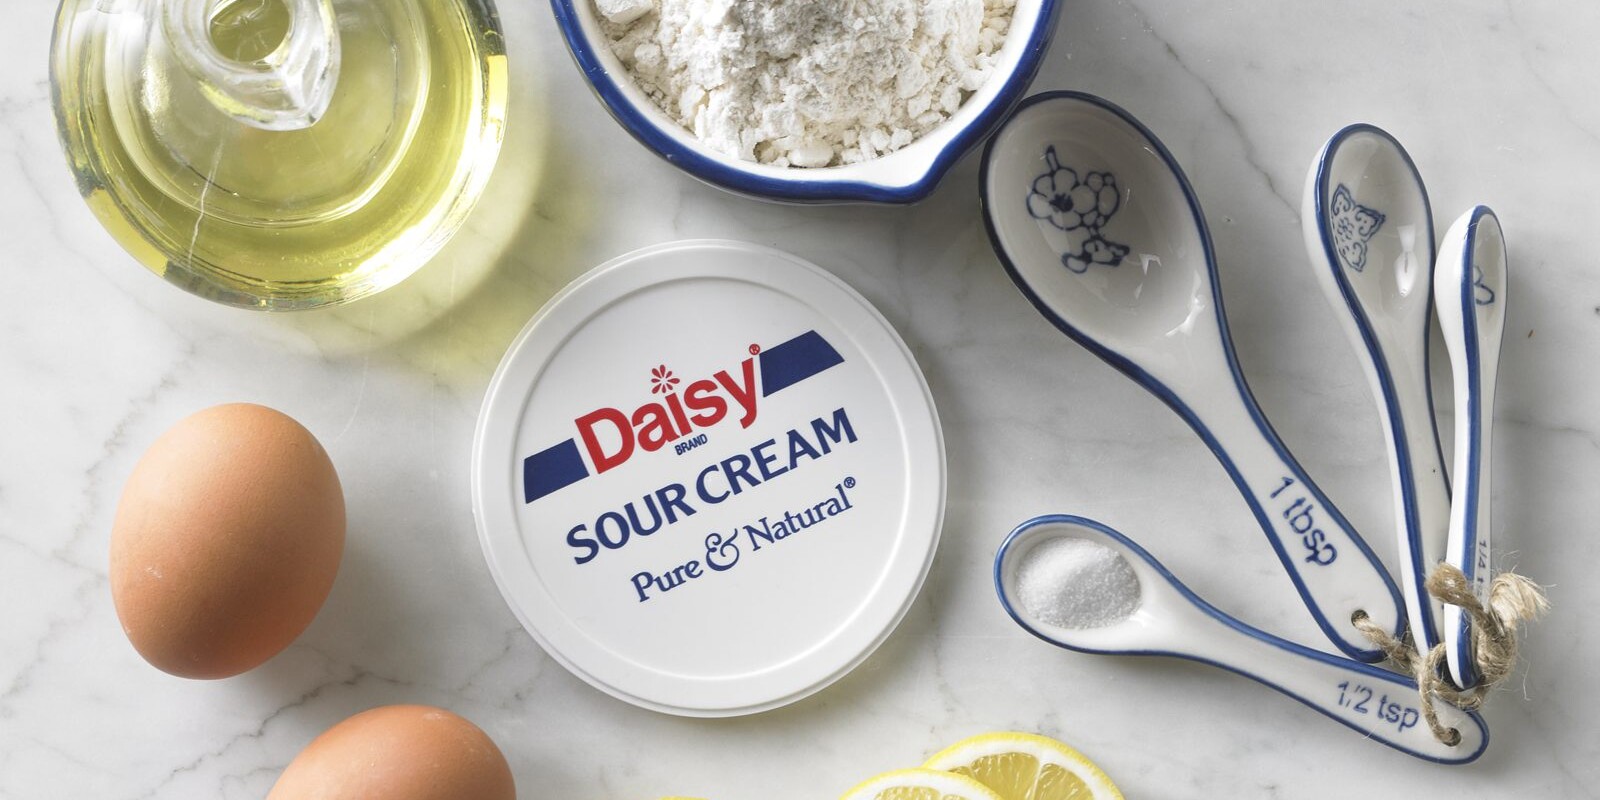
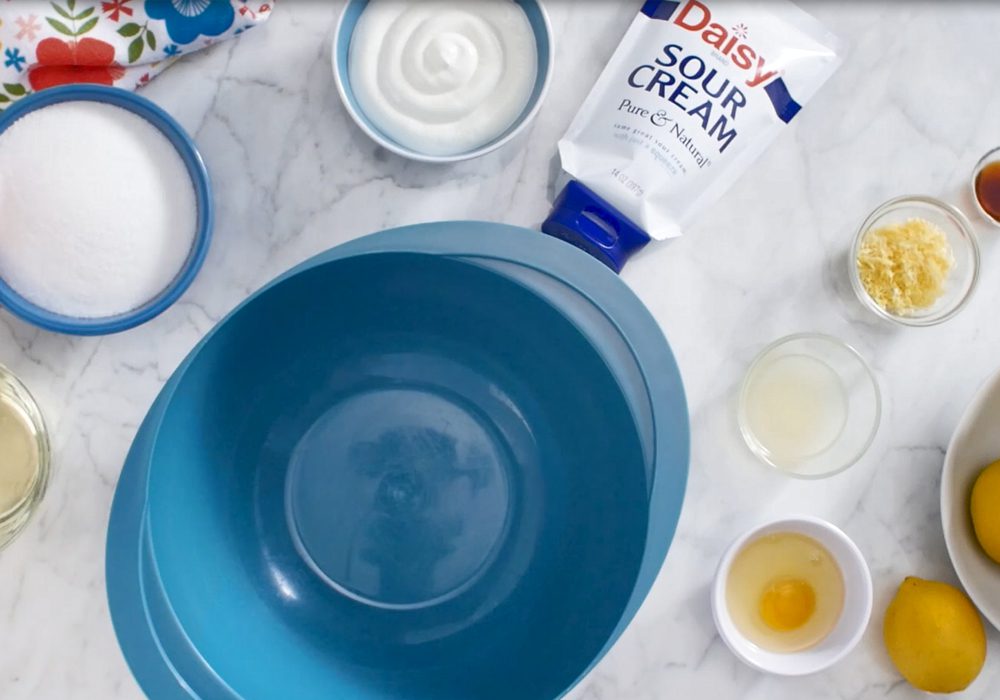
Lemon Sour Cream Pound Cake Ingredients
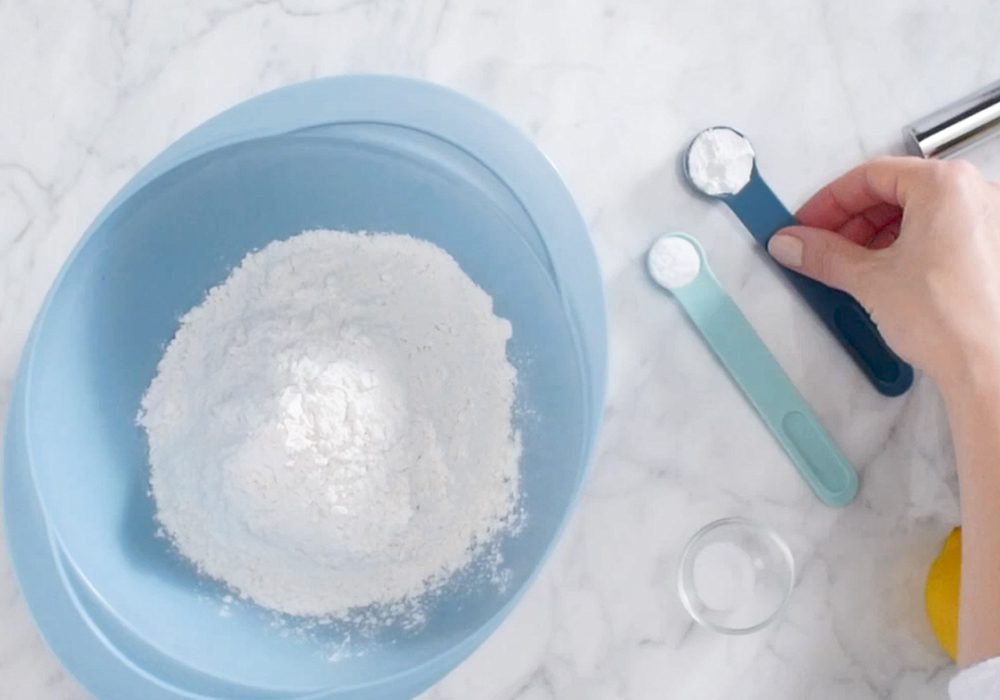
- All-Purpose Flour (2 ¼ cups): The gluten in all-purpose flour gives the cake structure.
- Baking Powder (1 teaspoon): A main ingredient for leavening, it adds volume and lightness to the batter.
- Baking Soda (1/2 teaspoon): Another ingredient for leavening. It helps the batter rise and gives baked goods a light and fluffy texture.
- Salt (1/2 teaspoon): Helps enhance the flavors and balances the sweetness of the batter.
- Sugar (1 ¾ cups): Adds sweetness to the batter.
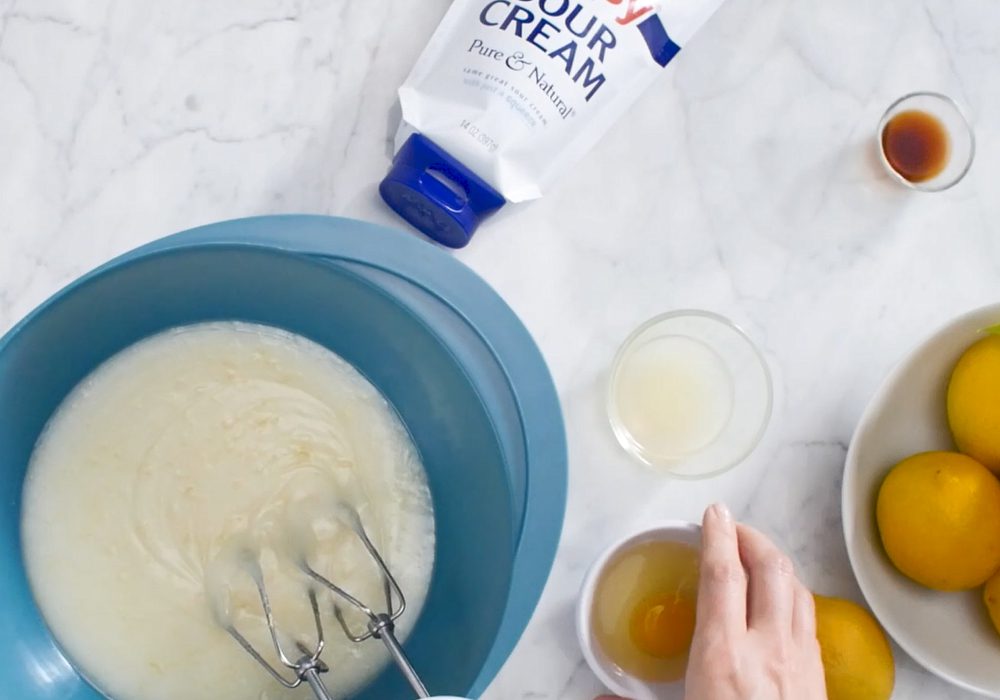
- Daisy Sour Cream: The star ingredient that gives the cake its name. It makes the cake moist and rich with a slight tang, ensuring it stays moist and fresh for days. The fat in the sour cream reacts with the flour to make shorter gluten strands making the cake tender, while the acidity in the sour cream interacts with the baking soda and baking powder to help the cake remain light while rising.
- Canola Oil (3/4 cup): One of the best options for baking, it has a mild, neutral flavor. It adds moistness to the cake.
- Grated Lemon Peel (2 tablespoons): Adds a concentrated citrus flavor and fragrance without adding additional tartness.
- Eggs (4 large): Creates the thickness and stability in the batter, providing the perfect structure of the cake. Eggs bond with the flour to create texture by forming a stronger gluten. The eggs also help add height to the cake.
- Lemon Juice (4 tablespoons, divided): Adds the fresh, tart, zesty citrus flavor to the cake and the glaze. The acid in the juice reacts with the leavening agents to create air bubbles which help the cake rise.
- Vanilla Extract (1 teaspoon): An essential ingredient in many desserts, it enhances the flavor of the cake.
- Powdered Sugar (1 ¼ cups): Finely ground sugar with no hint of graininess, it is the perfect sugar for making sweet frosting and glazes.

Substitutions, Variations, and Tips
- For best results, start by bringing all your ingredients to room temperature—this small step makes a big difference.
- Using high-quality ingredients, like Daisy Sour Cream, will give you the best flavor and texture.
- If you’re looking for an extra-tender crumb, cake flour can be used in place of all-purpose flour.
- When measuring flour, be sure to spoon it into the measuring cup and level it off with a knife. This helps prevent overpacking, which can lead to a dry cake.
- And when mixing the batter, resist the urge to overmix. Too much mixing develops excess gluten and can leave your cake dense or gummy.
- You can substitute vegetable oil or melted butter for the canola oil if you’d like—both work beautifully.
- Always preheat your oven and use the correct pan size so the cake bakes evenly and rises properly. Try not to open the oven door while it’s baking; letting heat escape can affect the final result.
- Once baked, allow the cake to cool fully before removing it from the pan. Skipping this step can cause cracks or breakage.
- If you prefer a thicker glaze, wait until the cake is mostly cool before glazing, as warmer cakes will cause the glaze to run thin.
- Because this cake takes a bit of time to cool, it’s a great make-ahead option. Store it in an airtight container or freeze it before glazing by wrapping it tightly in plastic wrap and then aluminum foil. It can be frozen for up to three months—just thaw completely before glazing and enjoying.
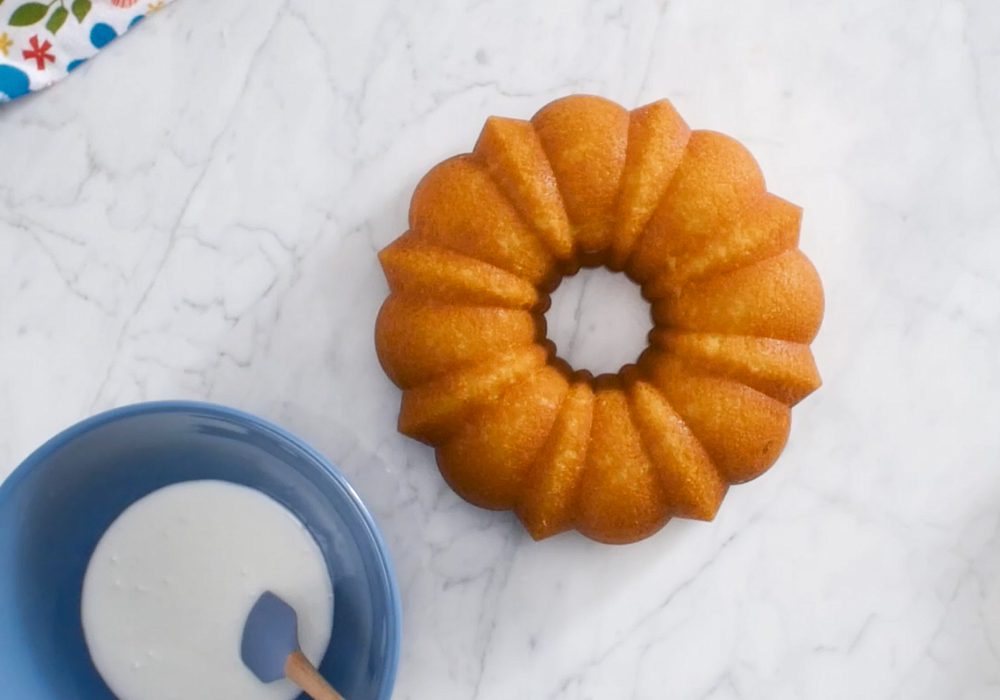

How to Make Lemon Sour Cream Pound Cake
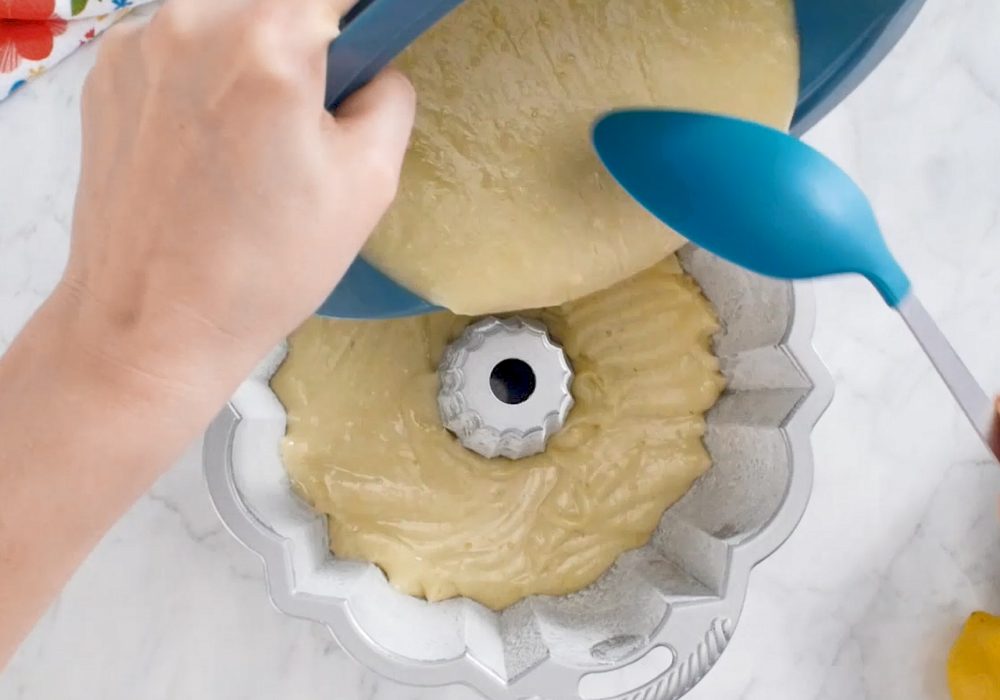
- Heat oven to 325° Coat 12-cup Bundt pan with nonstick cooking spray. Sprinkle with flour, tapping out excess.
- Whisk flour, baking powder, baking soda and salt in a medium bowl.
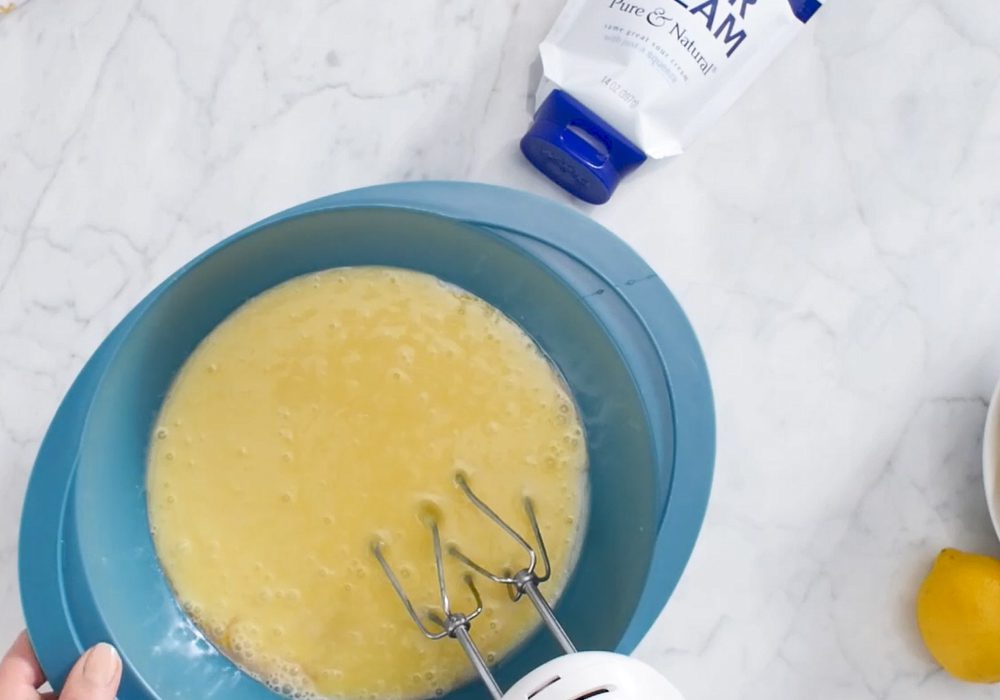
- Beat sugar, sour cream, oil, and lemon peel in large bowl at medium-low speed until smooth. Beat in eggs, one at a time, beating until combined. Beat in 2 tablespoons lemon juice and vanilla extract. At low speed, beat in flour mixture until blended. Spoon batter into pan.
- Bake 55-60 minutes or until the top is golden brown and a wooden skewer inserted in center of cake comes out clean.
- Cool in pan on a wire rack for 10 minutes. Invert cake onto a wire rack and cool completely.
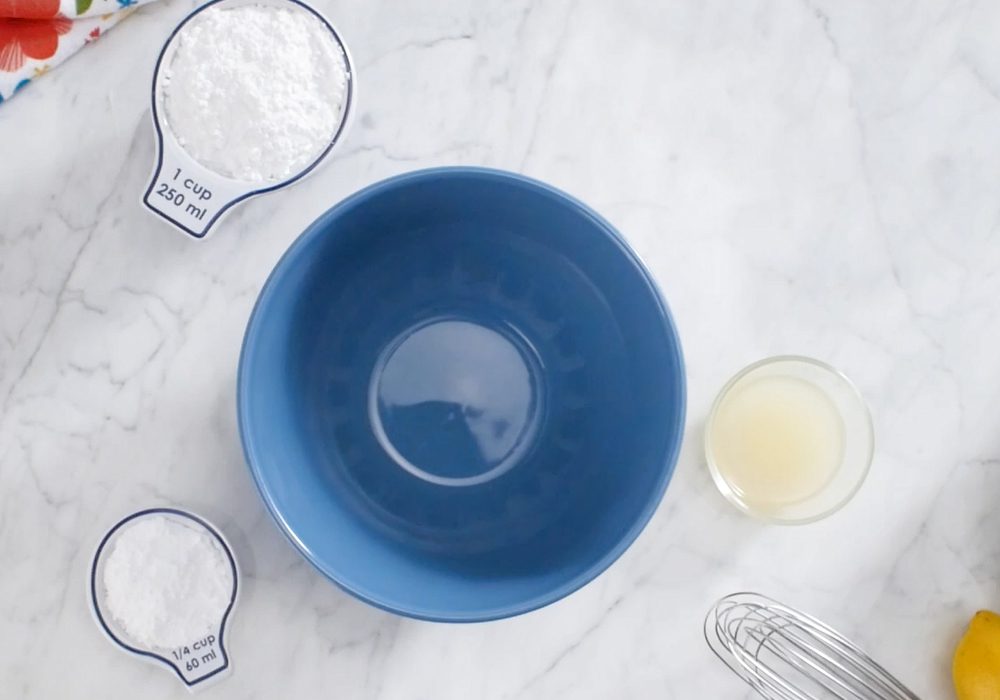
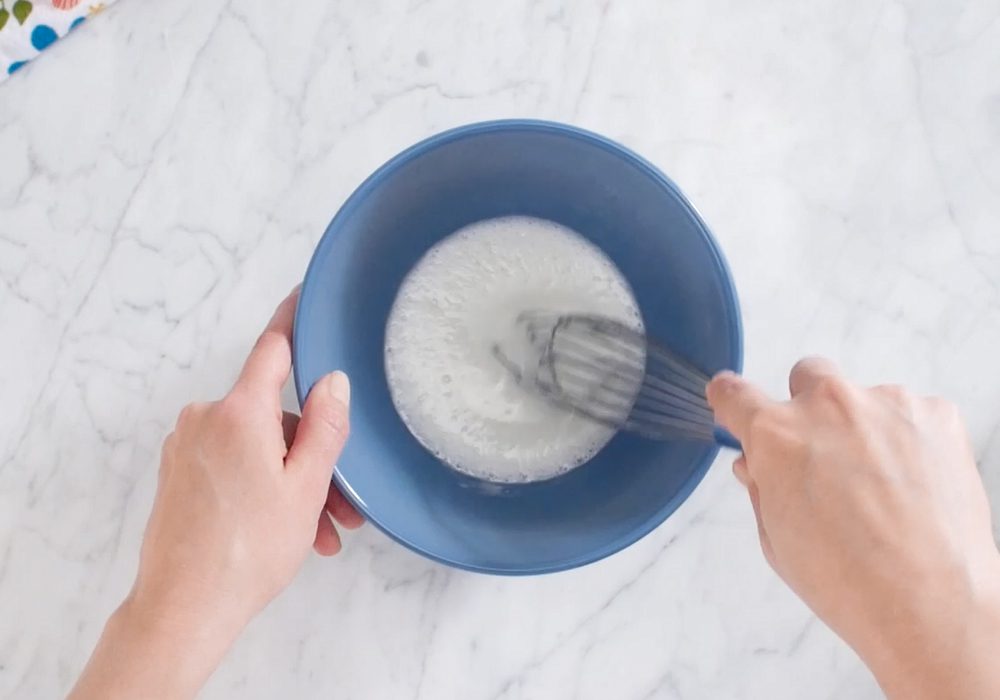
- Meanwhile, whisk 2 tablespoons lemon juice and powdered sugar. Drizzle over cake. Let stand until set.
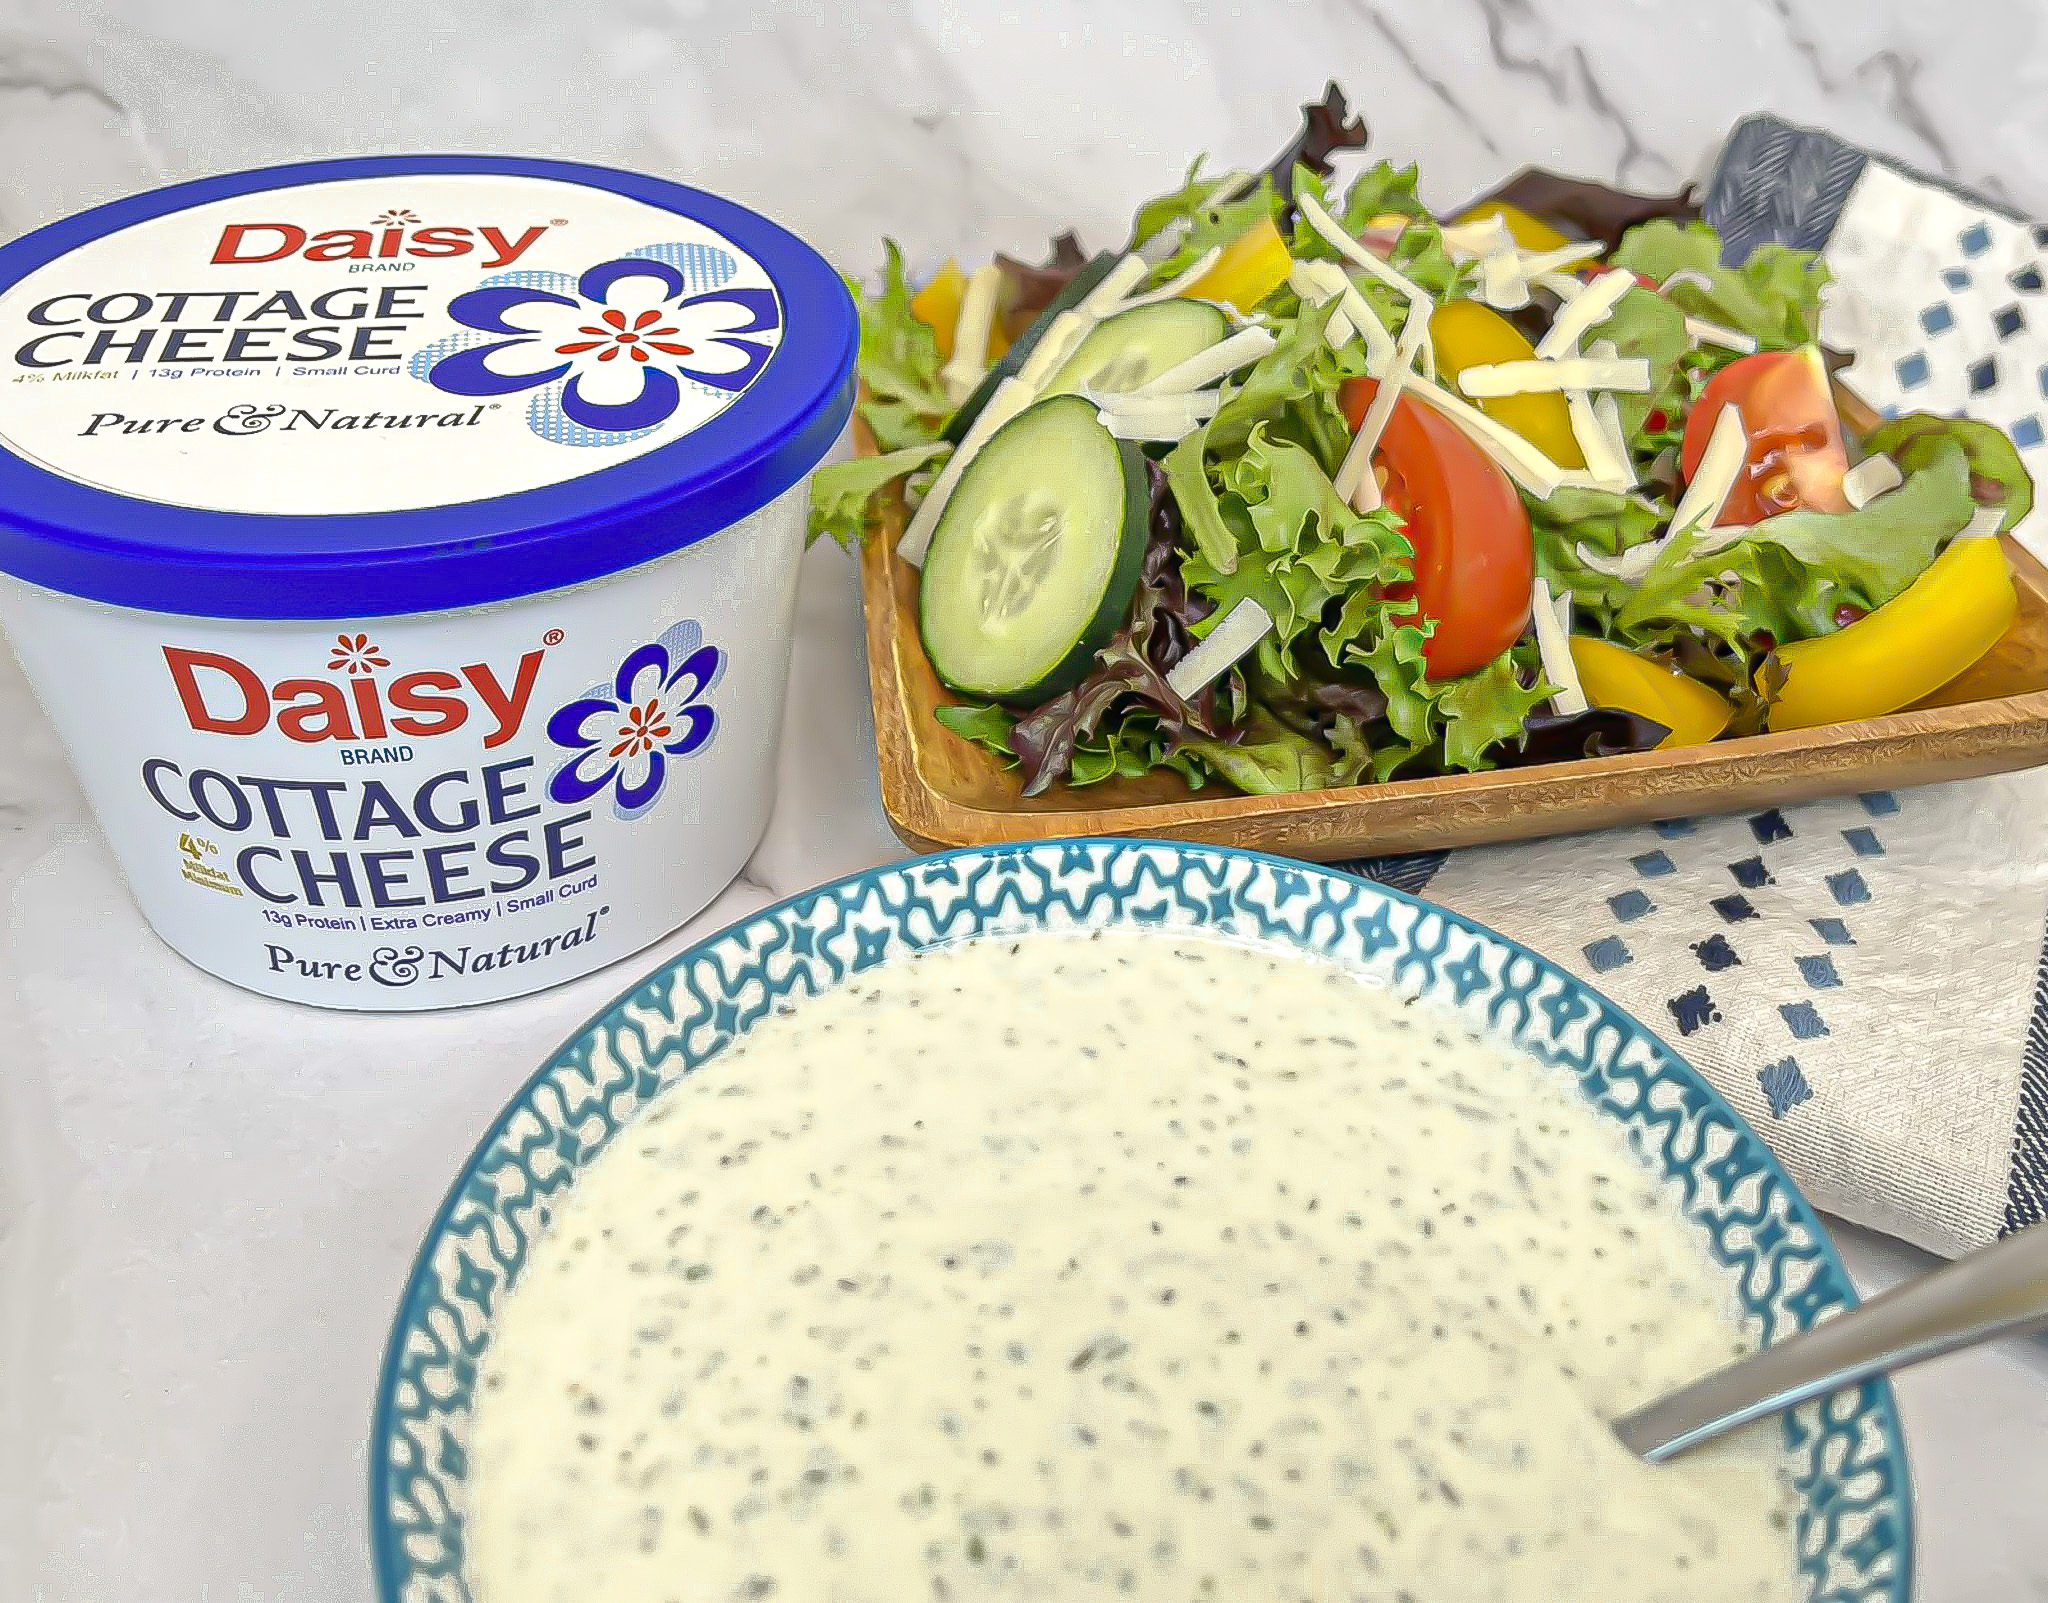
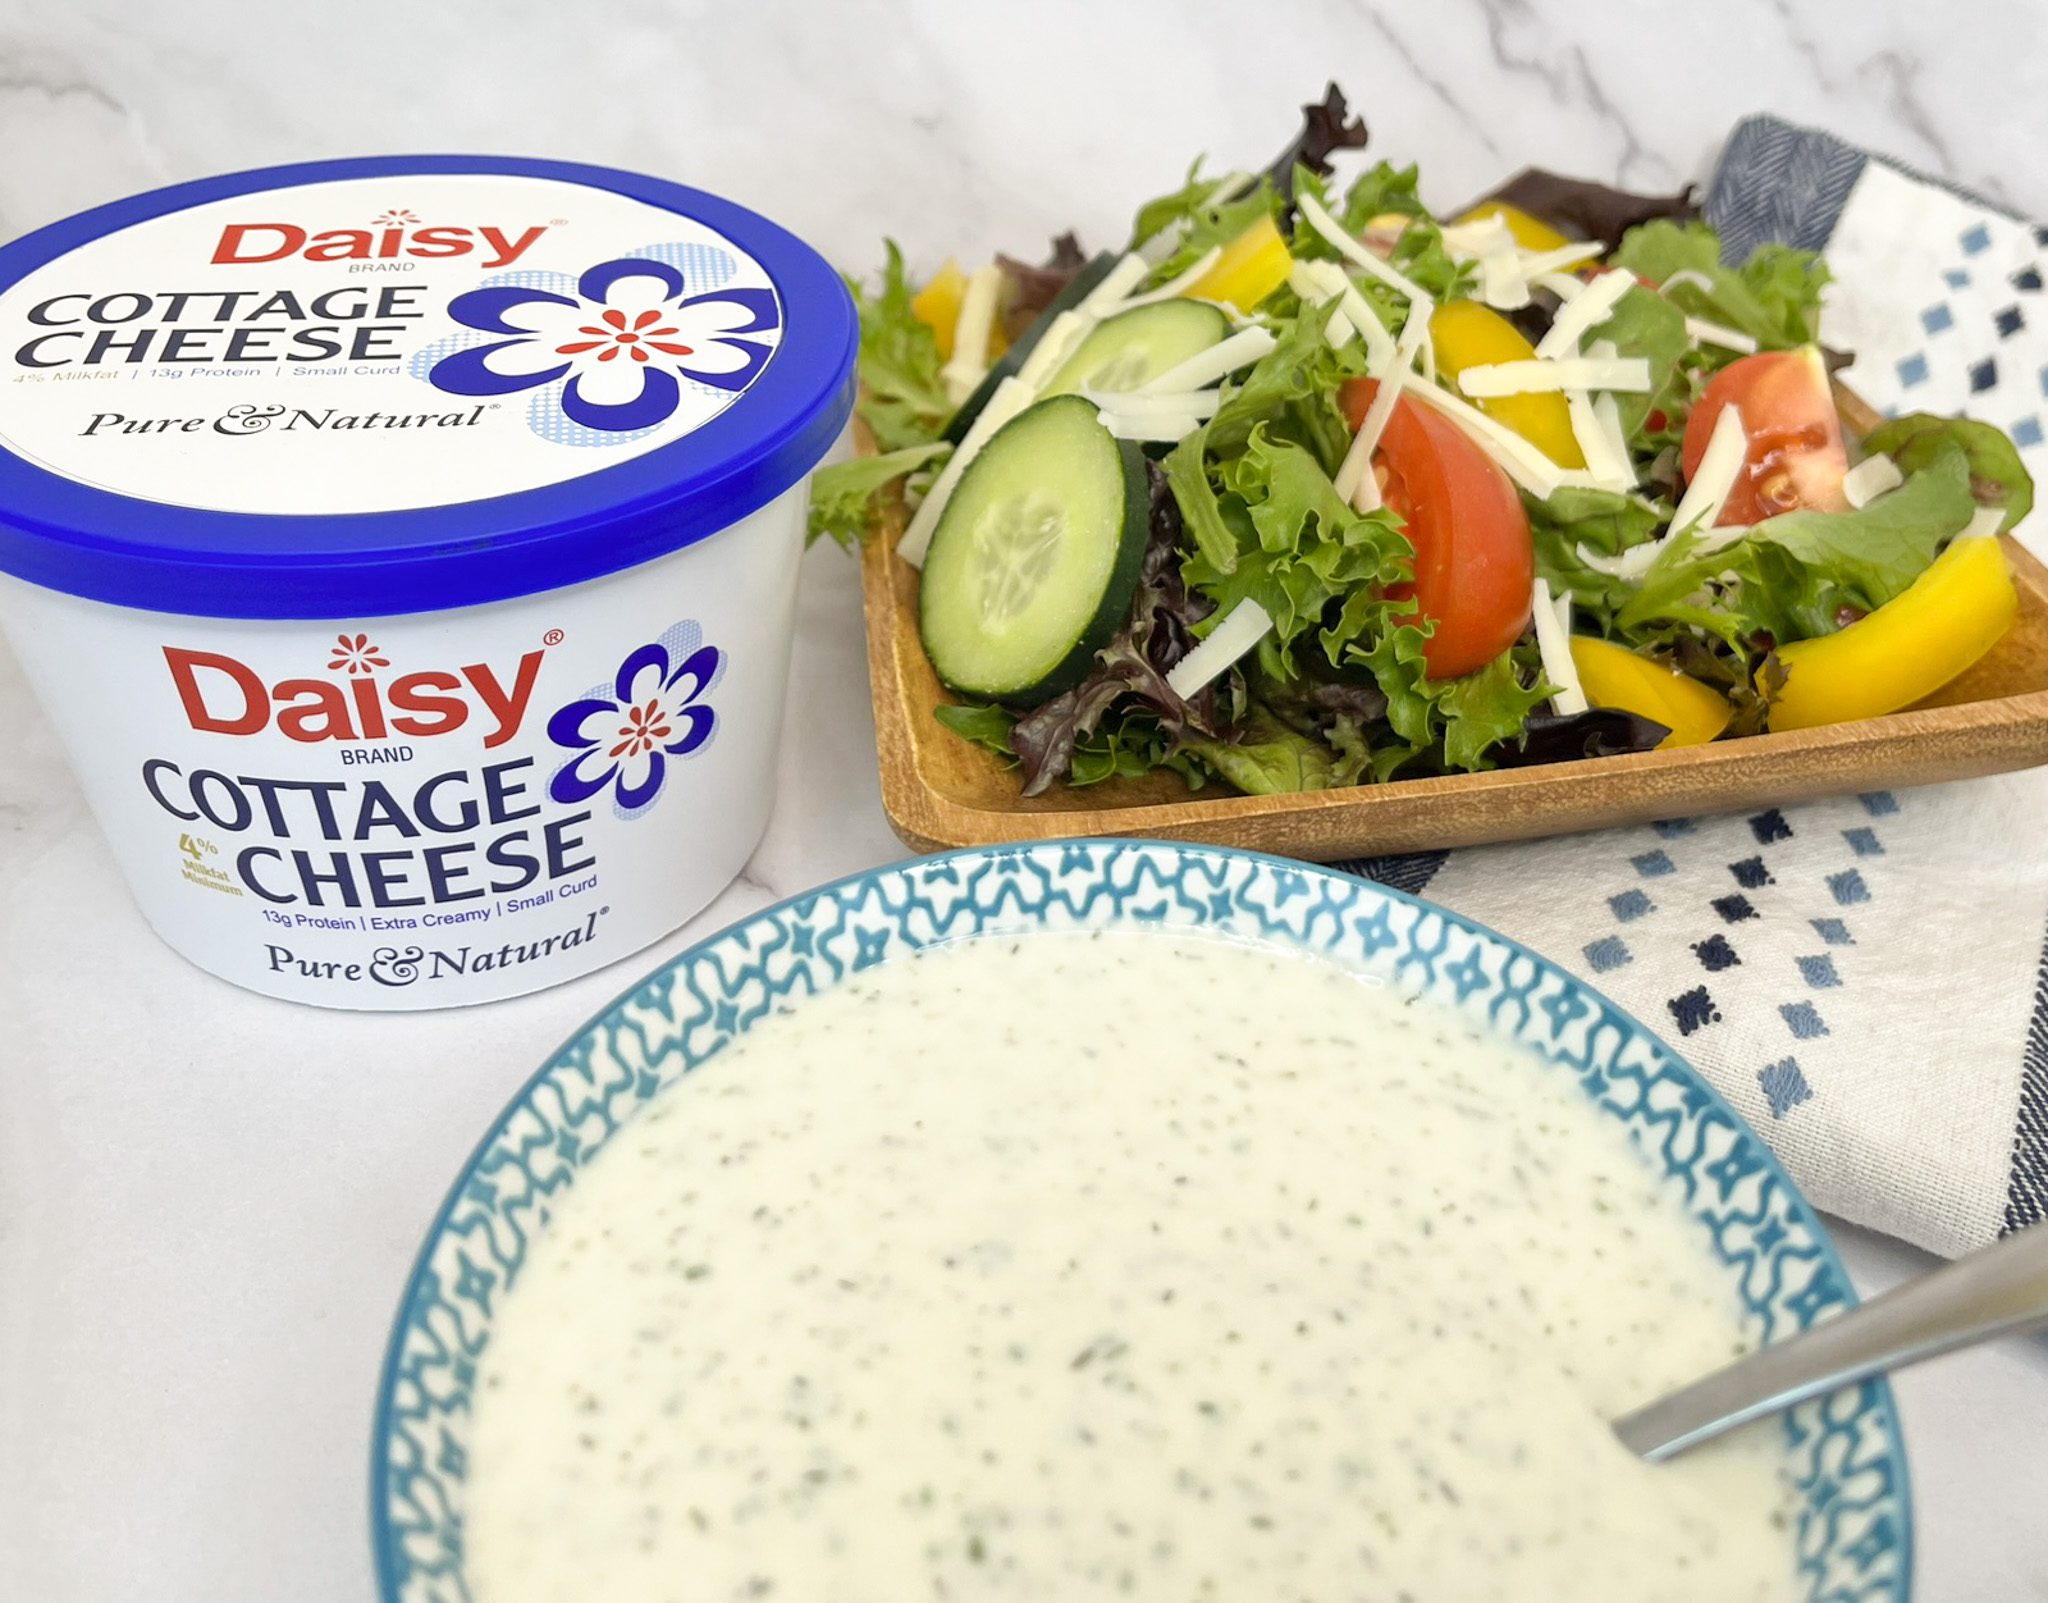
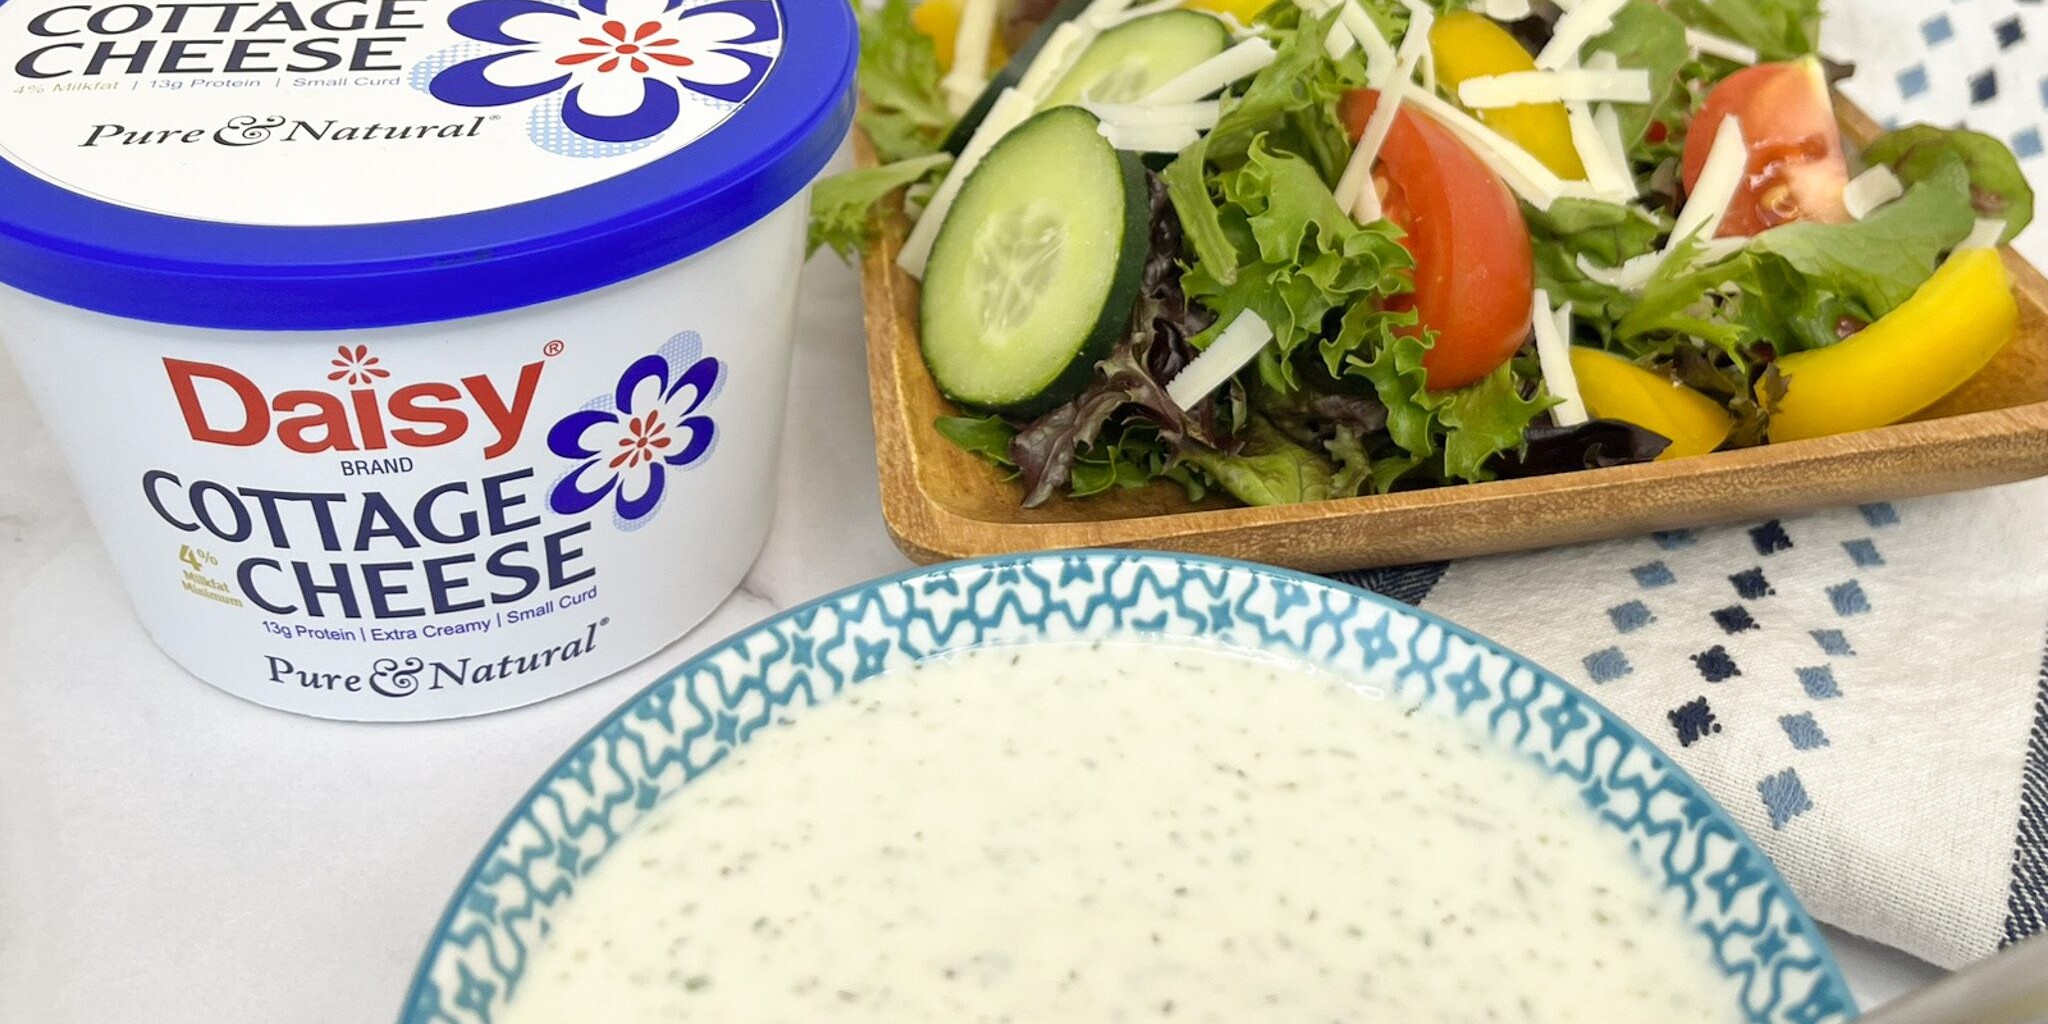
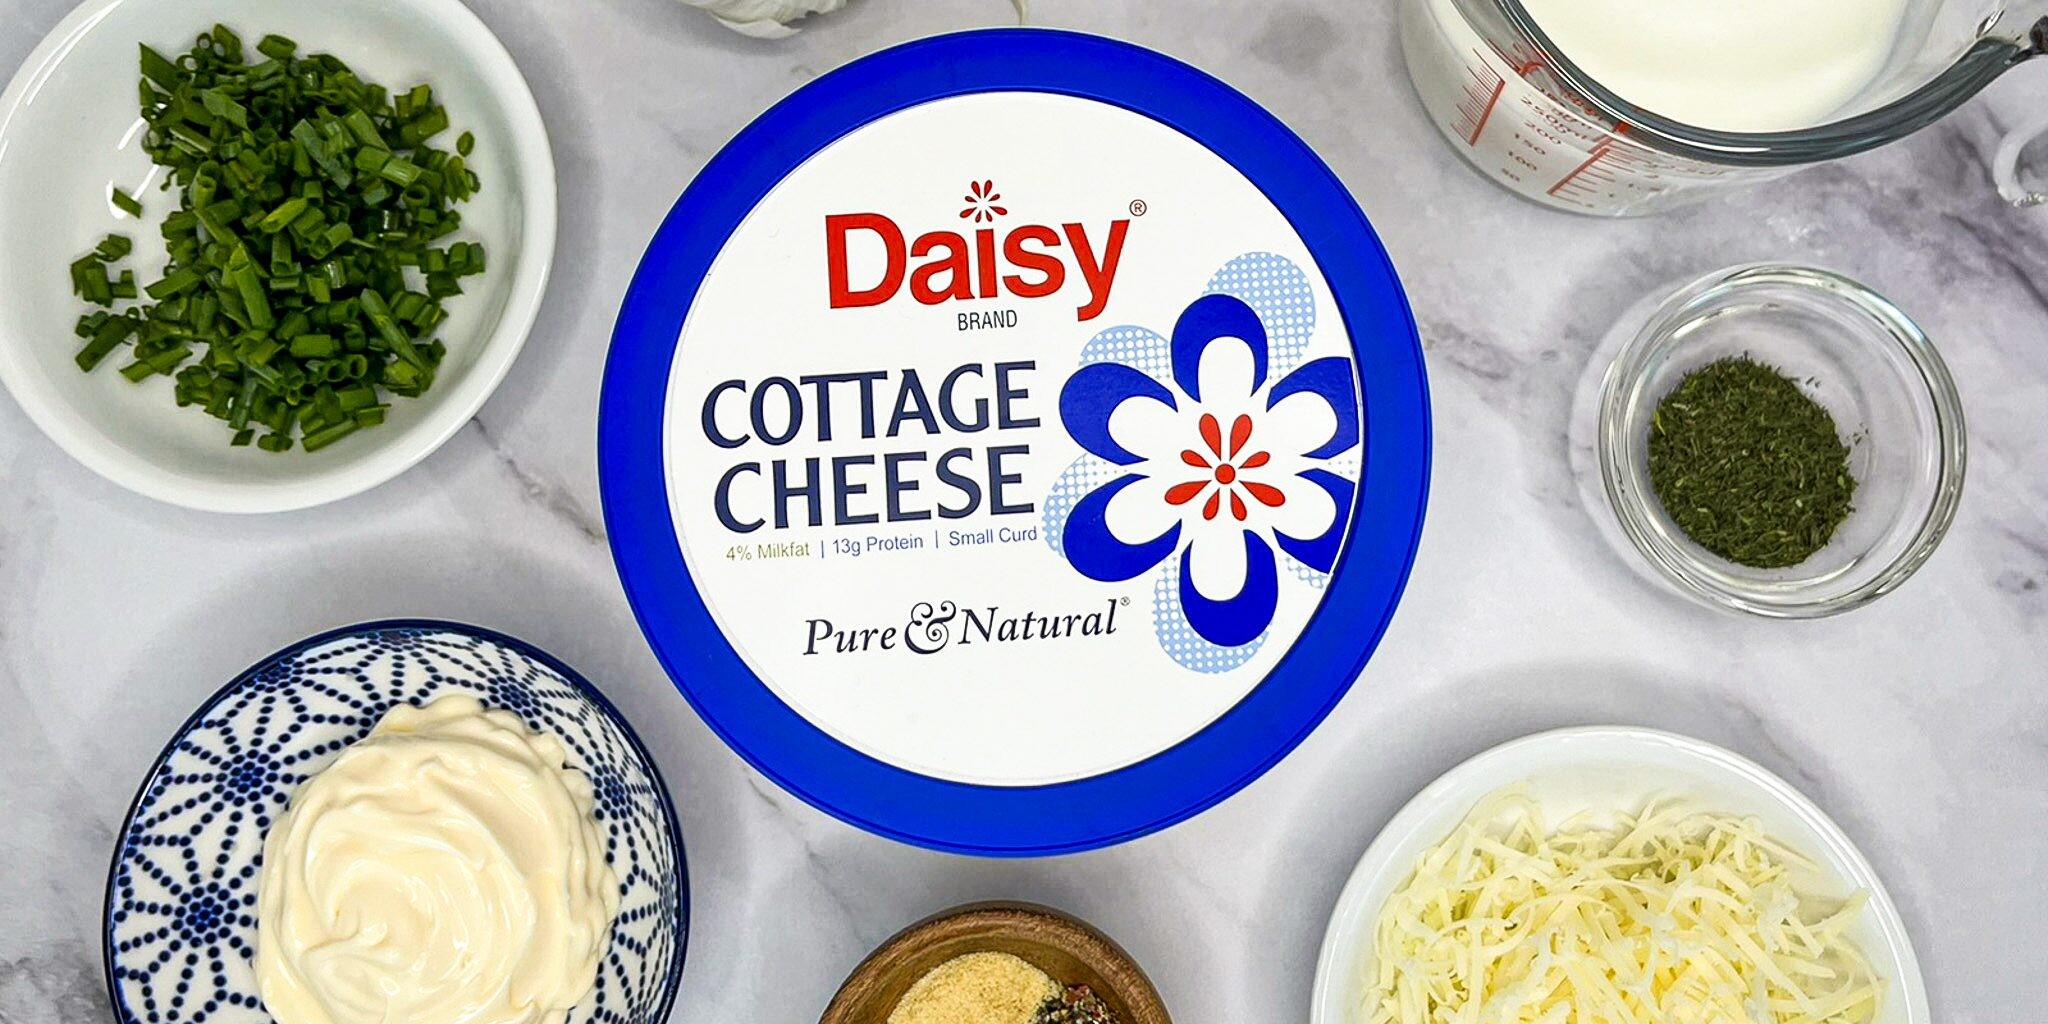
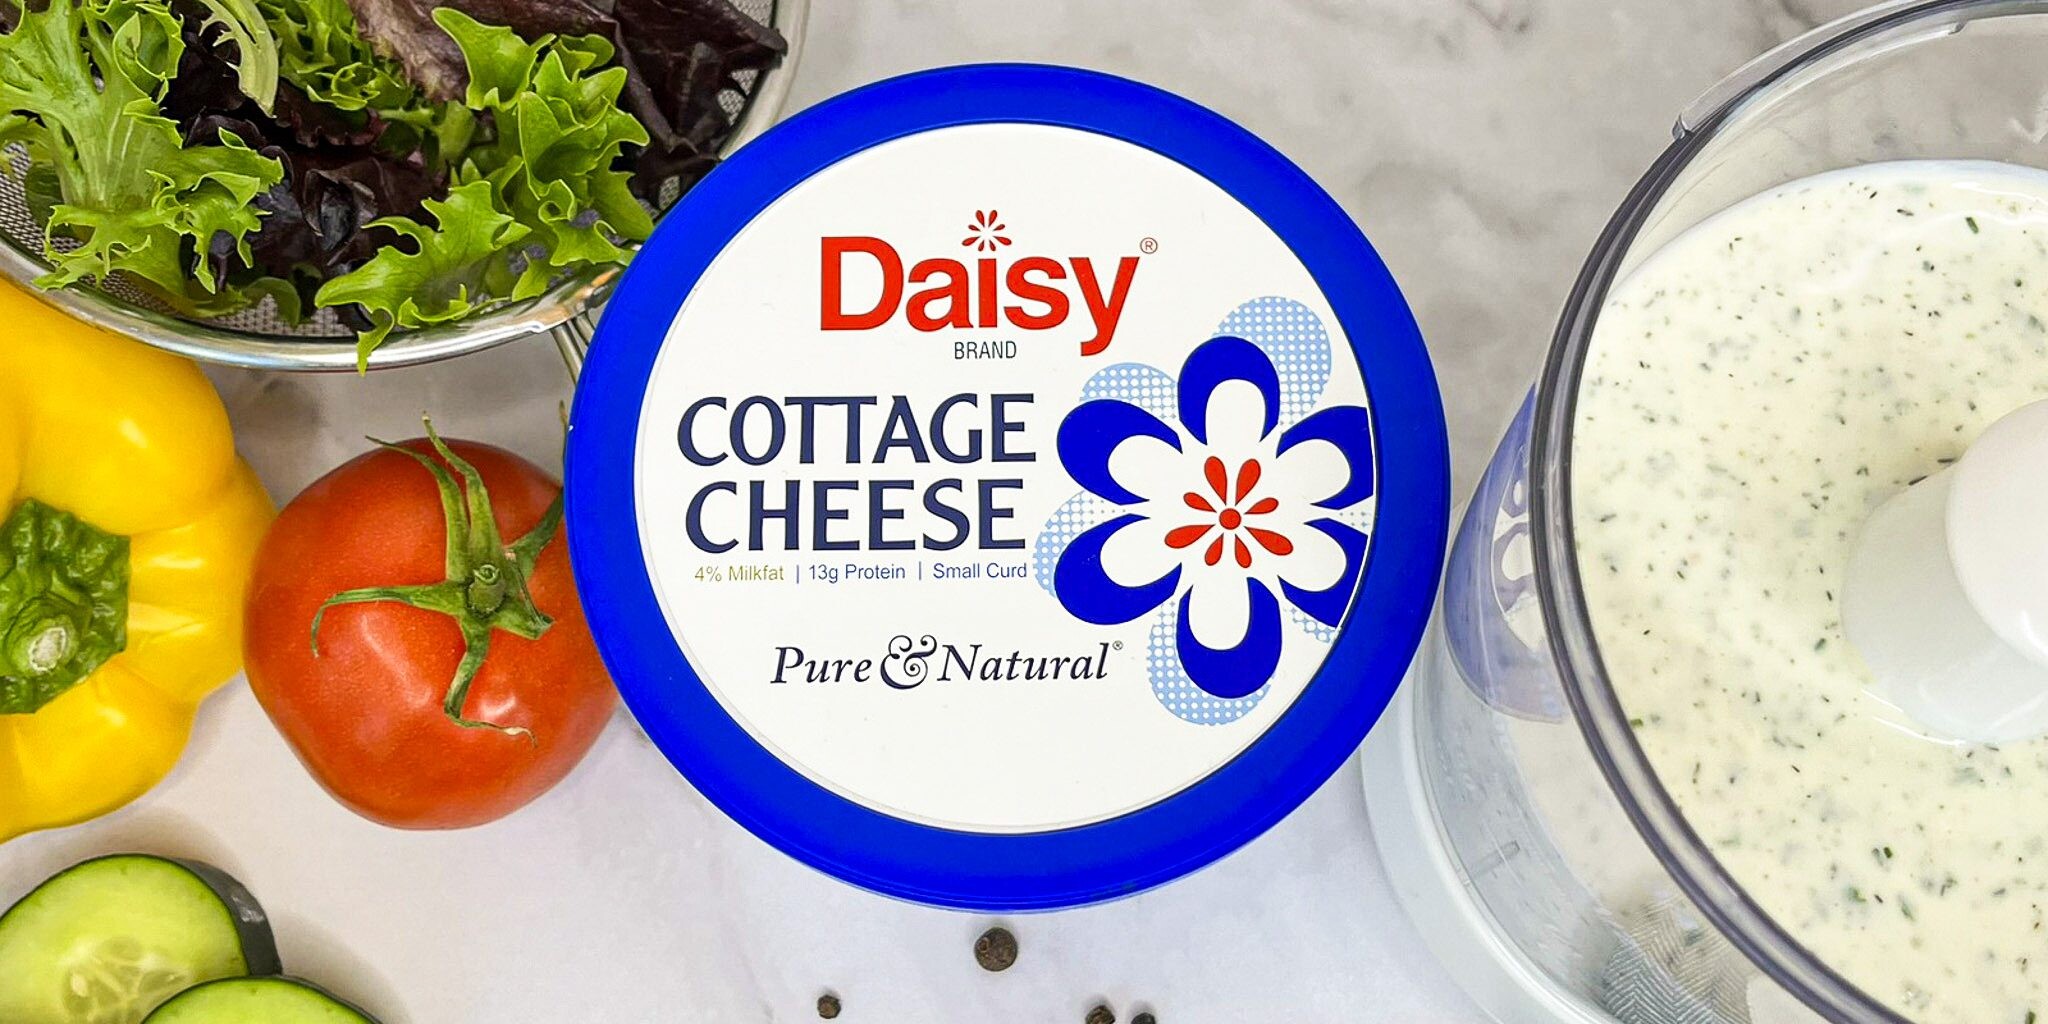
Cheesy Ranch Dressing
Cheesy Ranch Dressing
This easy Cheesy Ranch Dressing comes together in a snap and is packed with protein—without all the preservatives and additives found in many store-bought dressings.
Made with Daisy Cottage Cheese as the creamy base, this dressing is rich, flavorful, and surprisingly light. It’s perfect for salads, dipping veggies, or drizzling over grain bowls and roasted veggies. Once you try it, you’ll never go back to bottled ranch again!

Cheesy Ranch Dressing Ingredients
- Daisy Cottage Cheese (1 cup): Provides the dressing with its creamy texture and adds a subtle tangy taste with a boost of protein.
- Buttermilk (1/2 cup): Tangy in taste, it adds a touch of acid to the dressing and thins it out.
- Mayonnaise (1/4 cup): Adds a creamy richness to the dressing.
- Fresh Chives (2 tablespoons, chopped): Small, thin, and wispy onions, perfect for adding a touch of mild onion flavor with a taste similar to leeks.
- Parmesan (2 tablespoons, grated): Best when freshly grated, it adds a nutty saltiness to the dressing.
- Garlic (1 clove): Fresh garlic gives a pungent, sharp flavor that compliments the herbs.
- Onion Powder (1/4 teaspoon): Adds a concentrated, punchy onion taste without adding texture of fresh onions.
- Kosher Salt (1/4 teaspoon): A large-grain salt that is less refined than table salt and contains no additives. It helps enhance the other flavors of the dressing.
- Cracked Black Pepper (1/4 teaspoon): Adds a round and deep flavor than ground pepper. Highly fragrant and earthy in taste with citrus and slight floral notes.
- Dried Dill (1 teaspoon): One of the traditional flavors of ranch dressing, this concentrated dried herb packs a bright, sweet, citrusy, earthy punch.
Substitutions, Variations, and Tips
- Substitute ½ teaspoon jarred minced garlic for the fresh clove if you’re short on time.
- Want a little heat? Add a small diced jalapeño or 1/8 teaspoon cayenne pepper.
- No buttermilk? Make your own by mixing 1 tablespoon lemon juice or vinegar into 1 cup milk—let it sit for 10 minutes.
- Swap green onions or leeks for the chives.
- Use 1 tablespoon chopped fresh dill instead of dried for a brighter flavor.
- Customize the texture! Blend until smooth or leave a bit of chunkiness for a rustic feel.
How to Make Cheesy Ranch Dressing
- In a food processor, combine all ingredients except the dill and blend until smooth.
- Stir in the dill.
- Serve immediately, or refrigerate for a few hours to let the flavors meld.
This dressing keeps well in the fridge for several days—perfect for meal prep! Once you try this protein-packed twist on ranch, you may never go back to the bottled stuff.

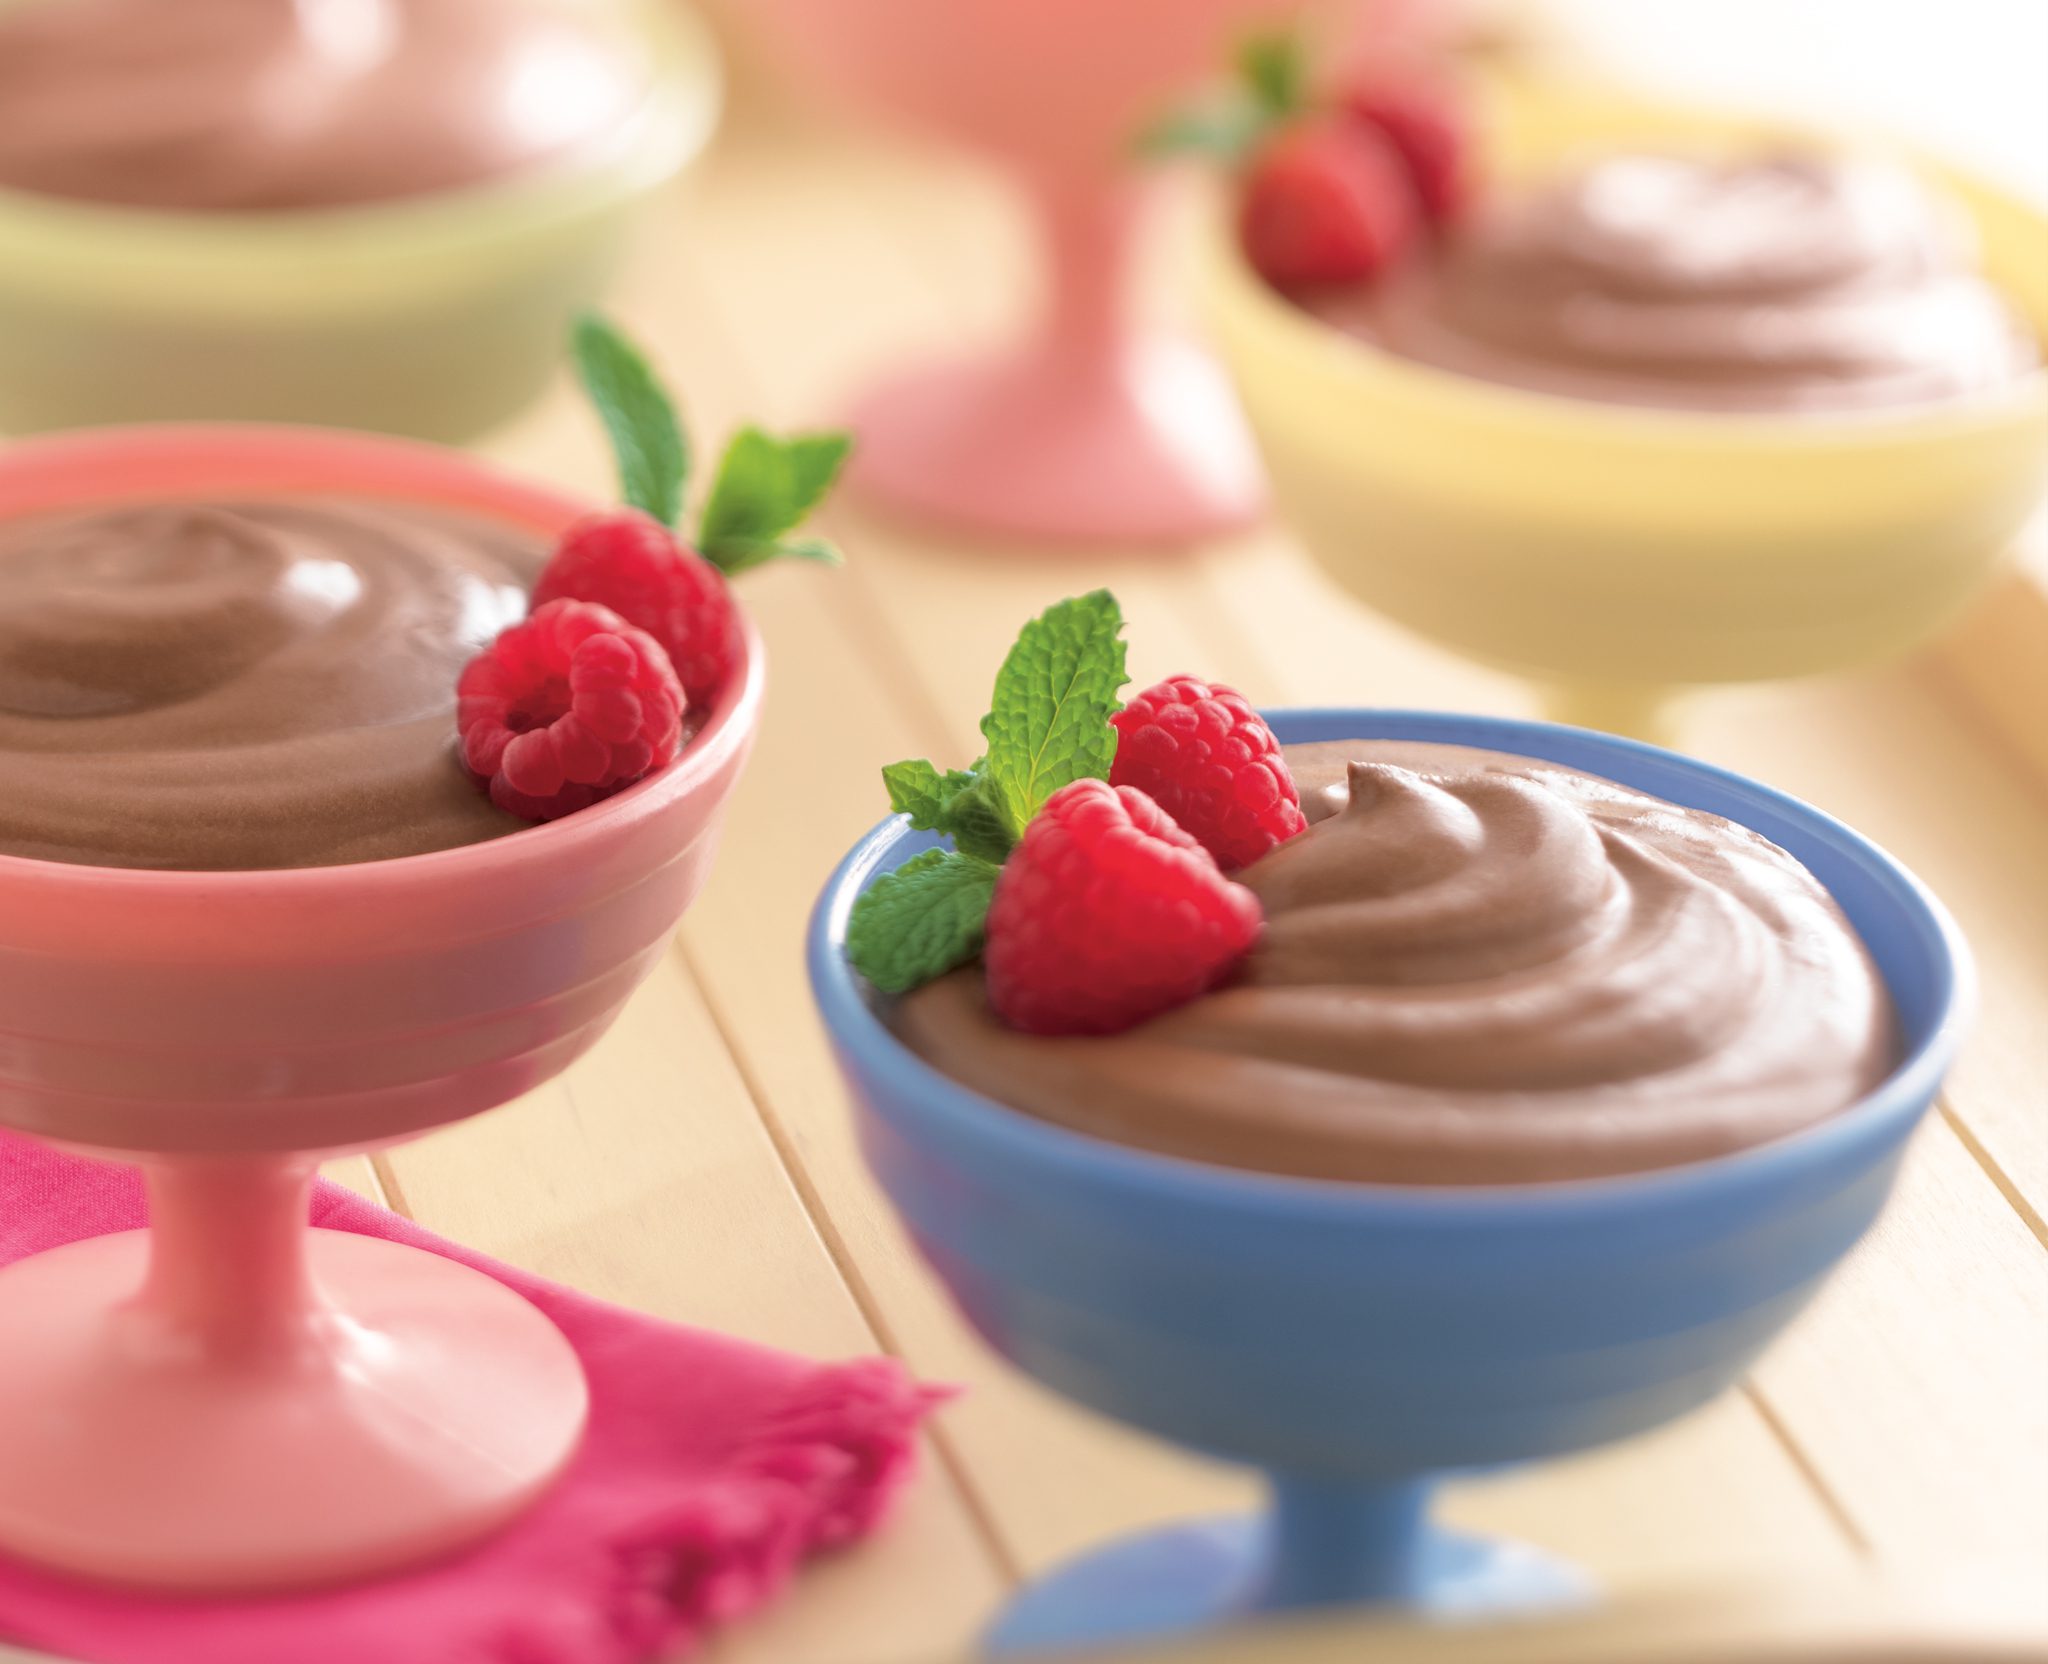
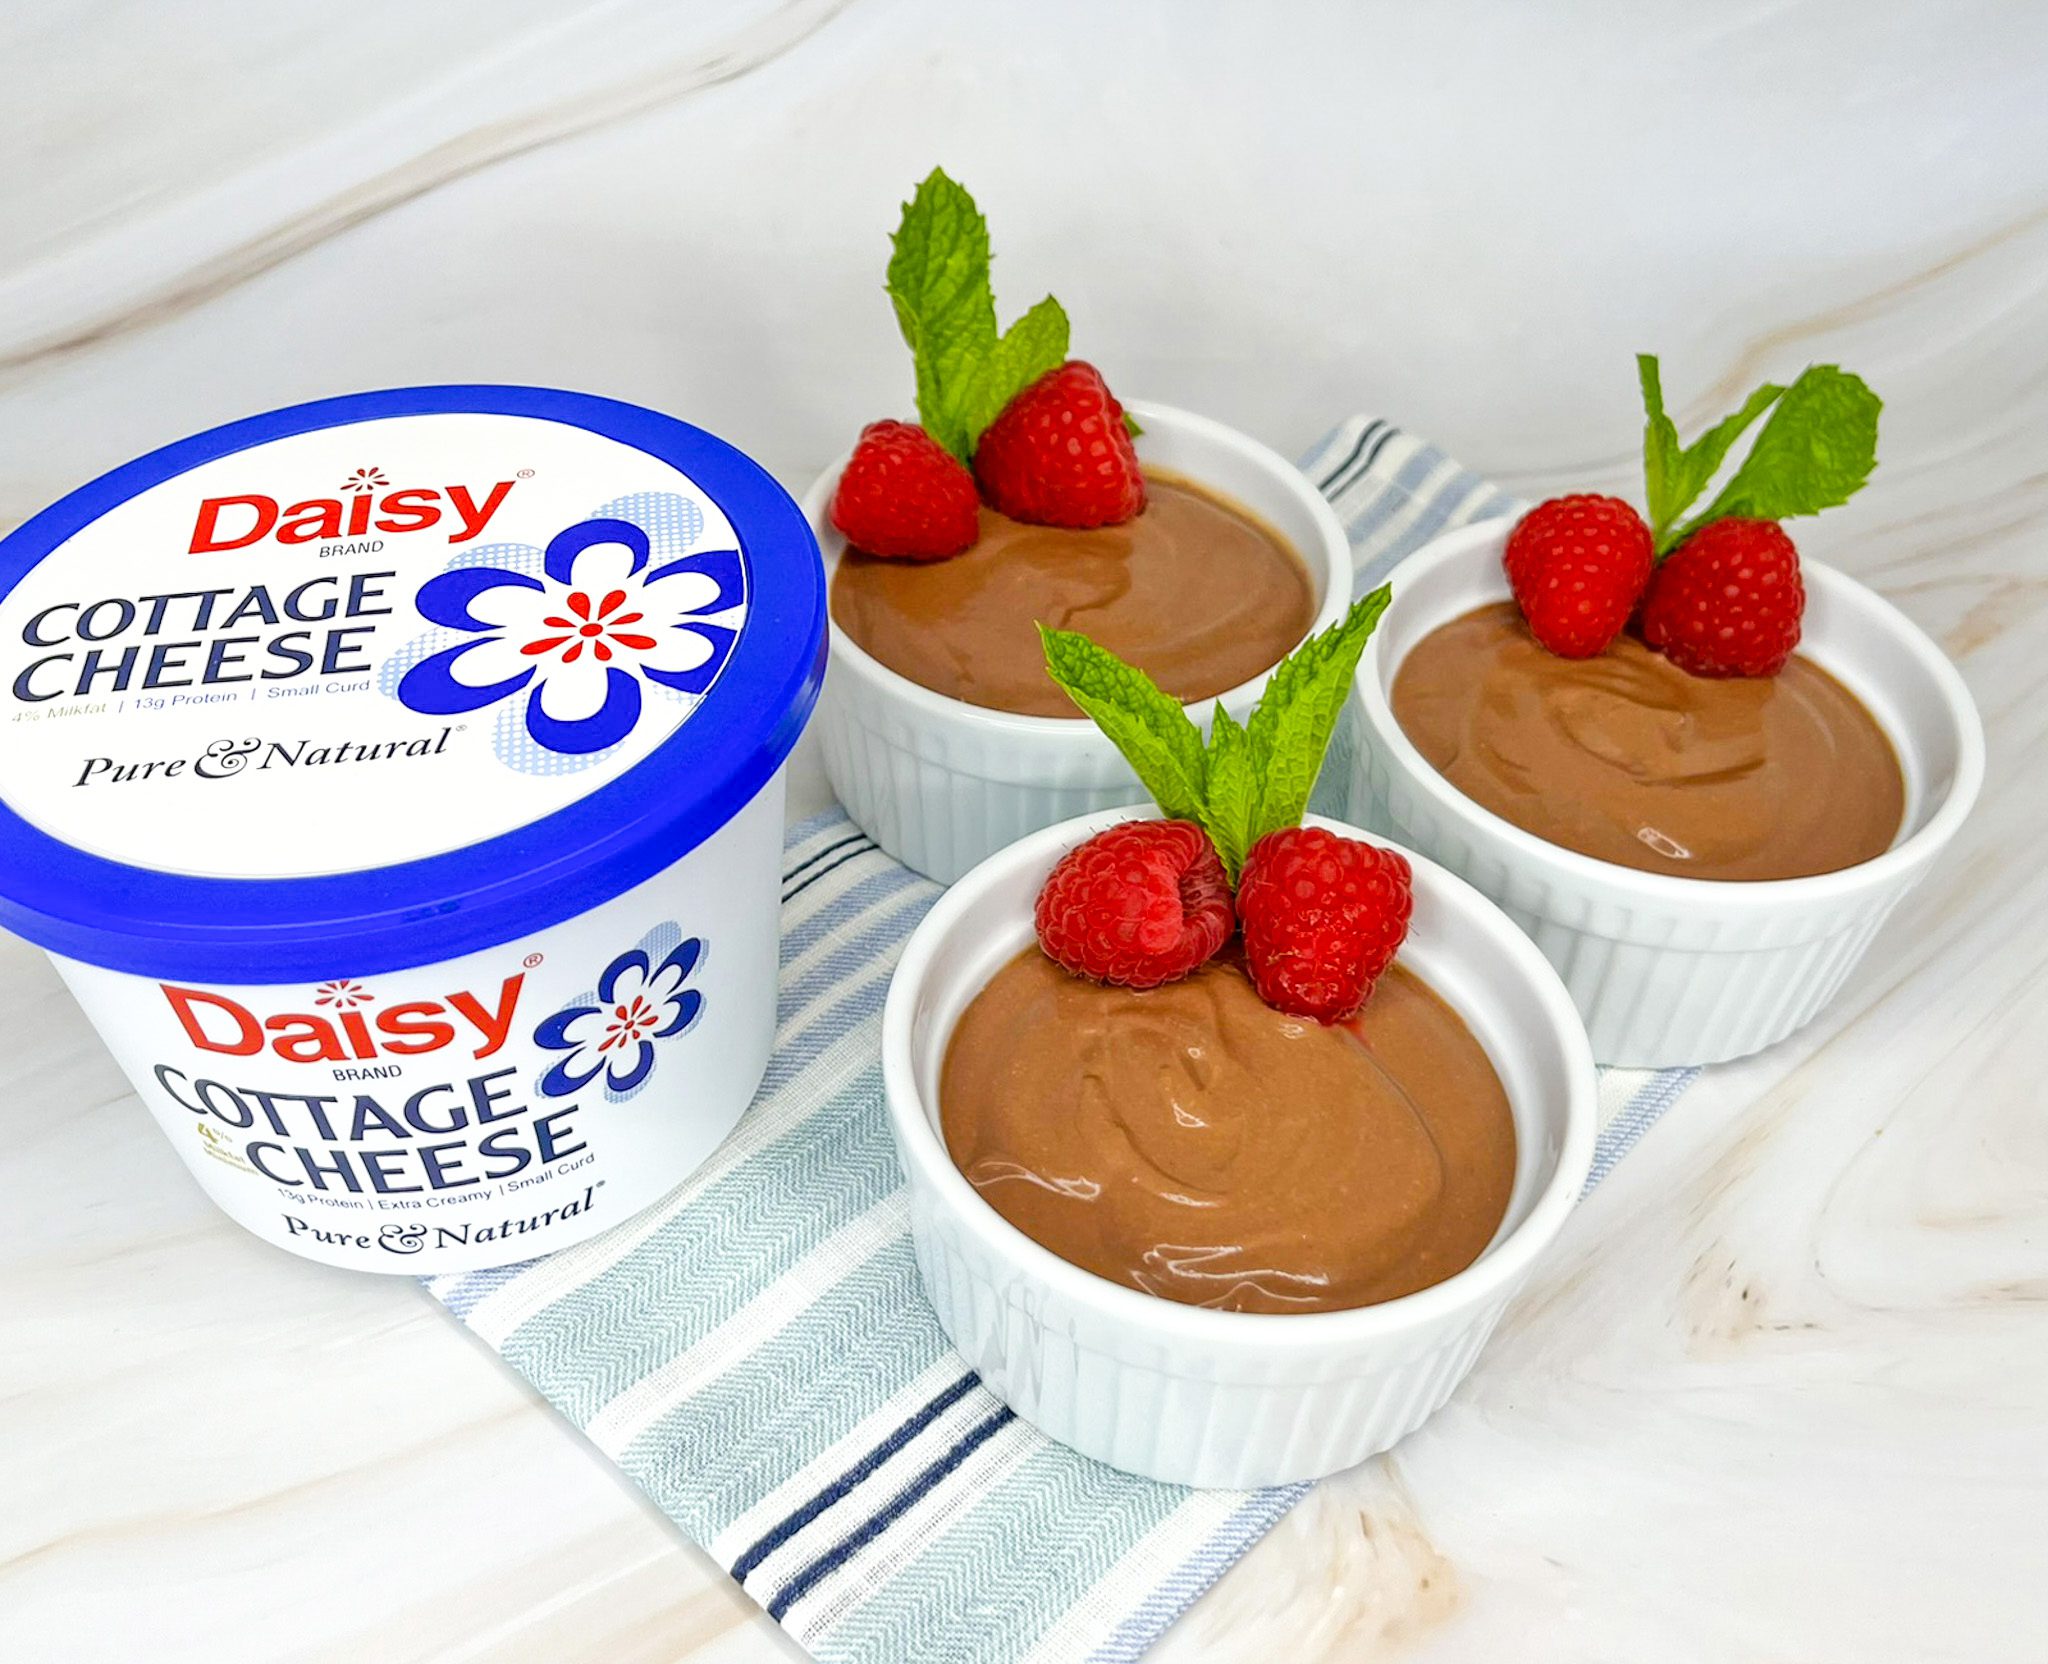
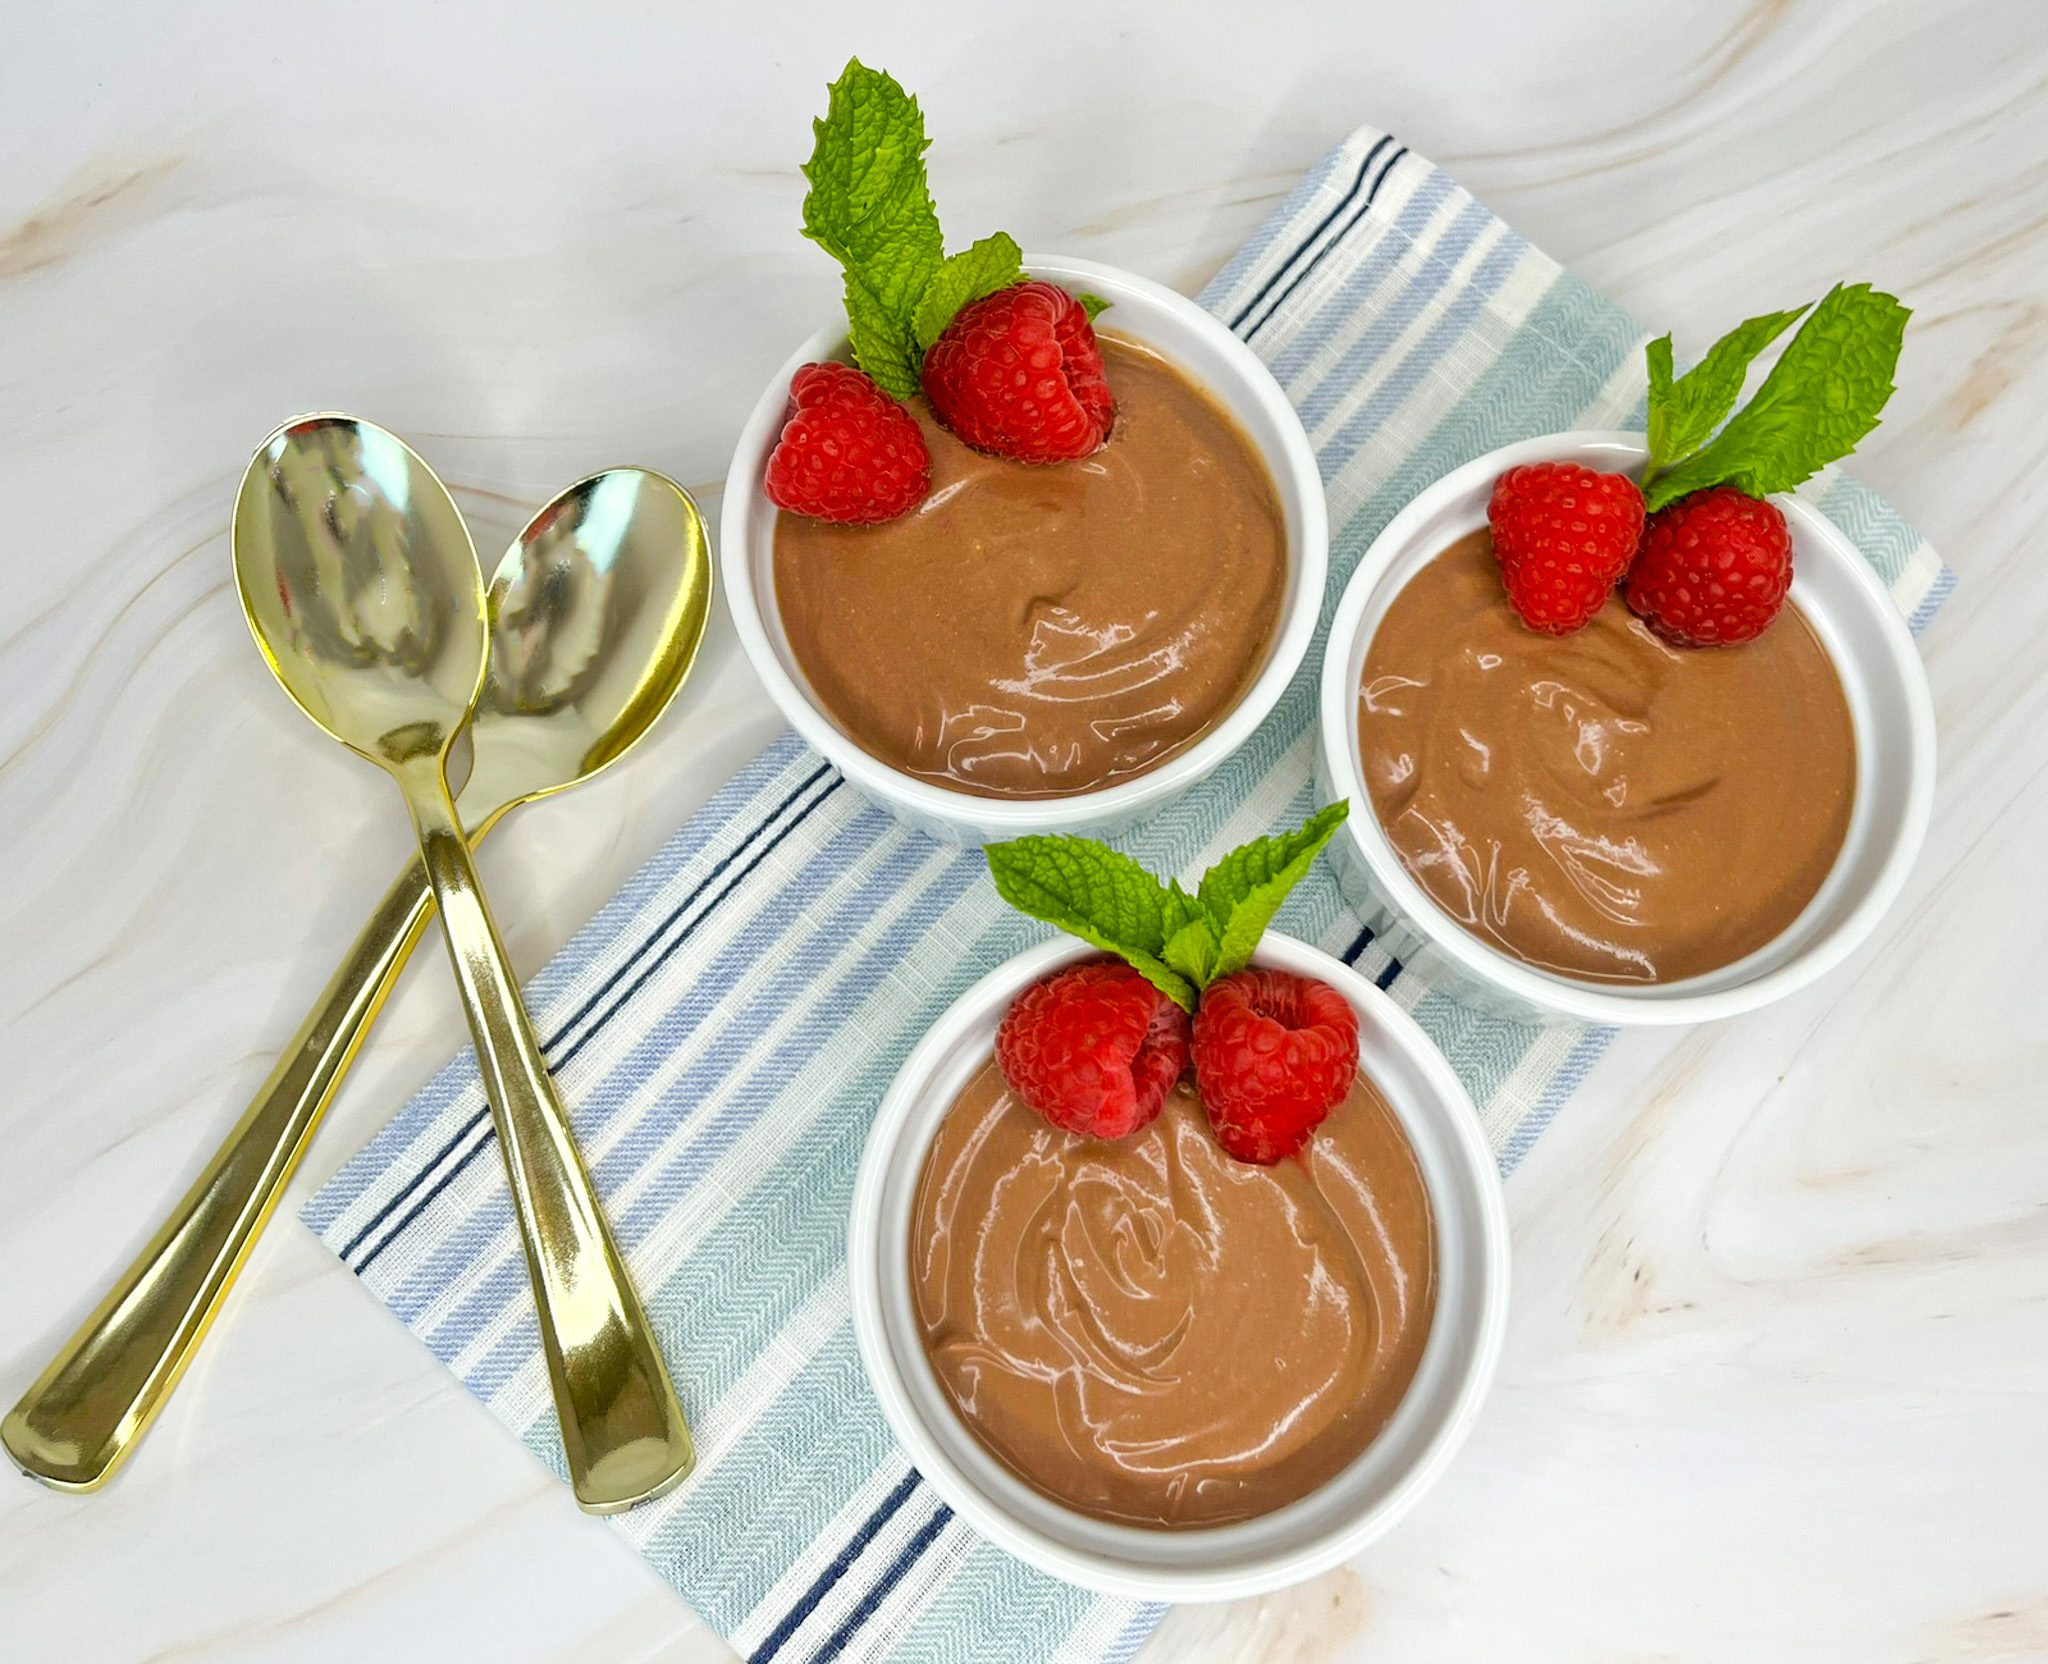
High Protein Chocolate Pudding
High Protein Chocolate Pudding
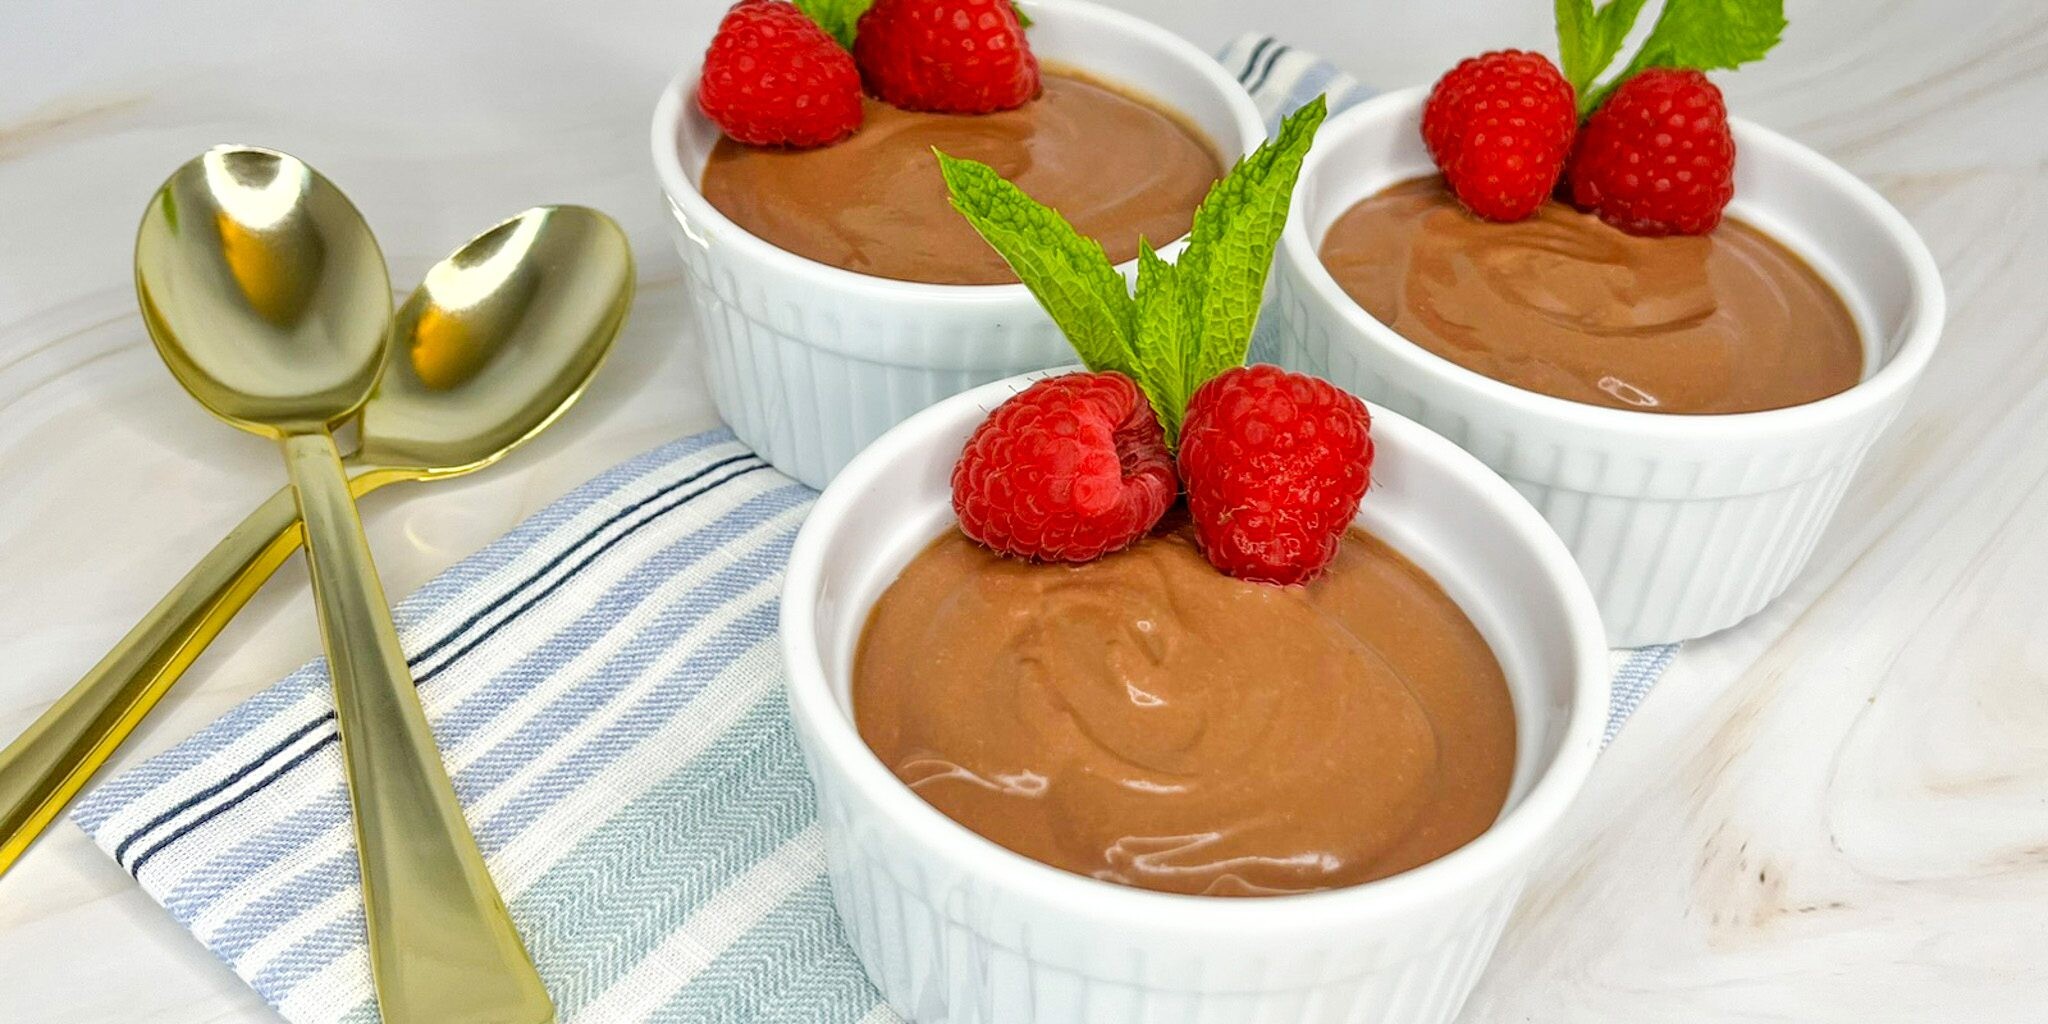
Looking for a quick and healthy snack or dessert that feels indulgent but is packed with protein? This High Protein Chocolate Pudding is the perfect treat for summer evenings—or anytime you’re craving something sweet and satisfying. With only two main ingredients and double the protein of traditional pudding, it’s a delicious way to sneak in some extra nutrition. Best of all, it comes together in just minutes!
High Protein Chocolate Pudding Ingredients
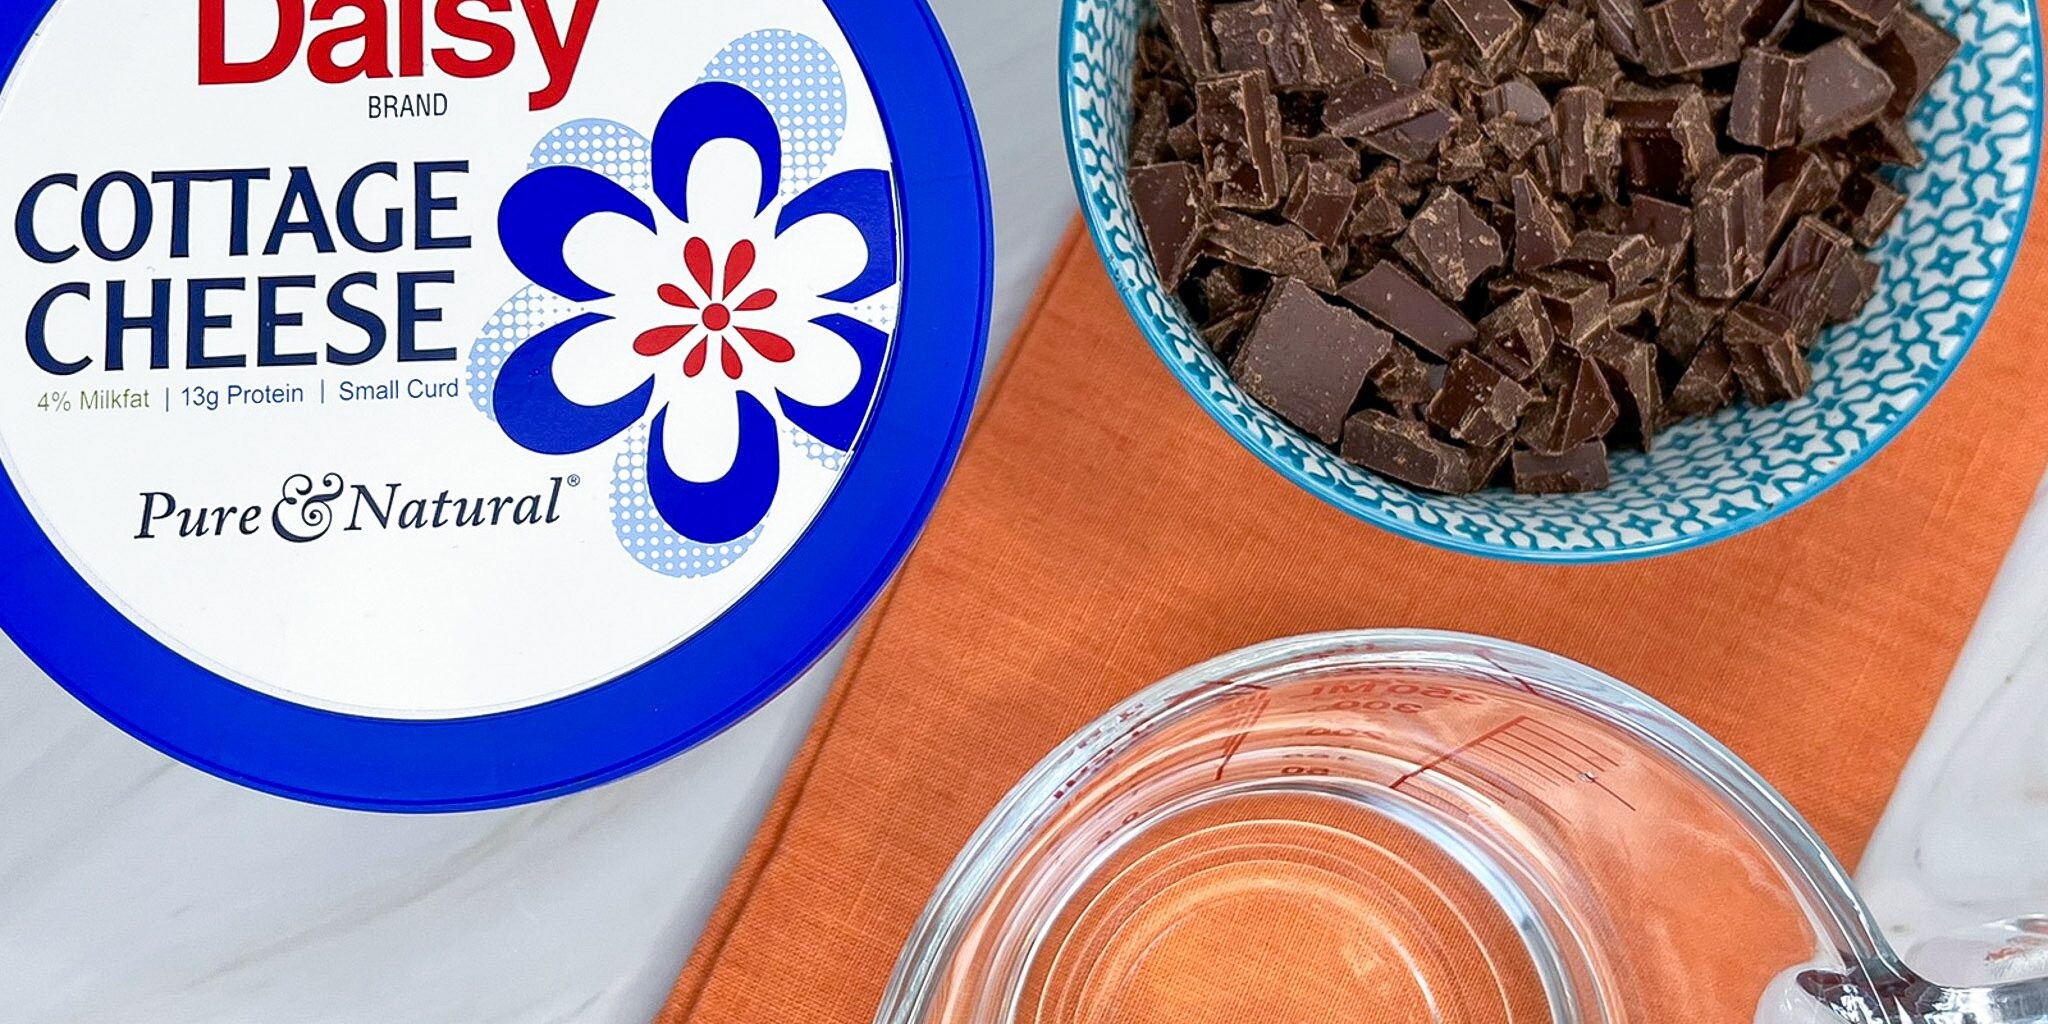
- Daisy Cottage Cheese (1 cup): The secret ingredient in this delicious and healthy pudding. It adds the creamy base to the pudding with a smooth and silky texture.
- Good Quality Chocolate (5 ounces): Adds flavor to the pudding. Both bittersweet and semisweet chocolate work well for the pudding.
- Water (1/2 cup): Thins the chocolate out and helps it mix well with the cottage cheese.
Substitutions, Variations, and Tips
- Try other chocolate varieties like white or milk chocolate for different flavor profiles.
- Avoid chocolate chips—they contain stabilizers that prevent smooth melting and result in a thicker texture.
- This pudding also makes a delicious dip for strawberries, bananas, or other fresh fruit!
- Agave, corn syrup, or artificial sweetener may be used in place of honey.
How to Make High Protein Chocolate Pudding
- Combine chocolate and water in a small saucepan over medium heat. Stir until melted and smooth (about 3 minutes).
- In a food processor, purée the cottage cheese until smooth and creamy. Add the melted chocolate and blend until fully combined.
- Pour into ramekins or dessert bowls. Enjoy immediately, or cover and refrigerate until ready to serve.
Pro Tip: Top with a dollop of Daisy Sour Cream or a few berries for an extra-special touch.
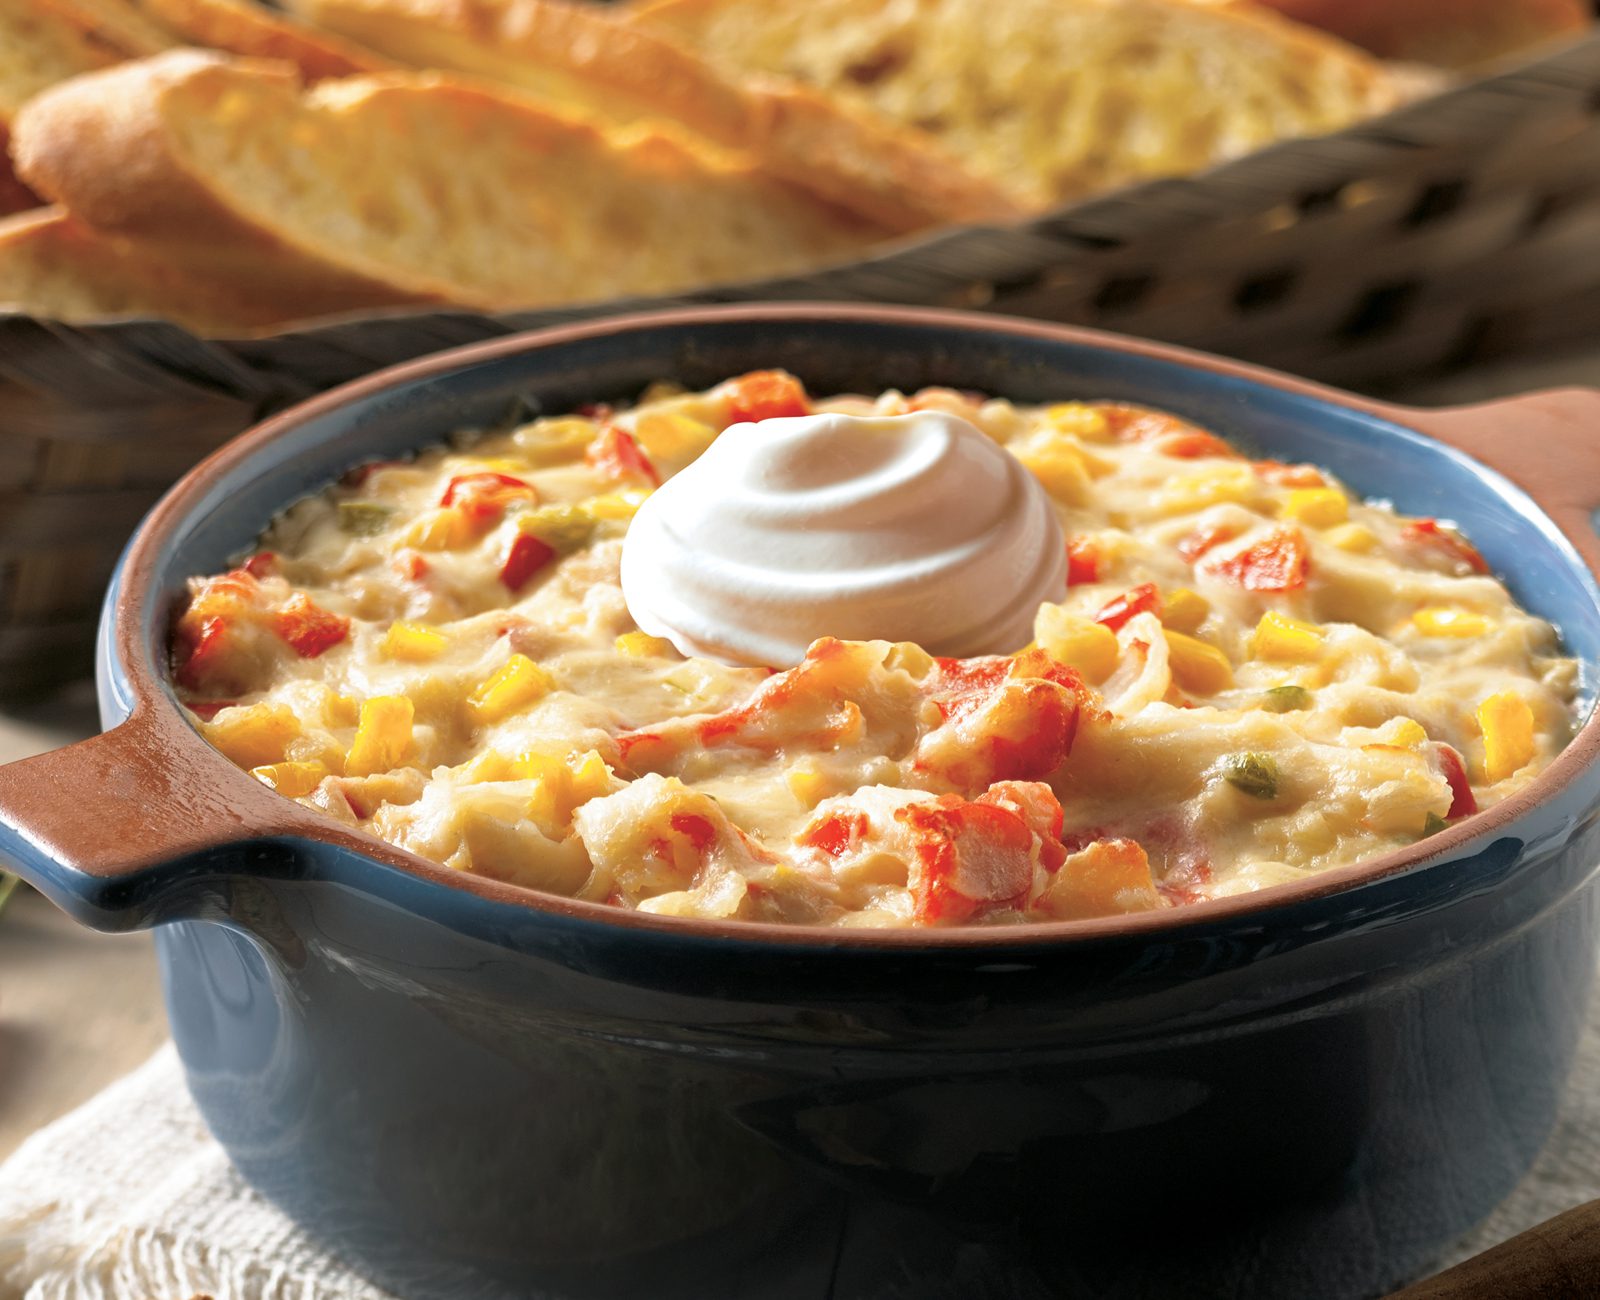
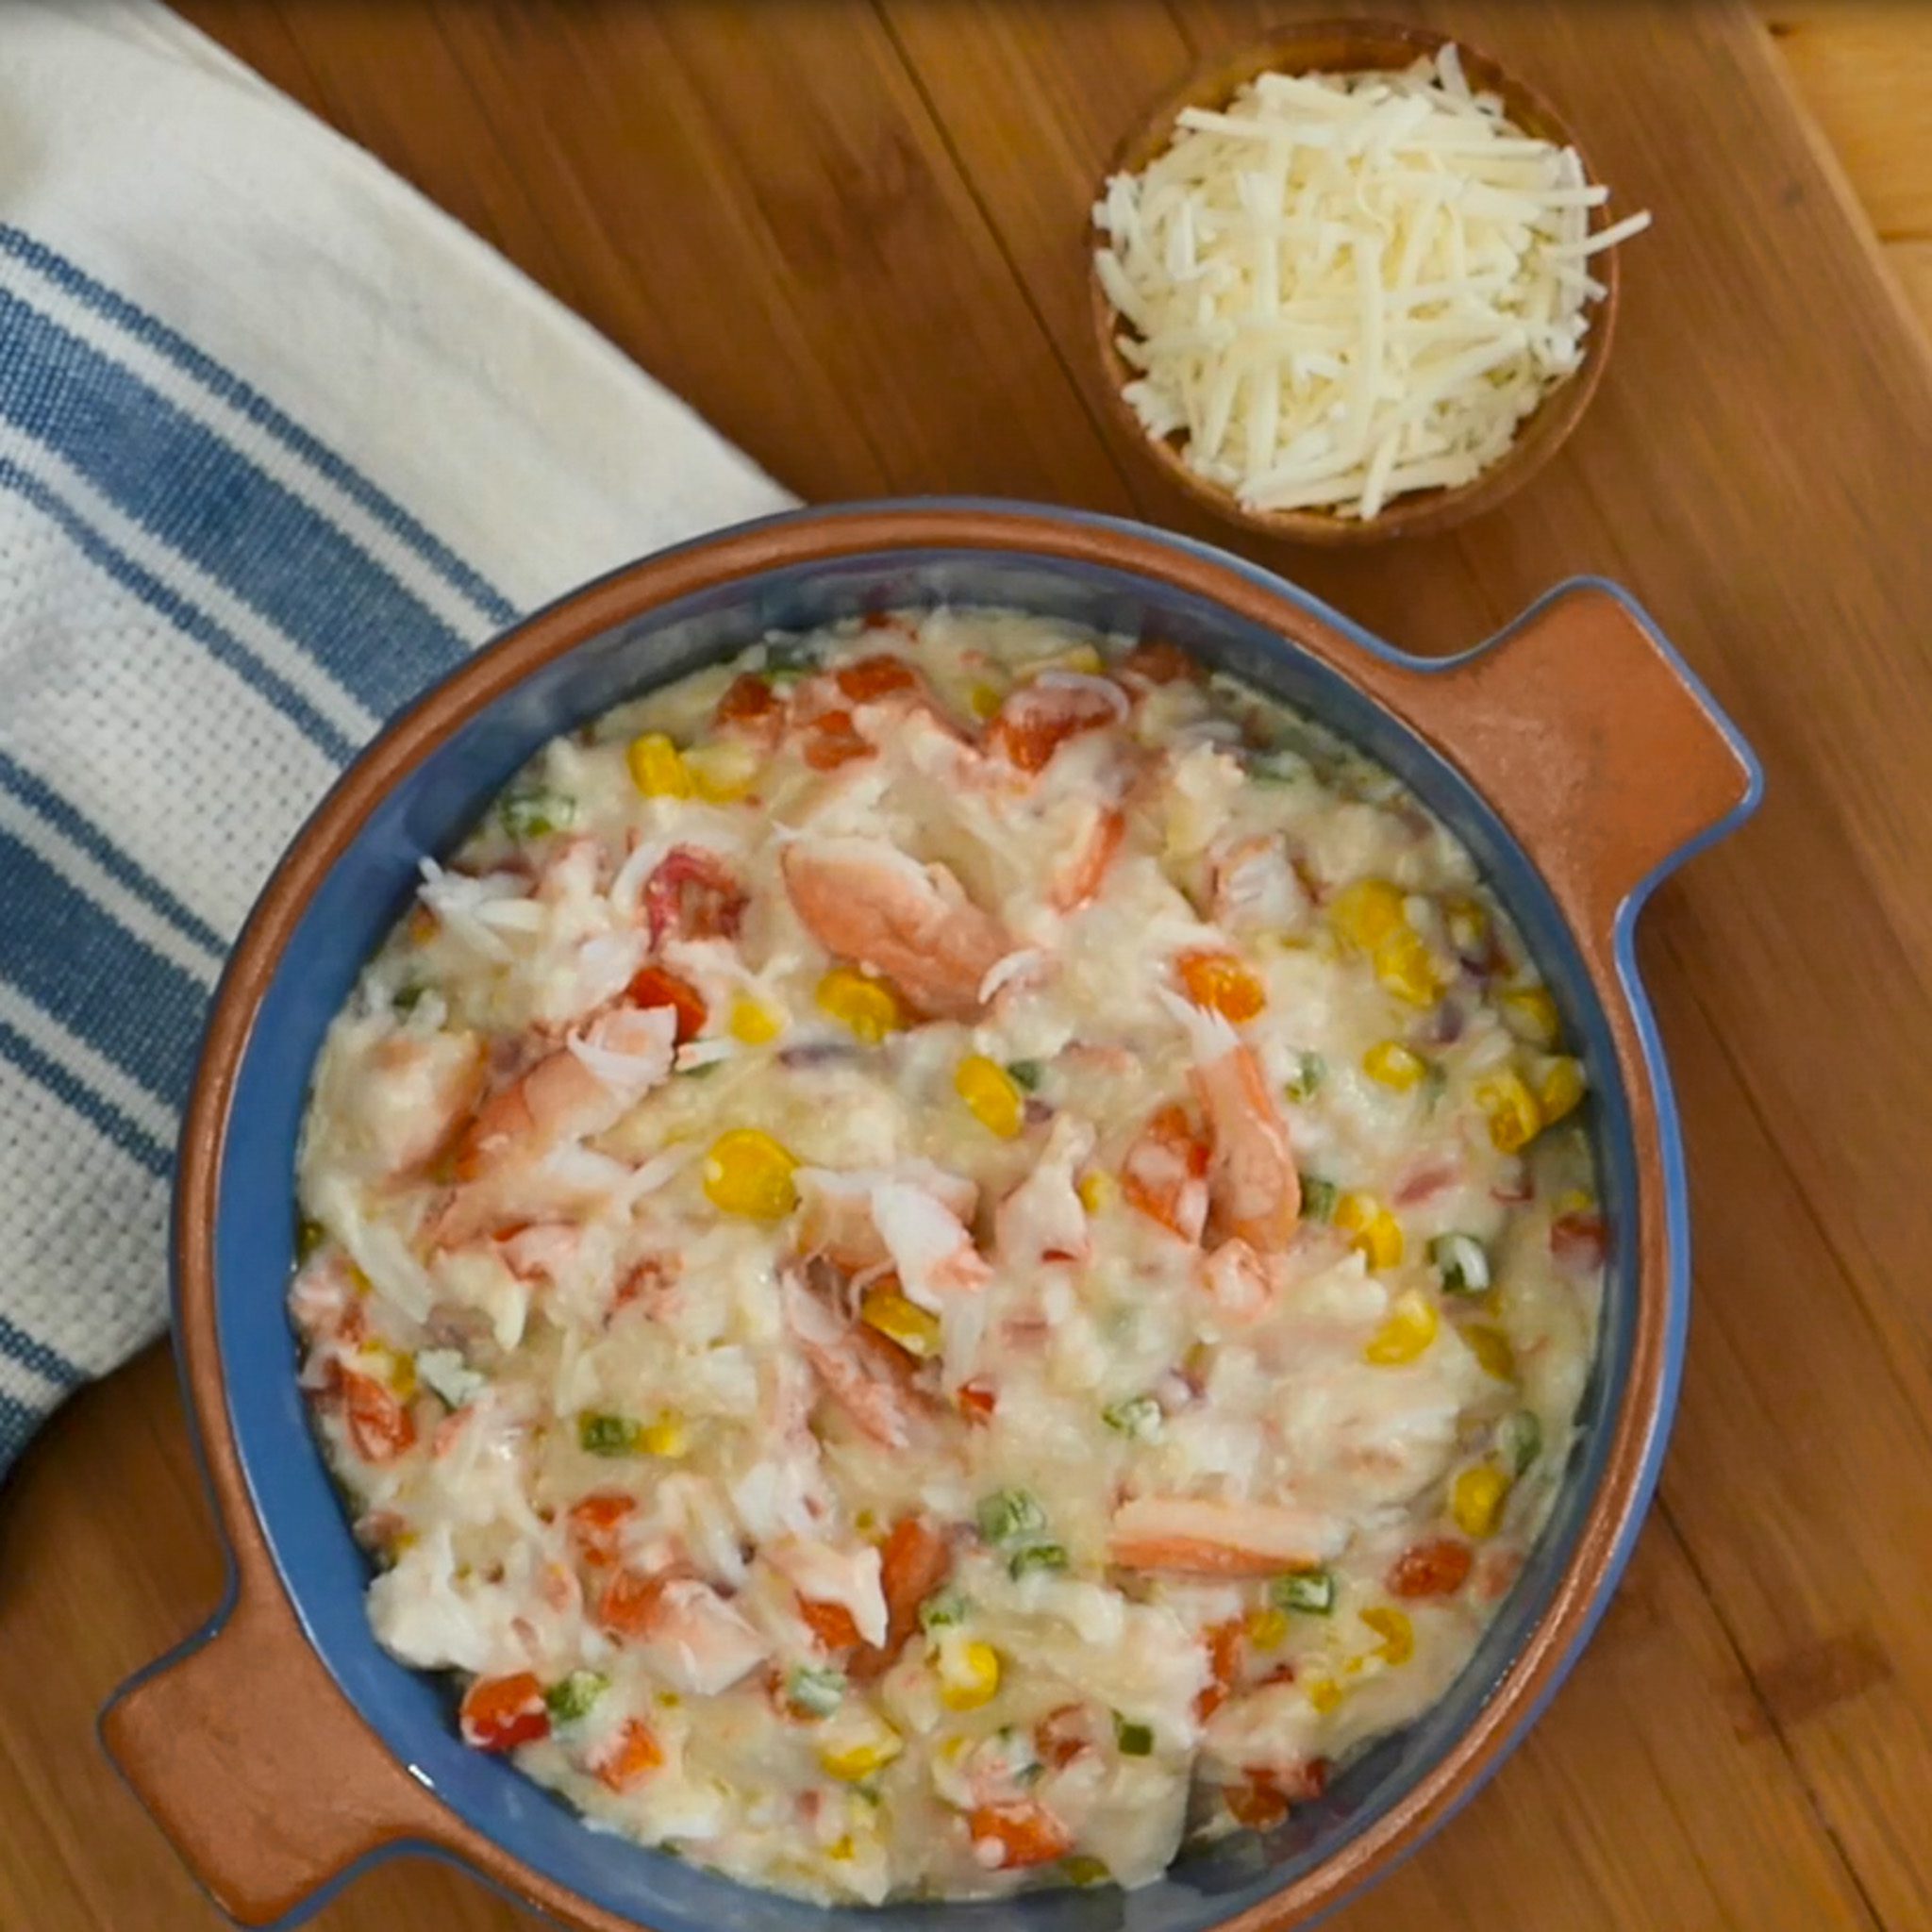
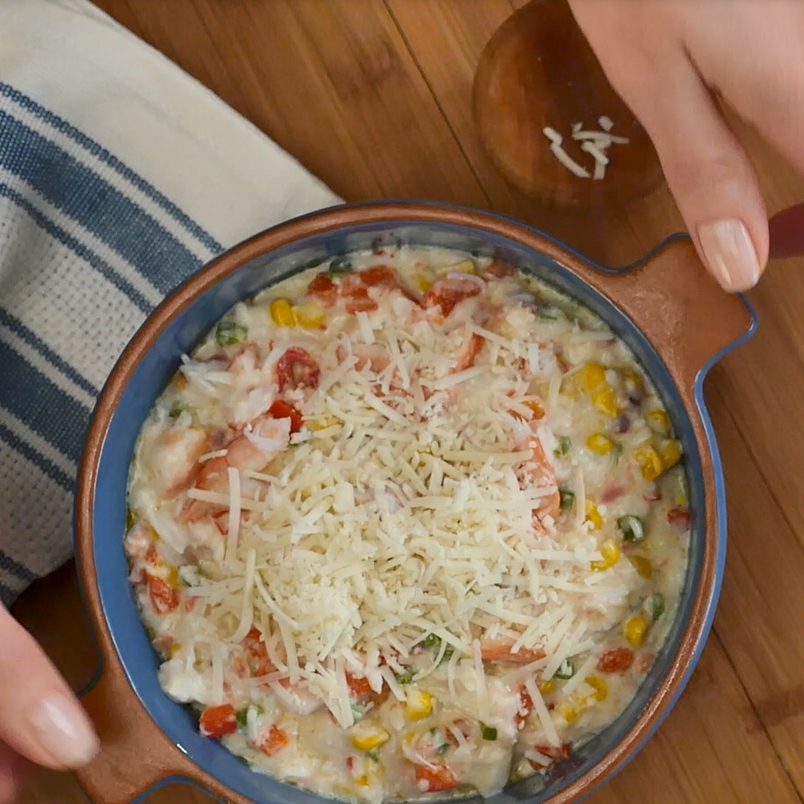
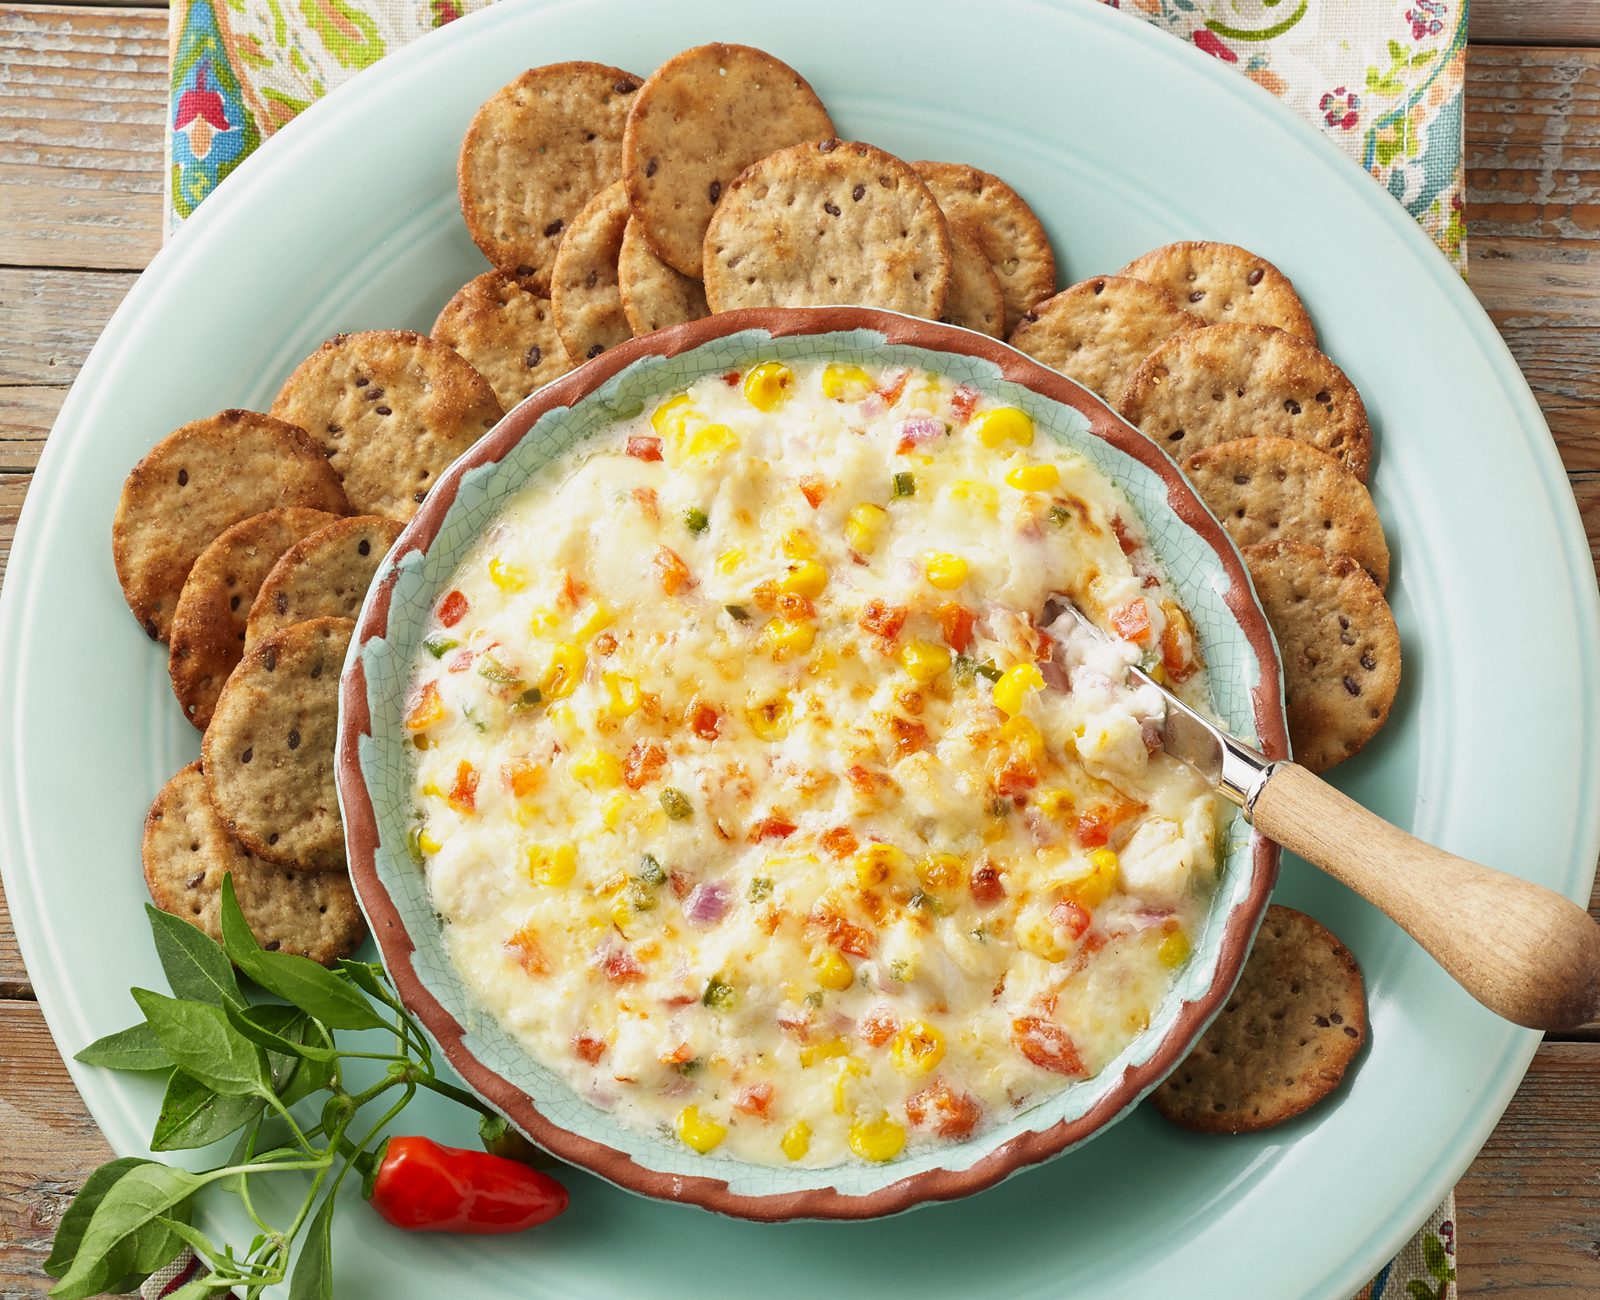
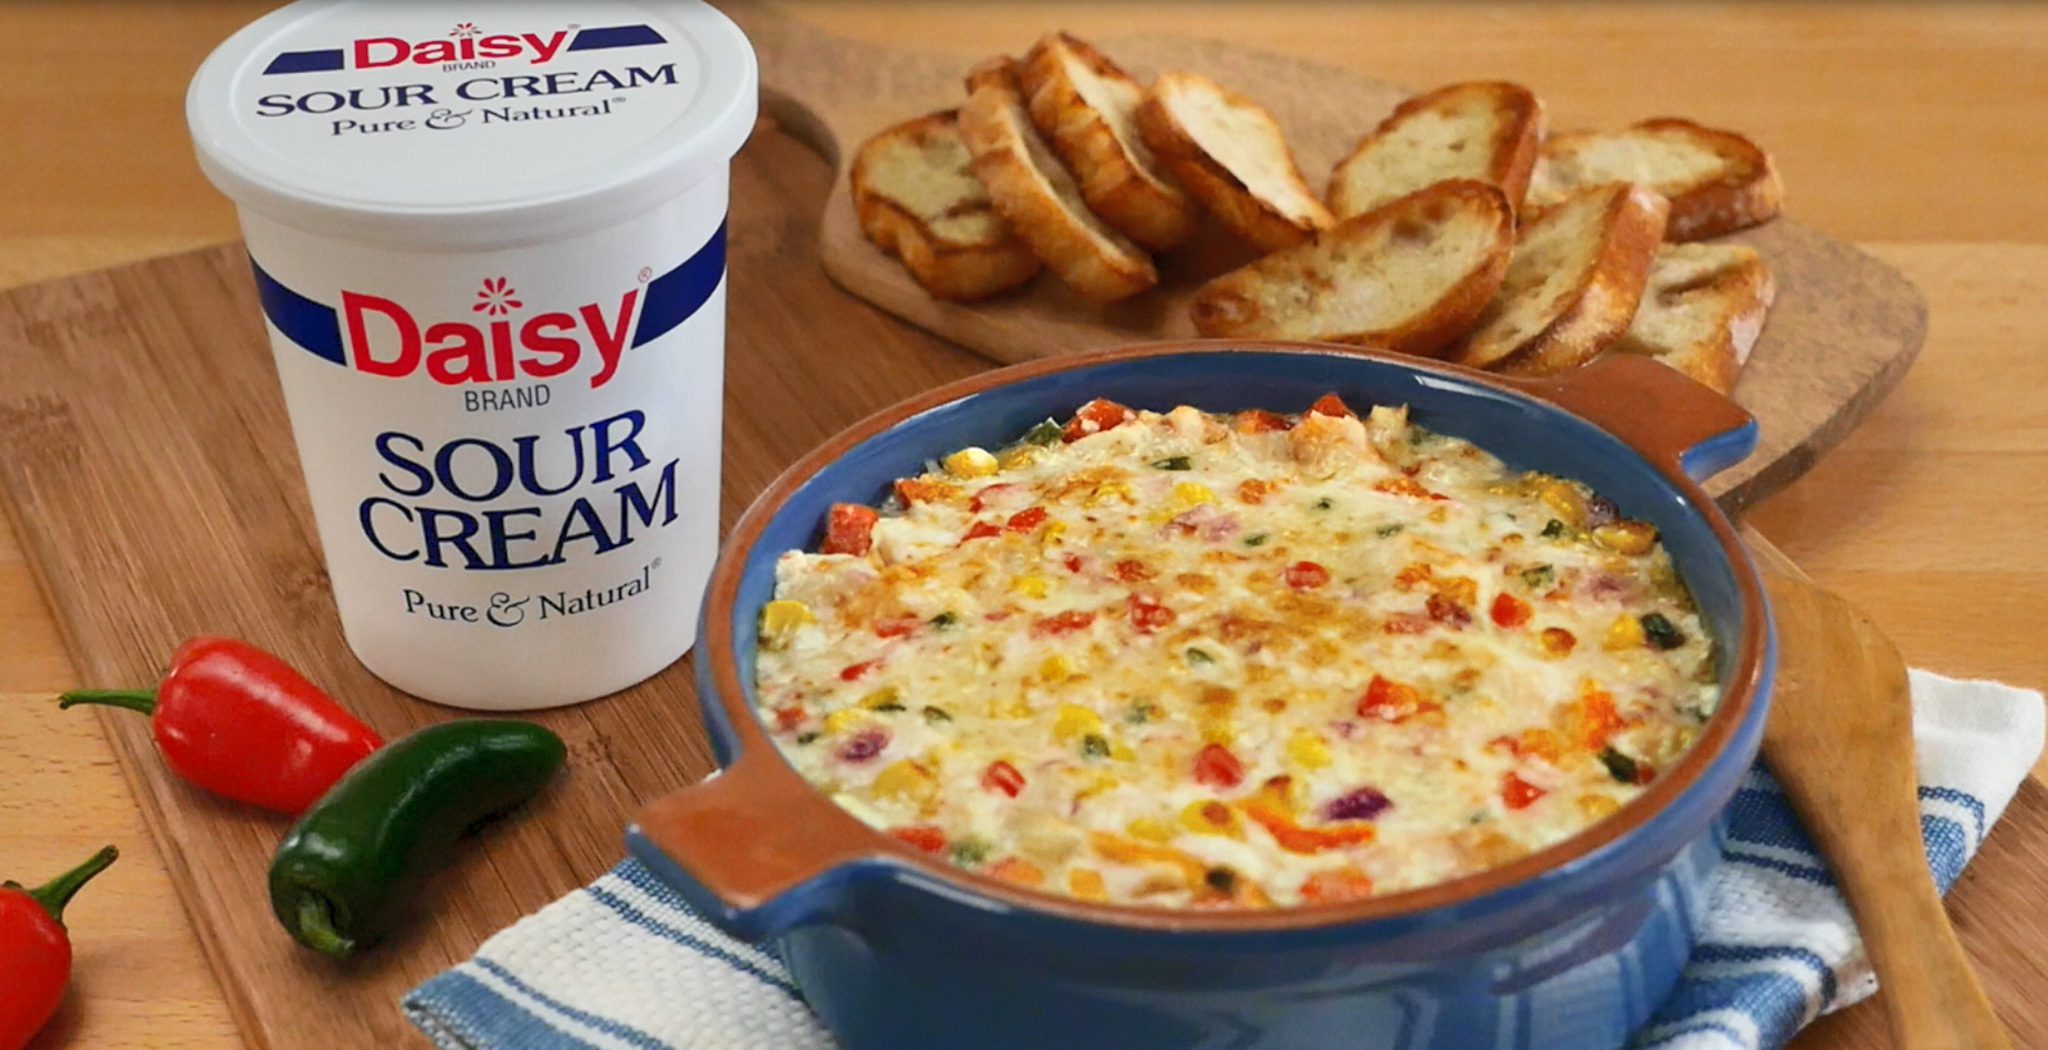
Jalapeno Crab Dip
Jalapeño Crab Dip
Spicy, Cheesy, and Perfect for Sharing
This Jalapeño Crab Dip is the ultimate party pleaser—whether you’re entertaining guests or just having a cozy night in with family. It’s creamy, cheesy, and a little bit spicy, with sweet corn and tender crab in every bite. Best of all? It’s easy to make ahead and pop in the oven right before serving!

The secret to this rich and decadent dip? Daisy Sour Cream. It adds a tangy, velvety creaminess that brings everything together and balances the heat of the jalapeño perfectly.
Jalapeño Crab Dip Ingredients
- Butter (2 tablespoons): Adds a rich flavor to the dip.
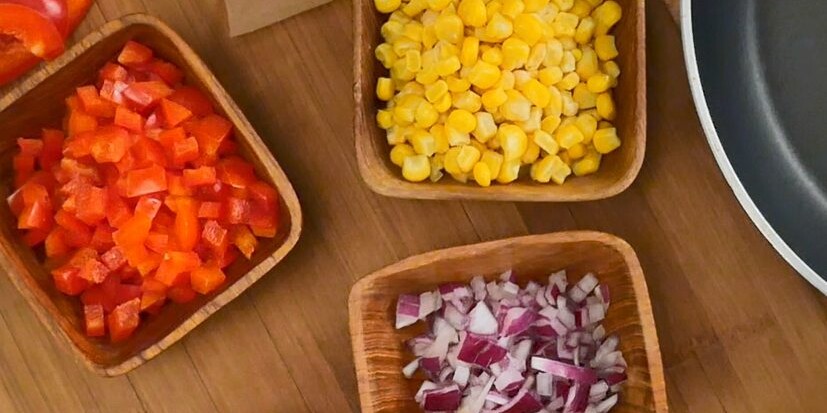
- Frozen Corn (1/2 cup): Picked at the peak of the season, the corn adds a sweet pop of texture and helps balance the heat of the jalapeno.
- Red Bell Pepper (1/2 cup, diced): Crunchy and juicy, with a sweet and mild flavor. Red bell peppers are a bit sweeter than green and add a burst of bright color to the dip.
- Red Onion (1/4 cup, finely diced): Adds a pop of color and a burst of bold, slightly peppery flavor.
- Garlic (1 clove, finely minced): Offers a warm, aromatic kick that’s pungent and a tad sharp. It pairs wonderfully with peppers and onion.
- Jalapeño (1 seeded and chopped): A fresh pepper with an earthy green bell pepper flavor but with more heat. They add a hint of heat to the dip. If you prefer hotter dips, you can add a bit more, or if you prefer milder dips, you can add only half.
- All-Purpose Flour (2 teaspoons): Acts as a thickening agent, helping the dip reach the perfect consistency and texture.
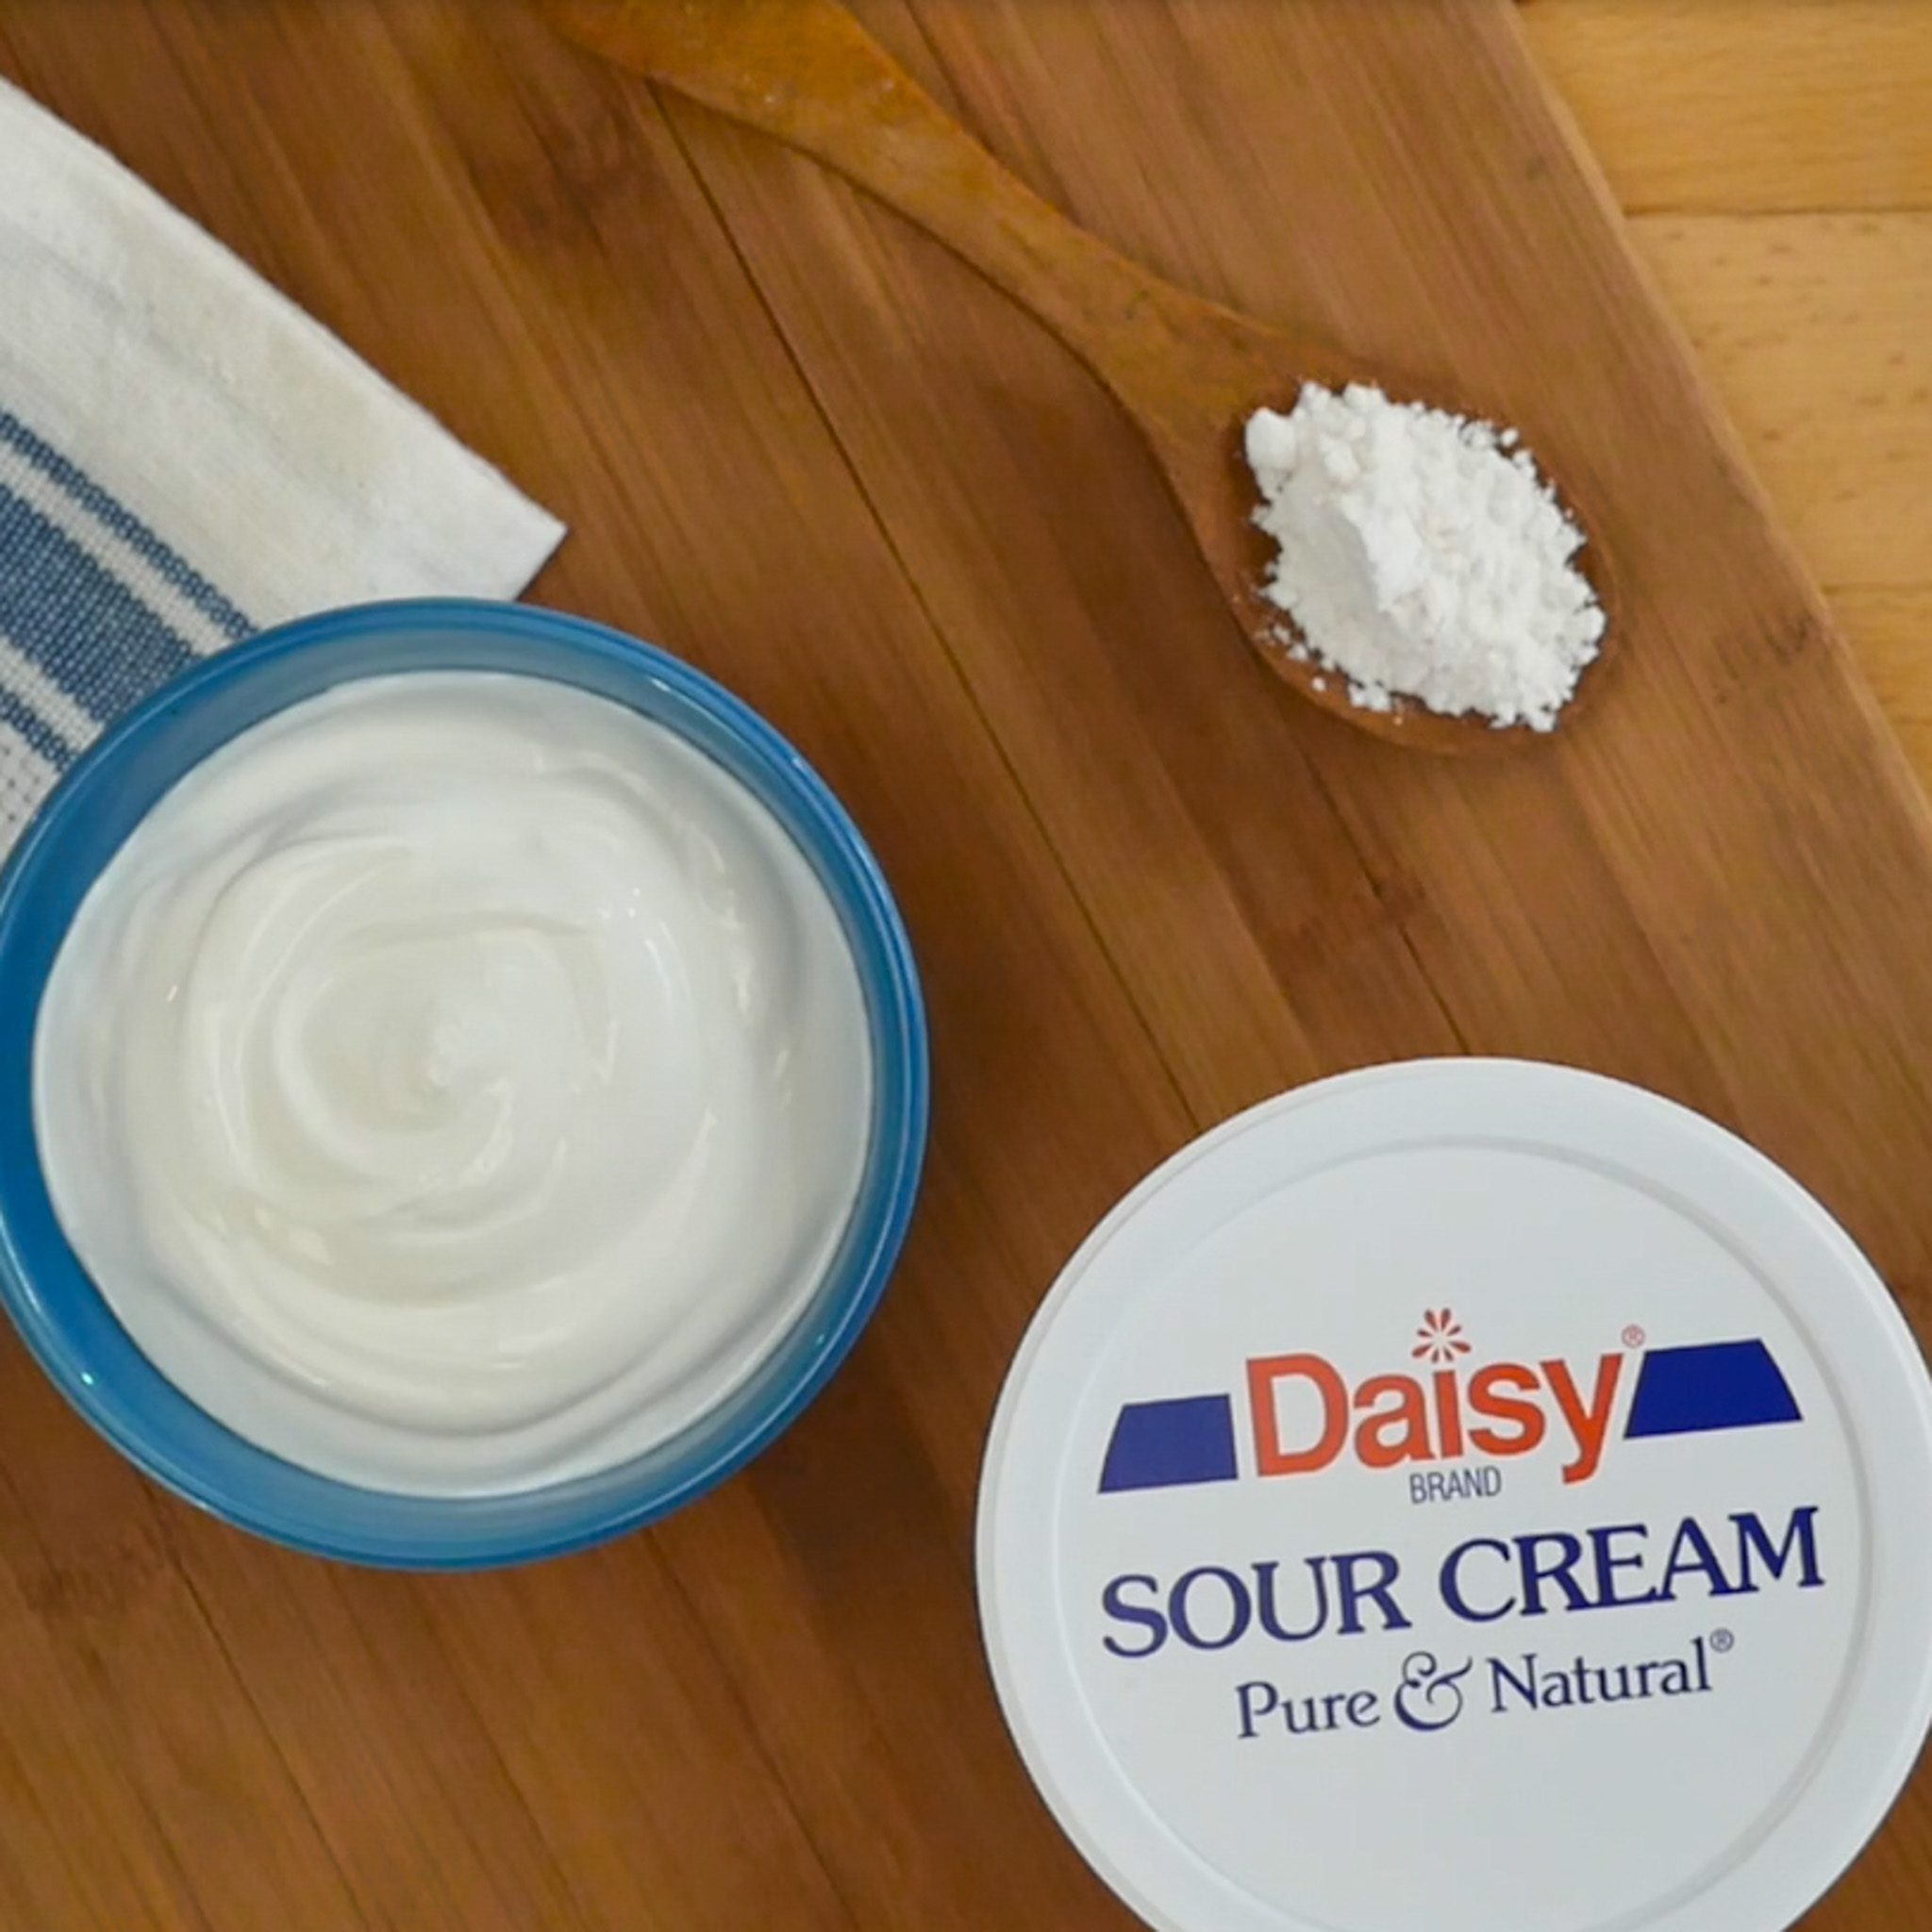
- Daisy Sour Cream (1 cup): The secret ingredient in the dip that makes it extra rich, creamy, and decadent, while adding a slightly tangy flavor. It also helps tame the heat of the jalapeno.
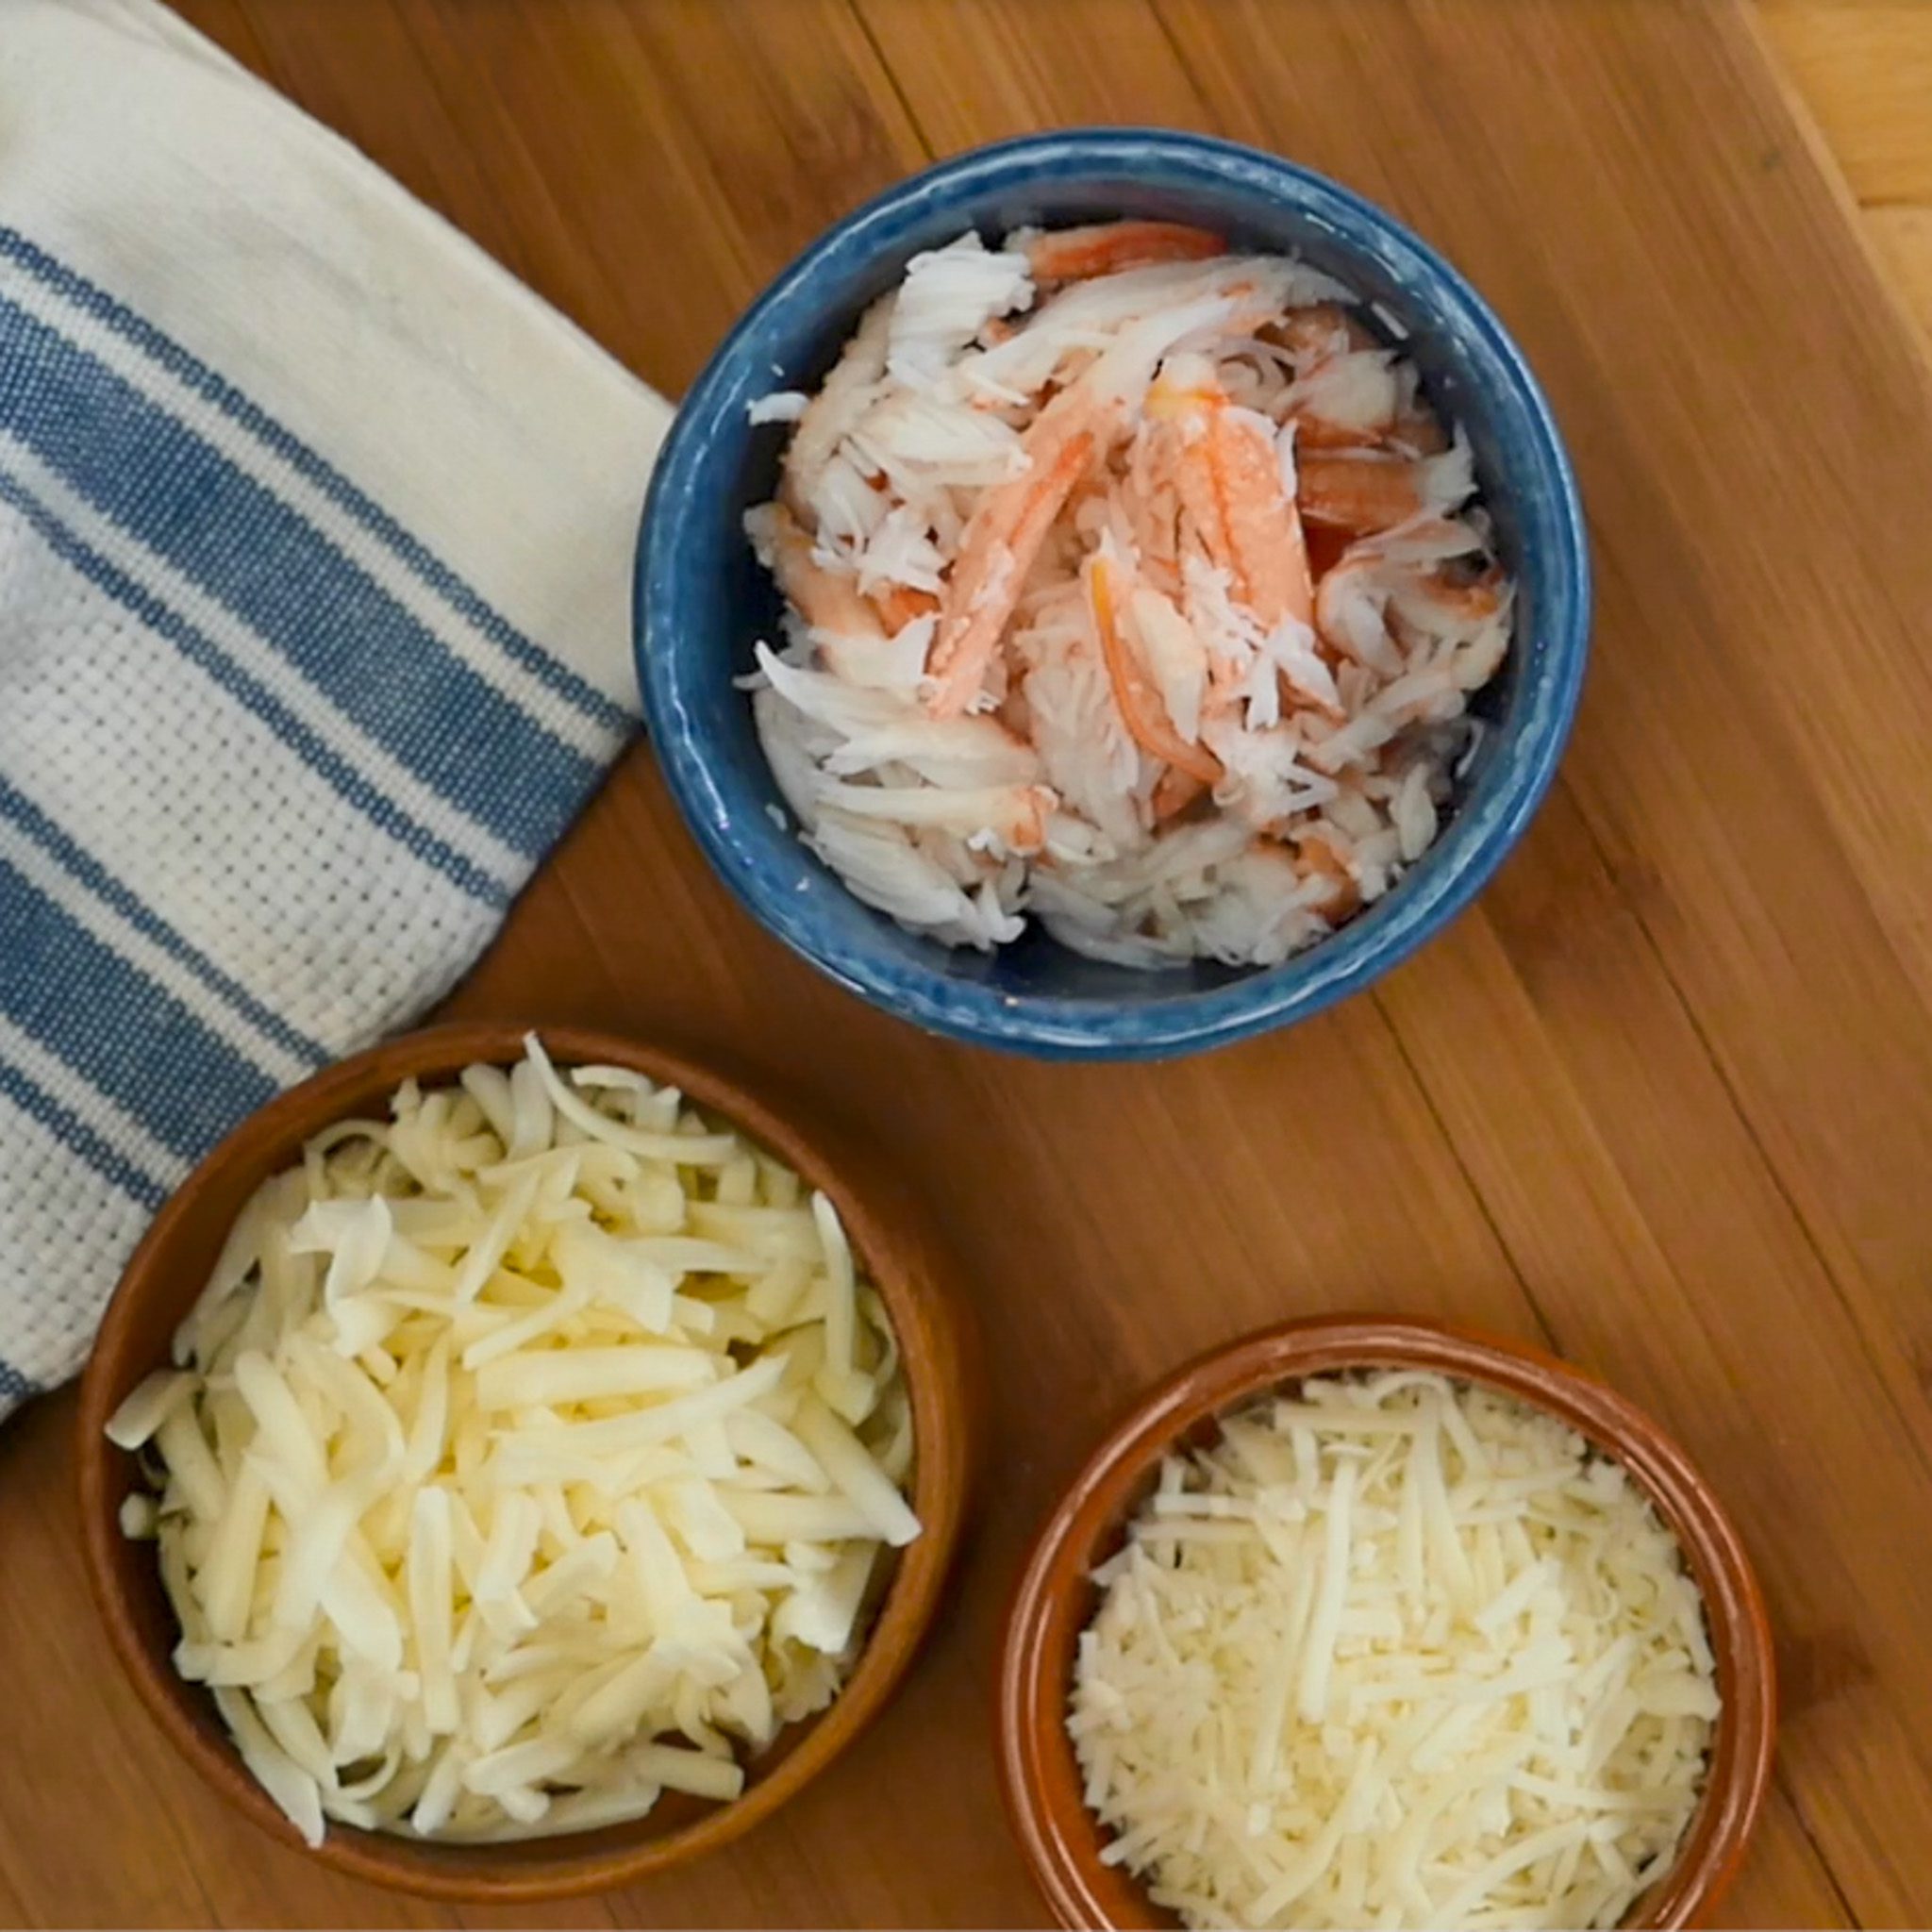
- Monterey Jack (1/2 cup, shredded): Adds a bit of flavor and the texture to the dip. It’s a great melting cheese with mild flavor.
- Asiago (1/2 cup, shredded): Similar to Parmesan, but nuttier in flavor and creamier in texture, it adds flavor and body to the dip.
- Lump Crab (6 ounces, drained): Sweet, mild, and briny, it adds a seafood flavor and elegance to the dip.
Substitutions, Variations, and Tips
- Canned corn works in place of frozen—just rinse and drain to reduce salt.
- Use any bell pepper—red, orange, and yellow are sweeter, while green is more earthy.
- Yellow onions offer a milder, slightly sweeter alternative to red.
- Prefer less heat? Swap jalapeño for paprika or go with a milder Fresno pepper.
- Muenster or Colby can replace Monterey Jack; Parmesan or Romano can sub for Asiago.
- Fresh or canned crab both work. Fresh crab is sweeter and more delicate; canned is saltier and more intense.
How to Make Jalapeño Crab Dip
- Preheat oven to 350°F. Spray a baking dish with nonstick spray.
- In a skillet, heat butter over medium-high. Add corn and cook for 5 minutes, stirring occasionally. Reduce heat to medium.
- Add bell pepper, onion, garlic, and jalapeño. Cook 3–4 minutes, stirring occasionally.
- In a small bowl, stir flour into sour cream, then stir the mixture into the skillet. Cook for 1 minute, then remove from heat.
- Stir in Monterey Jack, crab, and all but ¼ cup of the Asiago. Mix until cheese melts.
- Spoon into prepared dish, sprinkle remaining Asiago on top, and bake for 20 minutes, until bubbly.
- Serve warm with chips, crackers, or sliced baguette.

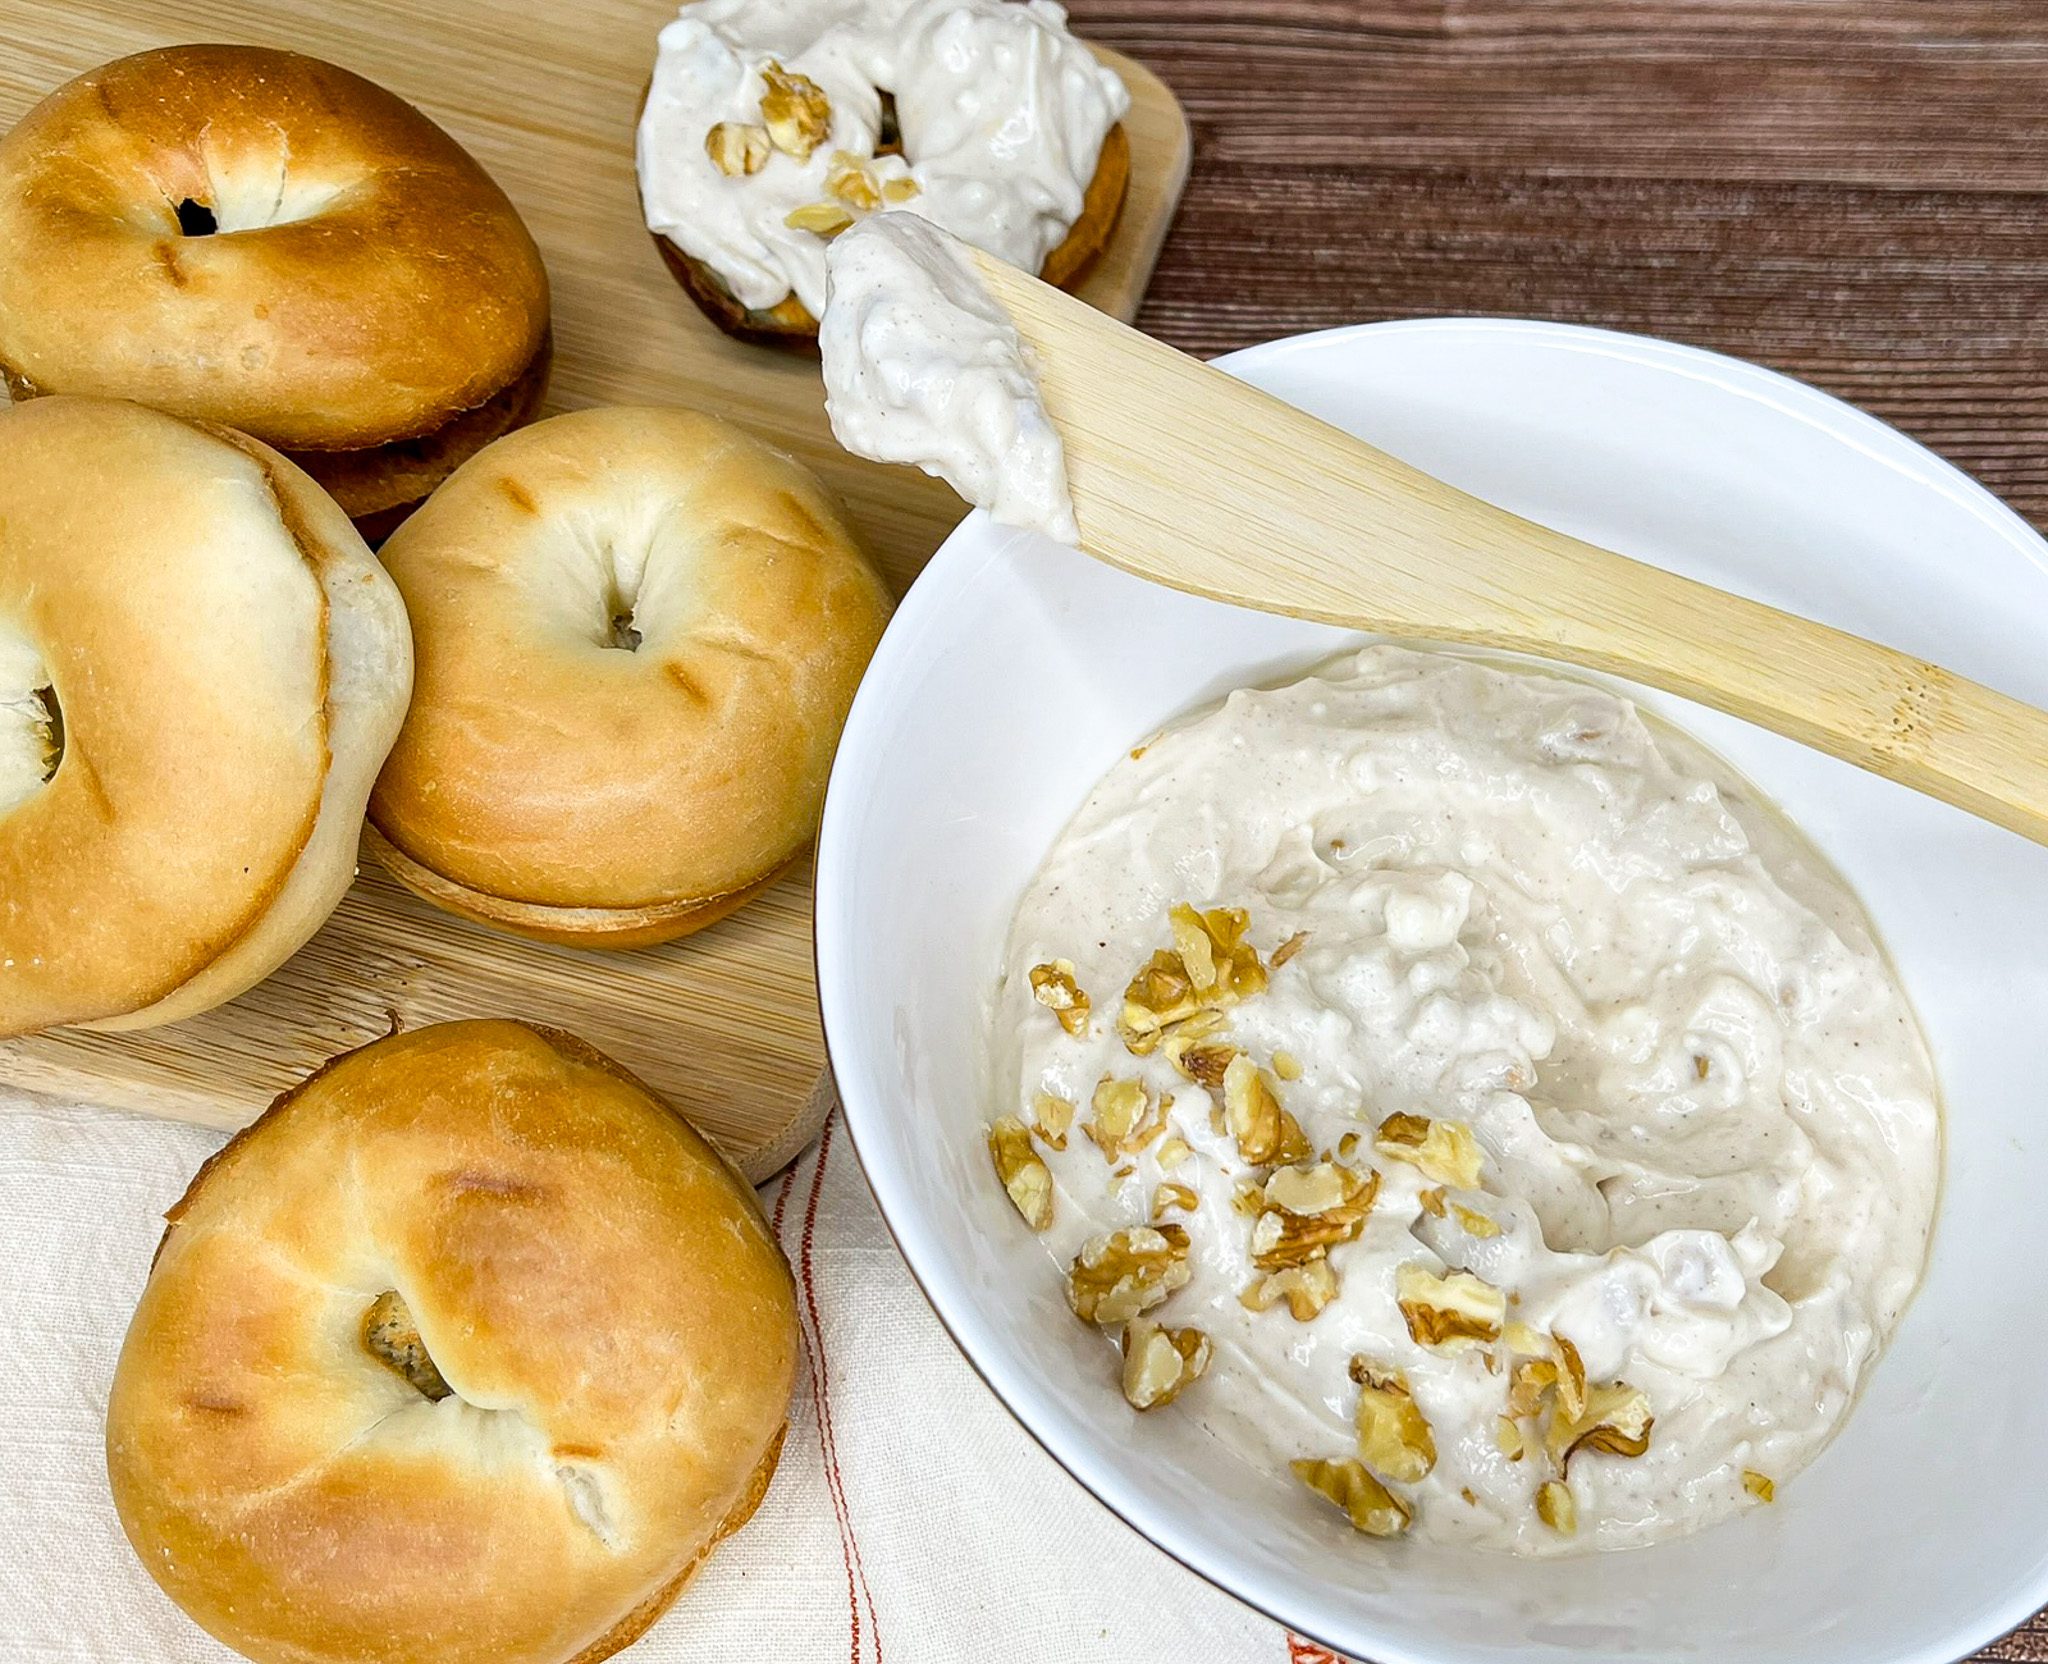
Honey Walnut Spread
Honey Walnut Spread
A Creamy, Protein-Packed Fall Favorite
Looking to add a cozy fall twist to your usual bagel spread? Try making your own with Daisy Cottage Cheese! Not only is it simple to whip up with just a few ingredients, but it’s also a lighter option—with two-thirds less fat than cream cheese.
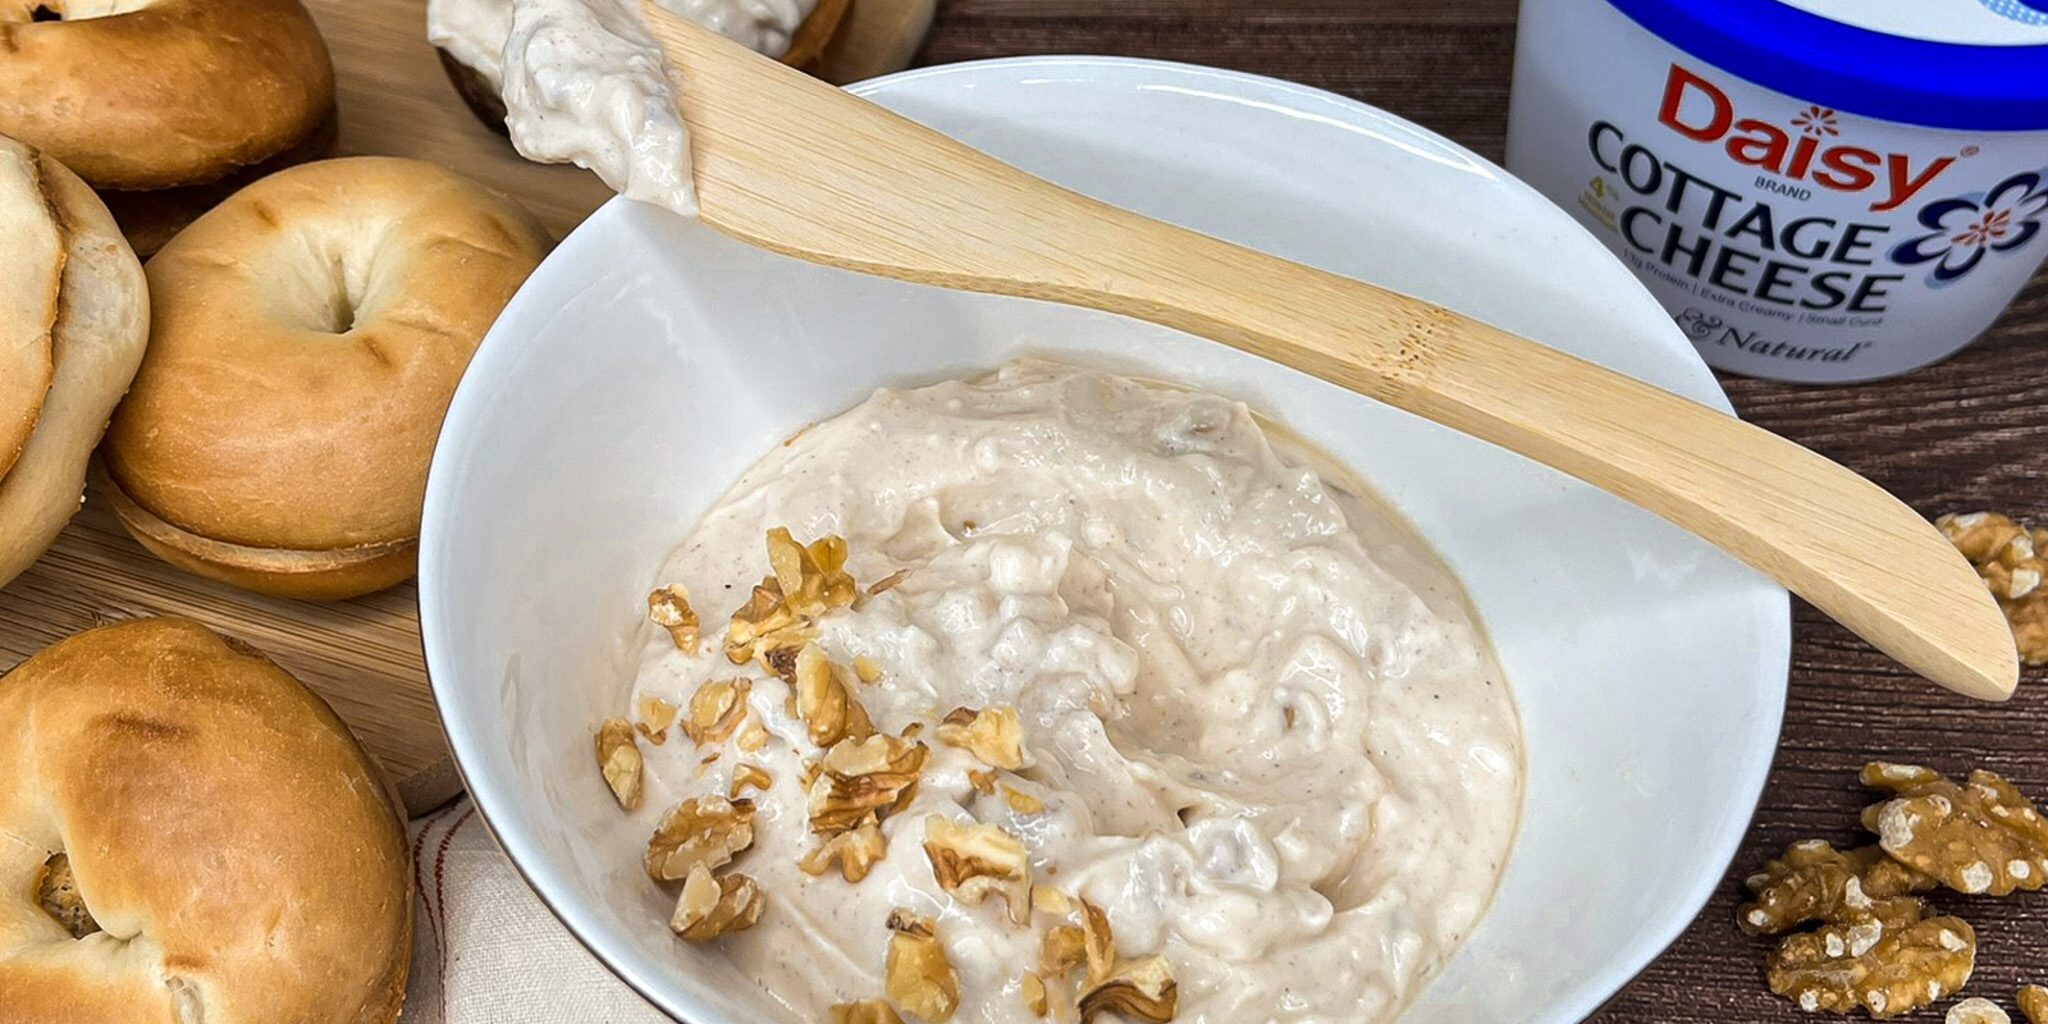
This spread is deliciously customizable and packed with protein, thanks to the creamy goodness of Daisy Cottage Cheese. Plus, the flavor combinations are endless!
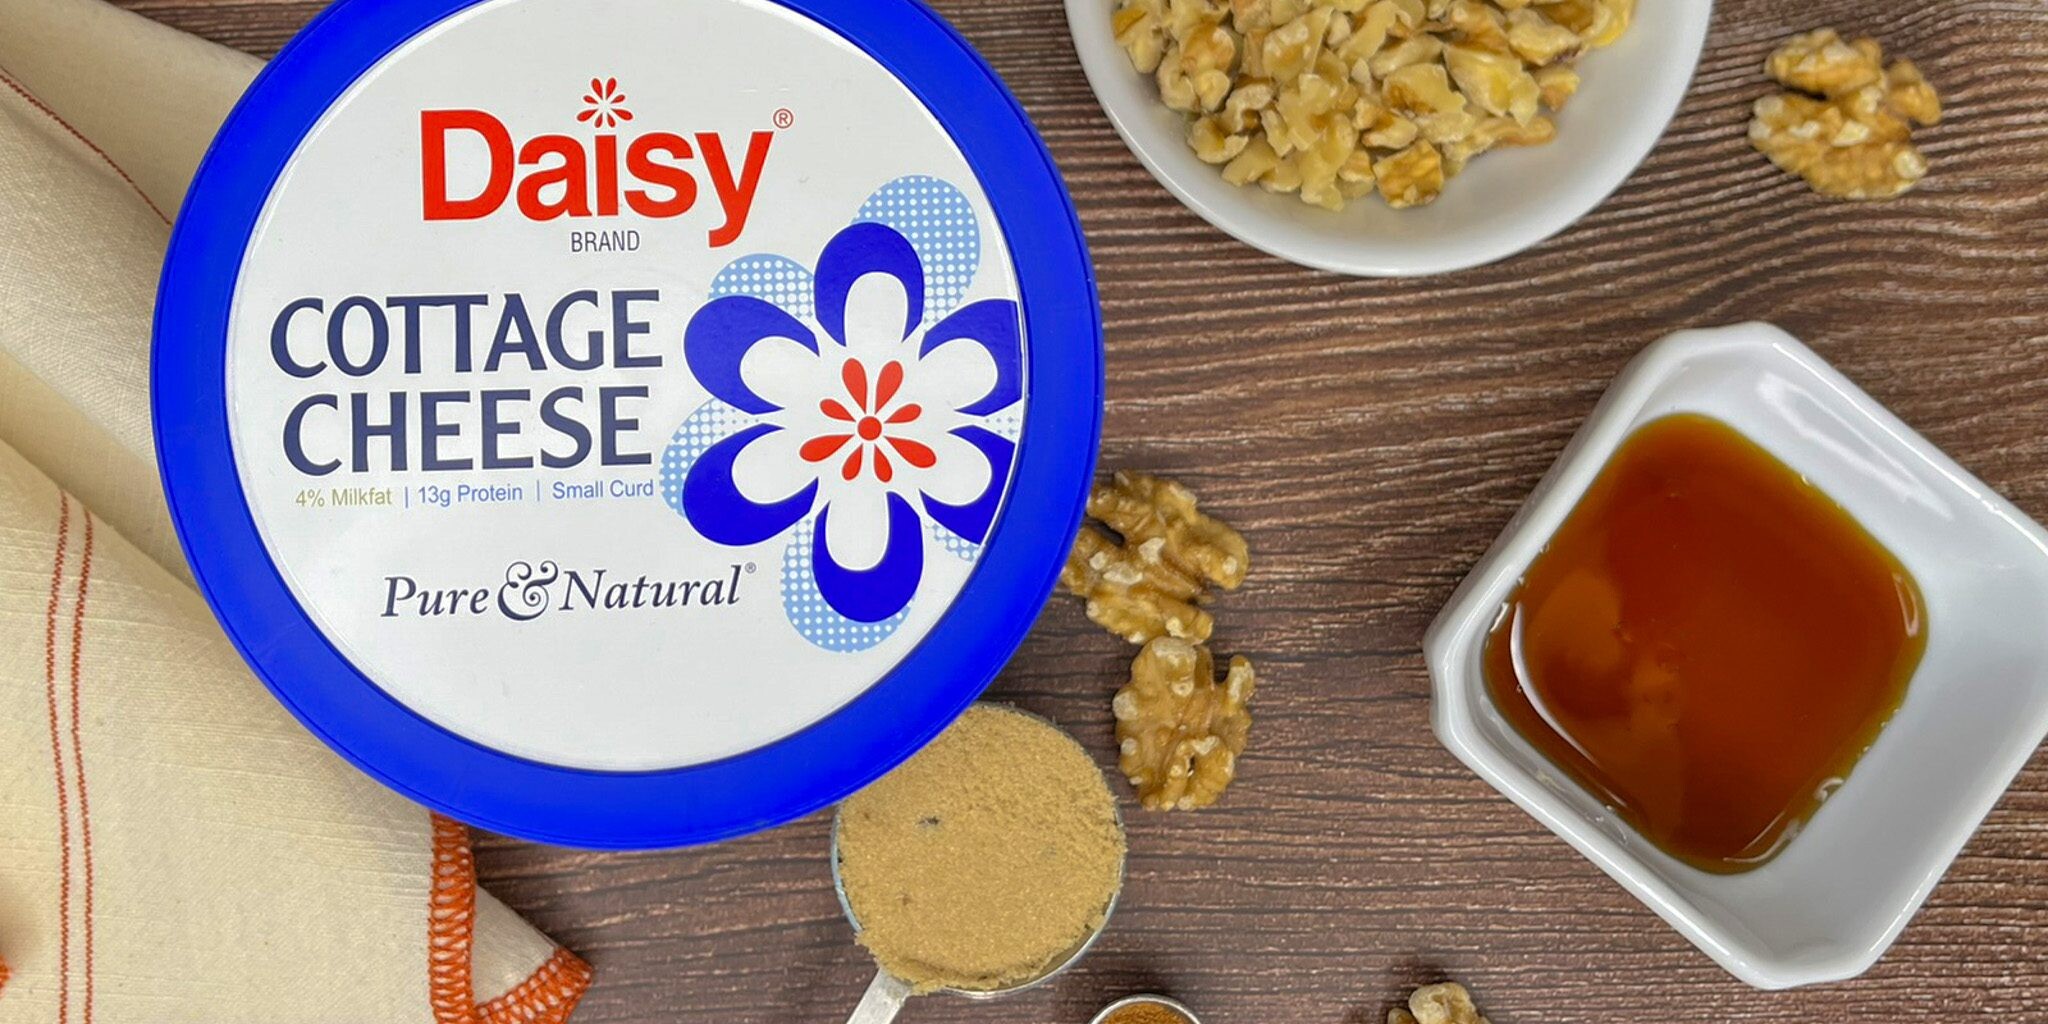
Honey Walnut Spread Ingredients
- Daisy Cottage Cheese (1 cup): The smooth, protein-packed base of your spread.
- Honey (1 tablespoon): A touch of natural sweetness.
- Light brown sugar (1 tablespoon): Adds subtle caramel flavor.
- Cinnamon (¼ teaspoon): Warm and cozy spice that tastes like fall.
- Chopped walnuts (3 tablespoons): For crunch and nutty flavor.
Substitutions, Variations, and Tips
- Add a dash of nutmeg or ginger for extra fall flair.
- Swap honey with agave, corn syrup, or your favorite sweetener.
- Use dark brown sugar for a deeper, richer flavor.
- Try pecans or other nuts instead of walnuts.
- Not just for bagels! It’s great as a dip for fruit or cookies, or on toast and crackers.
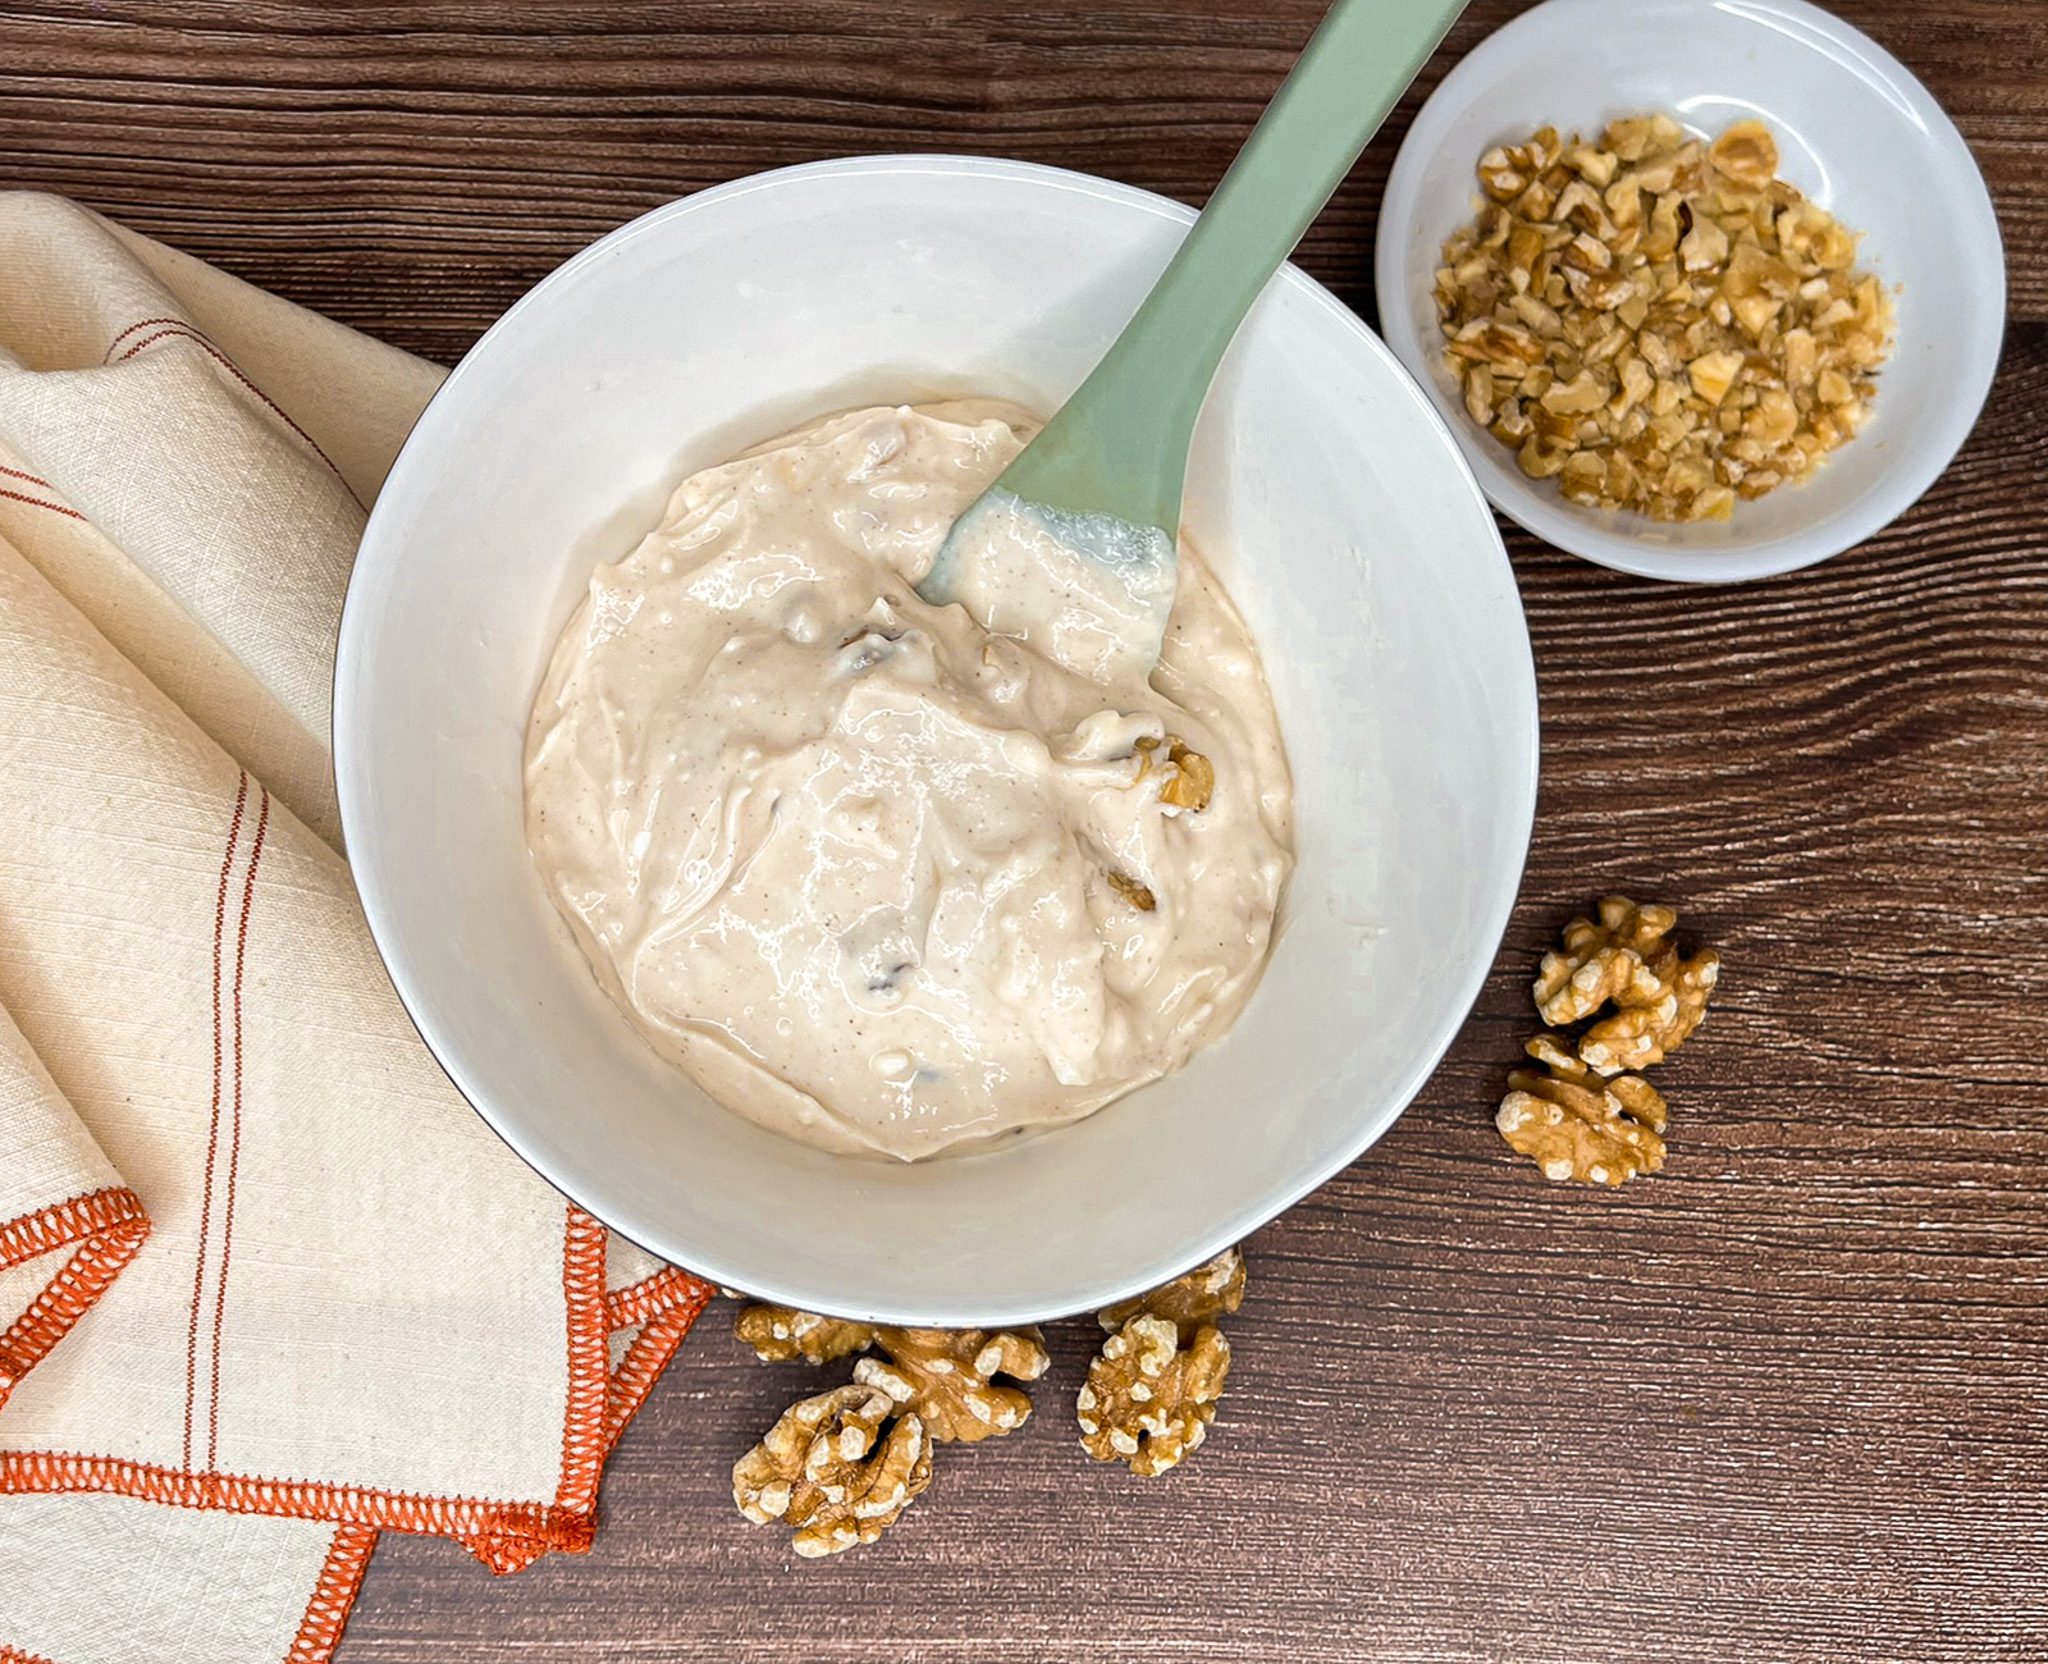
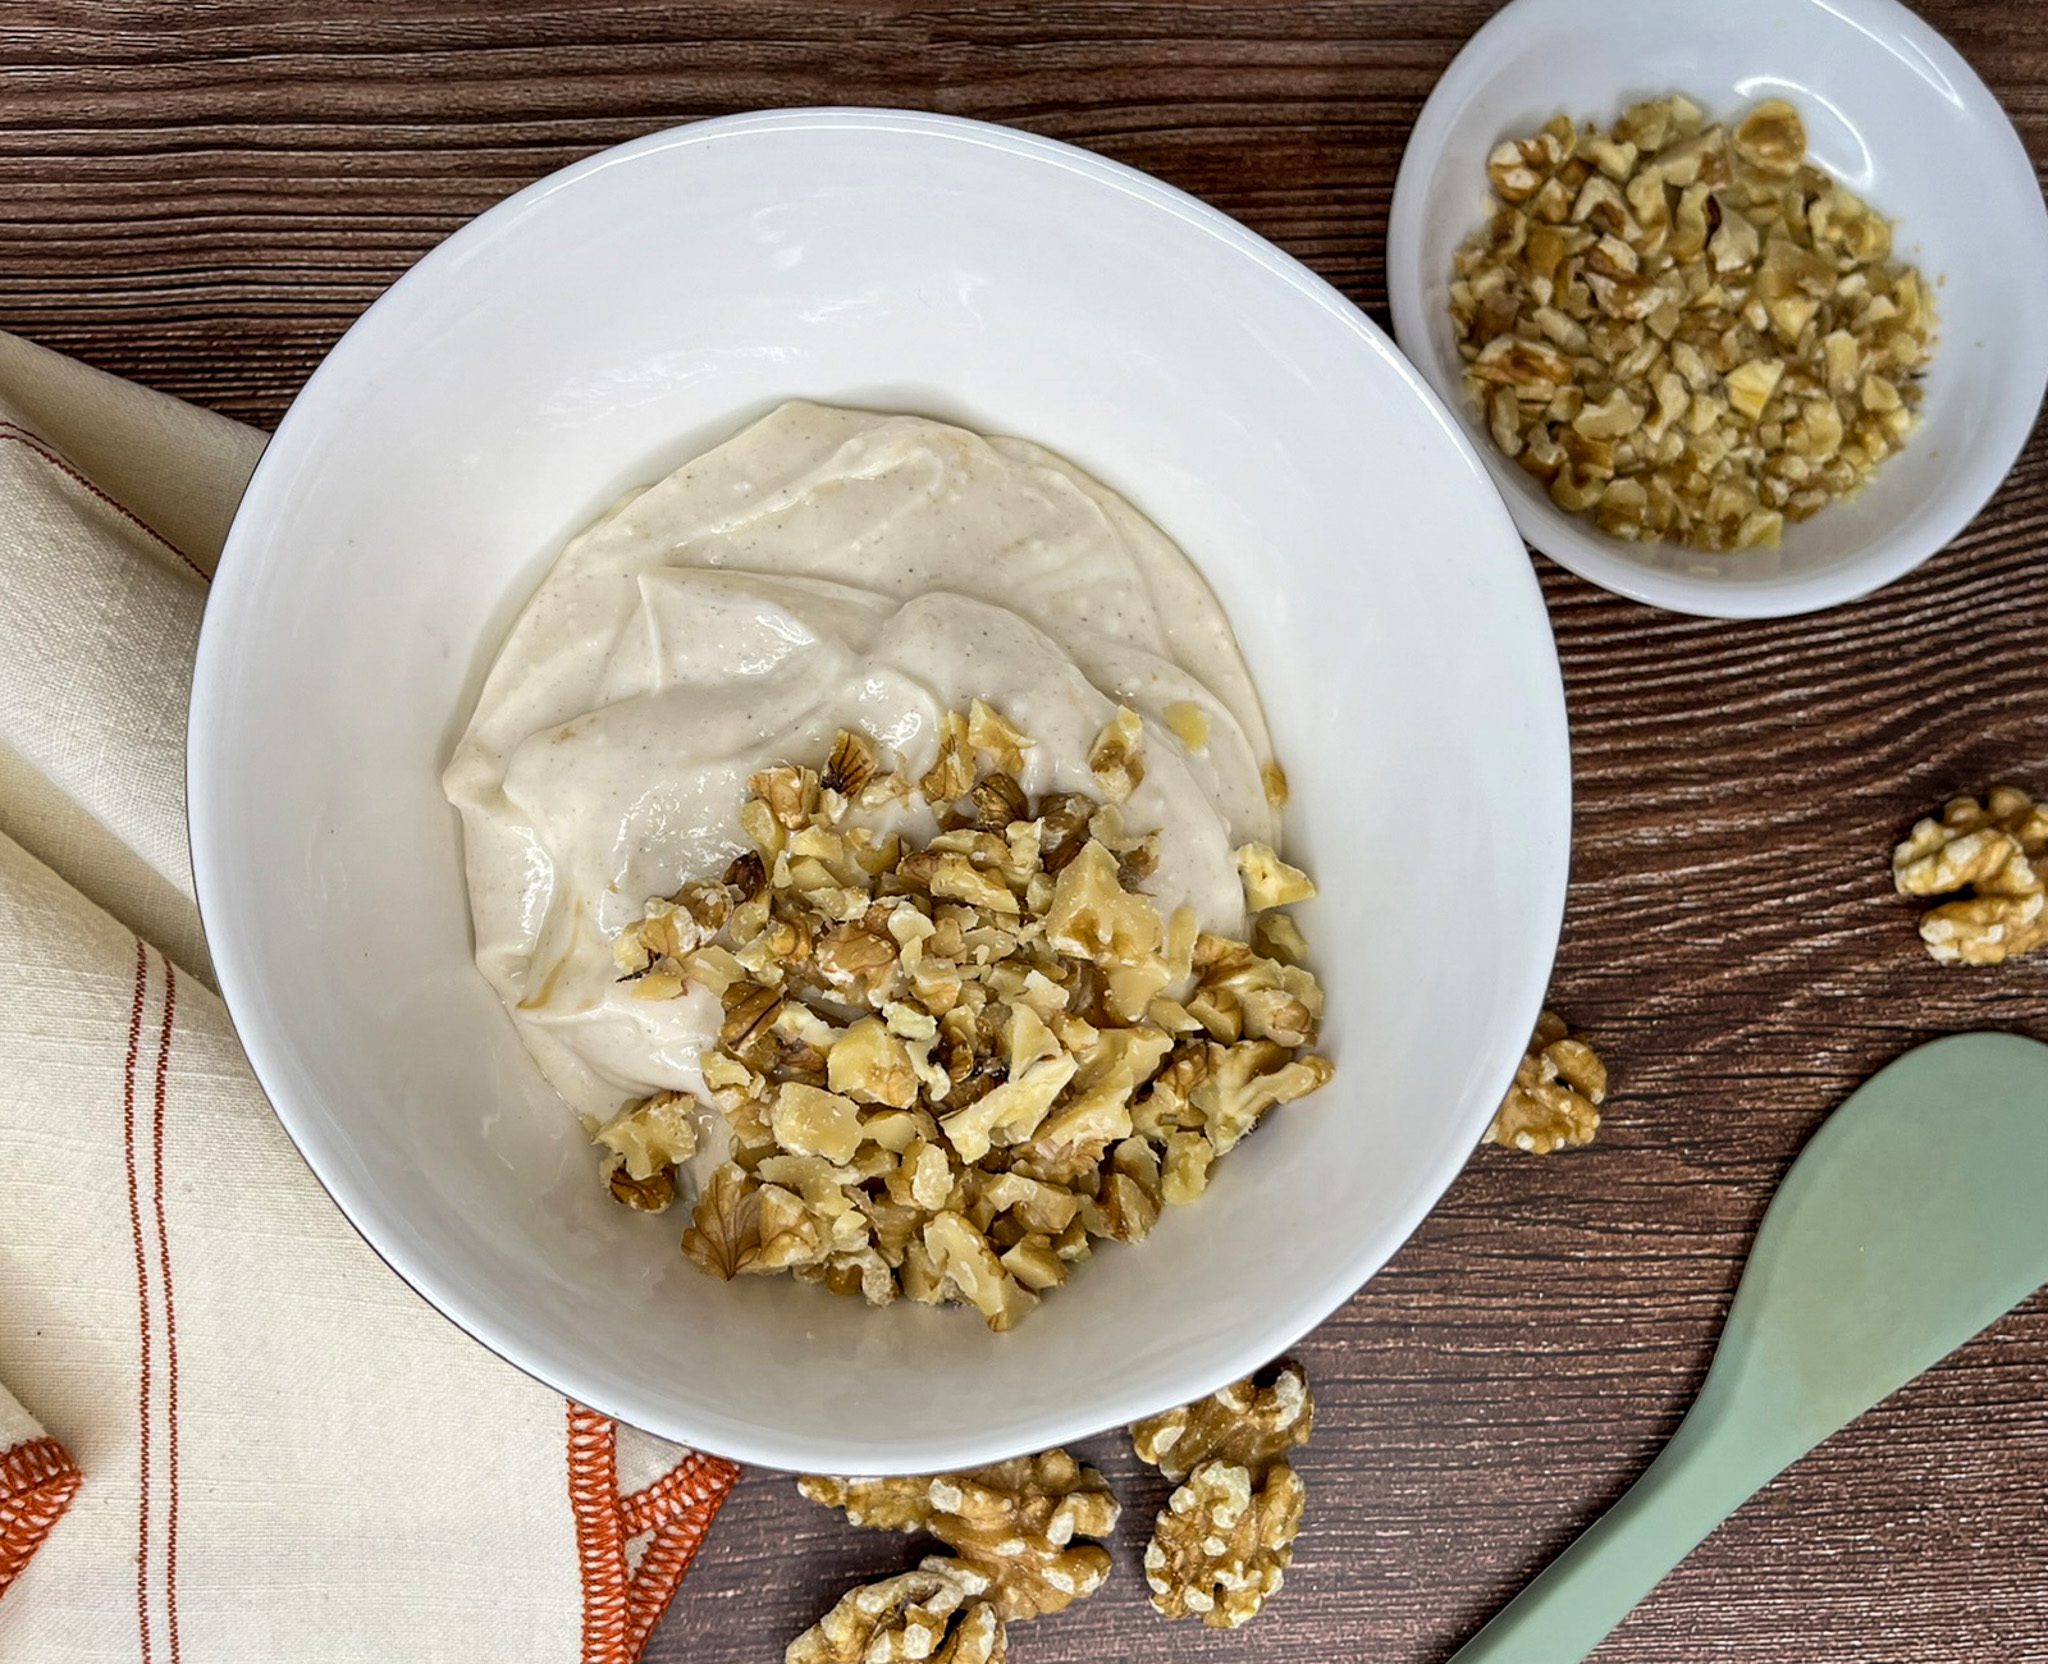
How to Make Honey Walnut Spread
- Process cottage cheese in food processor or blender until completely smooth (about 1 minute). Add freeze-dried fruit. Blend for an additional 30 seconds, or until smooth.
- Transfer to bowl and gently fold in fruit topping and honey. Cover and chill at least 30 minutes before serving.
- Enjoy on bagels, toast, or crackers. Refrigerate leftovers.